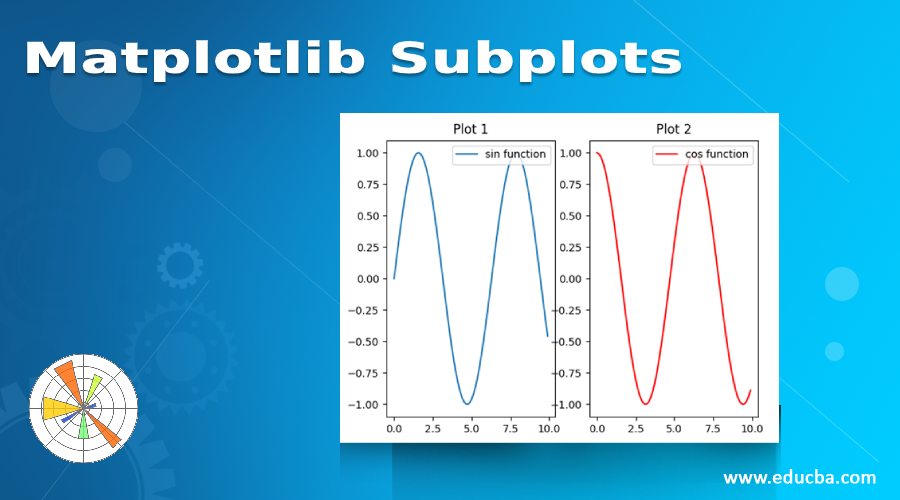
Introduction to Matplotlib Subplots
In this article, we will learn how to create Subplots, in Python. We will be making use of the Matplotlib library of Python for this purpose. Before we start creating subplots, let us first quickly understand what subplots are.
Subplots:
Plots are used in data visualization to get an intuitive understanding of our data. With plots, we can understand the relation between 2 variables. The matplotlib’s function subplot() helps us in creating multiple plots in a single figure.
How to Create Matplotlib Subplots in Python?
Let us now understand how to create subplots in python using Matplotlib:
Syntax:
importing numpy and matlplotlib
import numpy as np[importing 'numpy']
import matplotlib.pyplot as plt[importing 'matplotlib']
1. Let us take 2 functions, sine and cosine for this example.
a = np.arange(0, 10, 0.1)
b = np.sin(a)[creating a sine wave]
d = np.cos(a)[creating a cos wave]
2. We are now ready to create our subplots:
plt.subplot(1, 2, 1)[creating first subplot](Let us understand what exactly the function subplot(1, 2, 1) is doing. The first 2 numbers passed in the argument define the dimensions of the grid in which we want our plots to be displayed. So, in our example, the first 2 numbers are telling that we will have a grid of 1 row and 2 columns. So, in total, we will have 2 plots.
3. Now the 3rd number will define the position of the 2 plots.
Code:
plt.plot(a,b, label = "sin function")
plt.title('Plot 1')[Naming the first plot]
plt.legend(loc = 1)       [loc = 1 will set the label location to top right]
plt.subplot(1, 2, 2)[creating second subplot]
plt.plot(c,d, label = "cos function" , c = 'red')# [drawing the plot and defining the label & color for cos wave]
plt.title ('Plot 2')[naming the second plot]
plt.legend (loc = 1) [loc = 1, to control the direction of label]
plt.show()[calling show() to display our plot]
4. This is how our input and output will look like in python:
Code:
import numpy as np
import matplotlib.pyplot as plt
a = np.arange(0, 10, 0.1)
b = np.sin(a)
c = np.arange(0, 10, 0.1)
d = np.cos(a)
plt.subplot(1, 2, 1)
plt.plot(a,b, label = "sin function")
plt.title('Plot 1')
plt.legend(loc = 1)
plt.subplot(1, 2, 2)
plt.plot(c,d, label = "cos function" , c = 'red')
plt.title ('Plot 2')
plt.legend (loc = 1)
plt.show()
Output:
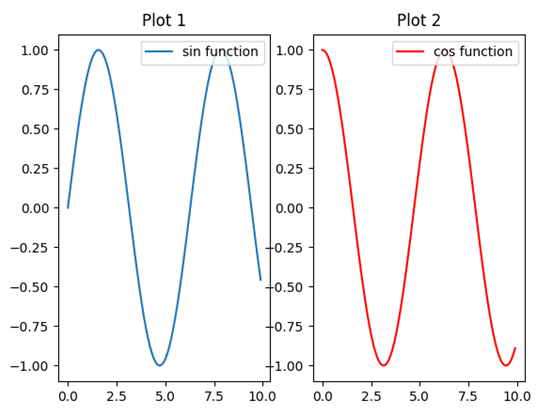
As we can see, our output has 2 plots placed in 1 row and 2 columns as per our input argument. Also, the subplots have taken respective positions as per our argument.
5. Next, let us learn how can we place these plots vertically.
For this, we will have to create a 2 x 1 grid. Let us understand the code:
Syntax:
importing numpy and matlplotlib
import numpy as np[importing 'numpy']
import matplotlib.pyplot as plt[importing ‘matplotlib]
Let us take 2 functions, sine and cosine for this example
a = np.arange(0, 10, 0.1)
b = np.sin(a)[creating a sine wave]
d = np.cos(a)[creating a cos wave]
We are now ready to create our sub plots
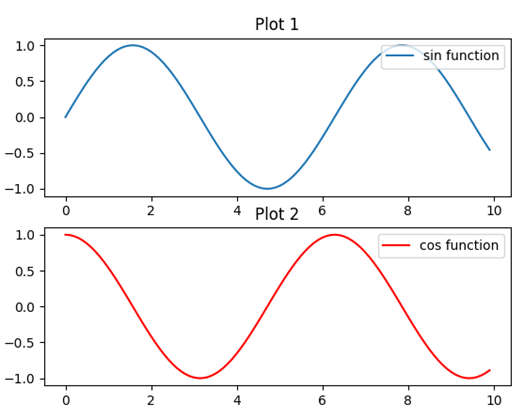
plt.subplot(2,1, 1)[creating first subplot](Here we have passed 2, 1 as first two numbers to get a 2 x 1 grid)
plt.plot(a,b, label = "sin function")
plt.title('Plot 1')[Naming the first plot]
plt.legend(loc = 1)       [loc = 1 will set the label location to top right]
plt.subplot(2, 1, 2)[creating second subplot]
plt.plot(c,d, label = "cos function" , c = 'red')# [drawing the plot and defining the label & color                             for cos wave]
plt.title ('Plot 2')[naming the second plot]
plt.legend (loc = 1) [loc = 1, to control the direction of label]
plt.show()[calling show() to display our plot]
6. This is how our input and output will look like in python.
Code:
import numpy as np
import matplotlib.pyplot as plt
a = np.arange(0, 10, 0.1)
b = np.sin(a)
c = np.arange(0, 10, 0.1)
d = np.cos(a)
plt.subplot(2 ,1, 1)
plt.plot(a,b, label = "sin function")
plt.title('Plot 1')
plt.legend(loc = 1)
plt.subplot(2, 1, 2)
plt.plot(c,d, label = "cos function" , c = 'red')
plt.title ('Plot 2')
plt.legend (loc = 1)
plt.show()
As we can see in our output, we have got 2 plots stacked vertically (a 2 x 1 grid).
Output:
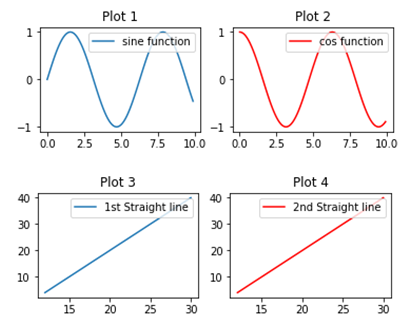
7. Next, we will learn to create 4 subplots, for which we will need 2 x 2 grid.
Code:
import numpy as np[importing 'numpy']
import matplotlib.pyplot as plt[importing 'matplotlib']
a = [12, 14, 16, 18, 20, 22, 24, 26, 28, 30][Creating straight line]
b = [4.1, 8.1, 12.1, 16.1, 20.1, 24.1, 28.1, 32.1, 36.1, 40.1]
c = [5.2, 10.2, 15.2, 20.2, 25.2, 30.2, 35.2, 40.2, 45.2, 50.2]
x = np.arange(0, 10, 0.1)
y = np.sin(x) [creating a sine wave]
z = np.cos(x)[creating a cos wave]
plt.subplot(2,2,1)[creating first subplot]
(Here we have passed 2, 2 as first two numbers to get a 2 x 2 grid)
plt.plot(x, y, label = "sine function")
plt.title('Plot 1')[Naming the first plot]
plt.legend(loc = 1)[loc = 1 will set the label location to top right]
plt.subplot (2, 2, 2)     [creating second subplot]
plt.plot(x, z, label = "cos function" , c = 'red')[drawing the plot and defining the label & color for cos wave]
plt.title ('Plot 2')[naming the second plot]
plt.legend (loc = 1)[loc = 1, to control the direction of label]
plt.subplot(2, 2, 3)[creating third subplot]
plt.plot(a, b, label = '1st Straight line')
plt.title('Plot 3')[Naming the 3rd plot]
plt.legend(loc = 1)
plt.subplot(2, 2, 4)[creating fourth subplot]
plt.plot(a, b, label = '2nd Straight line', color = 'red')
plt.title('Plot 4')[Naming the 4th plot]
plt.legend(loc = 1)
plt.show()
8. This is how our input and output will look like in python.
Code:
import numpy as np
import matplotlib.pyplot as plt
a = [12, 14, 16, 18, 20, 22, 24, 26, 28, 30]
b = [4.1, 8.1, 12.1, 16.1, 20.1, 24.1, 28.1, 32.1, 36.1, 40.1]
c = [5.2, 10.2, 15.2, 20.2, 25.2, 30.2, 35.2, 40.2, 45.2, 50.2]
x = np.arange(0, 10, 0.1)
y = np.sin(x)
z = np.cos(x)
plt.subplot(2,2,1)
plt.plot(x, y, label = "sin function")
plt.title('Plot 1')
plt.legend(loc = 1)
plt.subplot (2, 2, 2)
plt.plot(x, z, label = "cos function" , c = 'red')
plt.title ('Plot 2')
plt.legend (loc = 1)
plt.subplot(2, 2, 3)
plt.plot(a, b, label = '1st Straight line')
plt.title('Plot 3')
plt.legend(loc = 1)
plt.subplot(2, 2, 4)
plt.plot(a, b, label = '2nd Straight line', color = 'red')
plt.title('Plot 4')
plt.legend(loc = 1)
plt.show()
So, our output has 4 subplots, arranged in the order we declared in the input.
Output:
Conclusion
Subplots function become very handy when we are trying to create multiple plots in a single figure. It helps us in understanding any relation between various functions or variables in our data by drawing them all in one figure.
Recommended Articles
This is a guide to Matplotlib Subplots. Here we discuss the Introduction of Matplotlib Subplots and its different Examples as well as their input and output. You can also go through our suggested articles to learn more –
