Updated June 29, 2023

Definition of Linux Repository
In the context of computing, particularly in software development and version control systems, a repository serves as a central location for storing and managing data, such as source code, documents, or other files. Now, for the purpose of Linux, a repository is a location from where the Linux system retrieves and installs updates and applications related to the Operating system. In this article, we will talk about the standard and non-standard repositories, but before that, let us peep into the syntax first.
Syntax:
Before we learn what goes inside repository addition on Linux and what are the different segments of repositories, we in this section would like to look at syntaxes of different possibilities of repositories in Linux.
- Adding a non-standard repository
sudo apt-add-repository <repository name>- Removing a non-standard repository
sudo apt-add-repository -r <repository name>- Showing repository keys
sudo apt-key list- Deleting repository keys
sudo apt-key "<Key number>"
OR
sudo apt-key "<last eight characters of the key>"- Updating repositories
apt-get updateHow Repository works in Linux?
Now that we are aware of the Linux syntax and different use cases of the repositories, we must know about the repositories in detail and their way of working of the repository. Repositories are a collection of thousands of programs that are capable of providing a high level of security. The updates occur with no “breakage” of the operating system. We call it the famous distribution because of the reachability it has provided in the short time of distribution. If we can understand the classification, it will be easier for us to correlate and extrapolate it for any other distribution or repository. The software in Ubuntu’s repository is divided into 4 categories:
Main: Some of Ubuntu’s software is free and even can be redistributed with full support from Ubuntu’s team. The software falls into this category is chosen based on its significance and importance. Some of these set of software is, by default, installed in the system.
Restricted: These are those “small” set of tools that help install Ubuntu and its free applications efficiently. These proprietary drivers are kept in the restricted component, and complete support by Ubuntu developers is impossible as they cannot fix them independently and work with vendors on fixing the issues. Although Linux or Ubuntu promotes free open-source software, there are some, as already mentioned, “small” sets.
Universe: Every piece of open-source software would be available here, but with a pinch of salt that all updates, for example, security updates, might not be present at regular intervals. Having said that, the updates will surely be made available when it is done for the entire community. With this small difference between Main and Universe, the set of software are interchangeable in terms of places.
Multiverse: These are, again, some small sets of software that do not meet components maintenance policy and norms, and the onus lies in the hands of the user to verify if the licensing terms have complied.
Now it is time for us to look at the working of different syntax in the topic of repositories before jumping on to the examples of each.
- Adding a non-standard repository
sudo apt-add-repository <repository name>Here, we first add sudo to make the command run in superuser or admin mode. The apt-add-repository invokes the command to add the repository to the Linux, and finally, the <repository name> needs to be added to the corresponding name of the repository which you like to install.
- Removing a non-standard repository
sudo apt-add-repository -r <repository name>Here again, we first add sudo to make the command run in superuser or admin mode. The apt-add-repository invokes the command to add a repository to the Linux, the -r option lets the command know that we would need to remove a repository, and finally, the <repository name> needs to be added the corresponding name of the repository to which you like to install.
- Showing all repository keys
sudo apt-key listAgain here, we add sudo to make the command run in superuser or admin mode. The apt-key invokes the command to add repository keys to the Linux, and finally, the list prints all the keys present in the Linux.
- Deleting repository keys
sudo apt-key del "<Key number>"
OR
sudo apt-key del "<last eight characters of the key>"
Like showing all repository keys, adding a del option invokes that the command should now delete the given key, which is denoted by <Key number>, which essentially is the entire key, or alternatively <last eight characters of the key>, which just takes last eight characters of the key.
- Updating repositories
sudo apt-get updateThis command will allow updating of all repositories which are installed under the Linux system, where the update is the keyword that will invoke the action.
Examples
Lets us discuss examples of Linux Repository.
Example #1
Syntax:
sudo apt-key adv --keyserver hkp://keyserver.ubuntu.com:80 --recv 9DA31620334BD75D9DCB49F368818C72E52529D4
sudo add-apt-repository 'deb [arch=amd64] https://repo.mongodb.org/apt/ubuntu bionic/mongodb-org/4.0 multiverse'
Output:
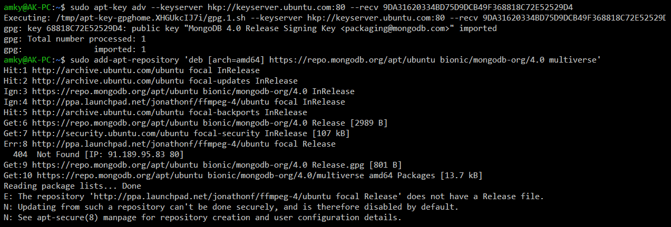
After adding the repository:
Example #2
Syntax:
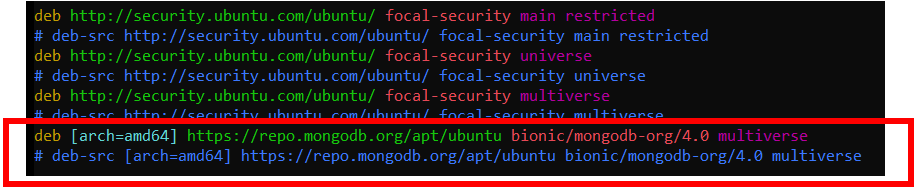
sudo add-apt-repository -r 'deb [arch=amd64] https://repo.mongodb.org/apt/ubuntu bionic/mongodb-org/4.0 multiverse'Output:
sources.list file before removal
![]()
sources.list file after removal

Example #3
Syntax:
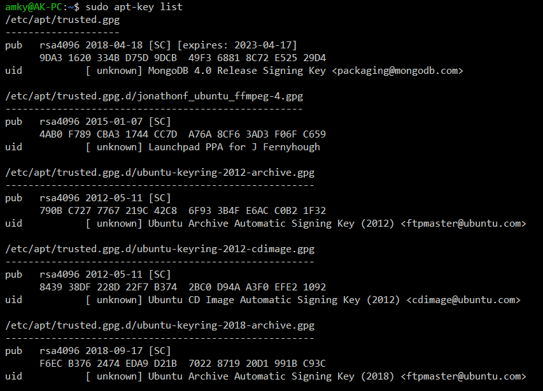
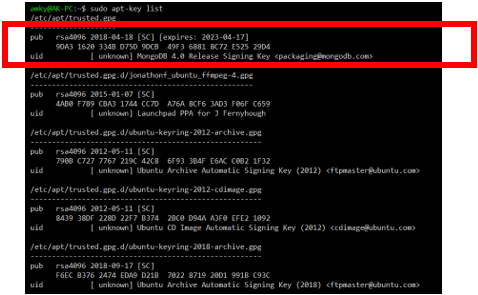
sudo apt-key listOutput:
Example #4
Syntax:
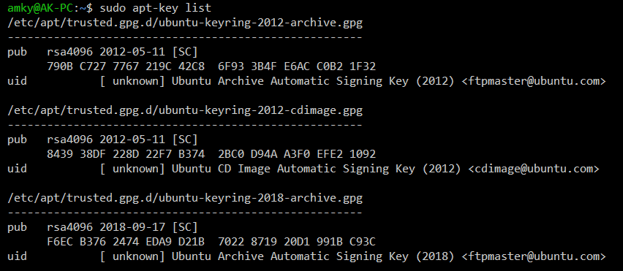
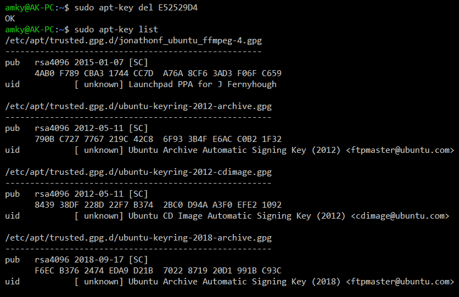
sudo apt-key del E52529D4Output:
Before deletion.
After deletion.
Example #5
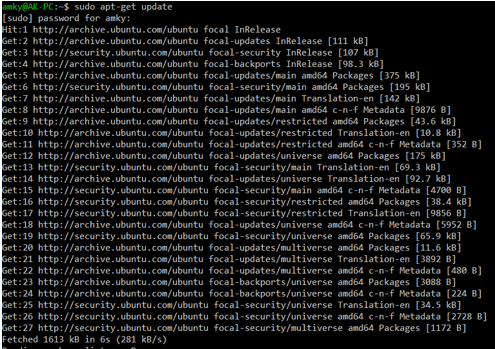
Syntax:
sudo apt-get updateOutput:
Conclusion
In this article, we have covered all the commonly used methods of utilizing repositories. This option of repositories is the crucial part of easiness in working with Linux so that one doesn’t have to reinvent the wheel in an open-source platform.
Recommended Articles
We hope that this EDUCBA information on “Linux Repository” was beneficial to you. You can view EDUCBA’s recommended articles for more information.

