Updated June 15, 2023

Introduction to jQuery checkbox Selector
The jQuery UI checkbox selector selects an element of the type checkbox. The jQuery UI checkbox selectors a built-in type of option for input in the jQuery UI library. The jQuery UI checkbox type selector can be used to select all checkbox components that are checked in the document. The user can choose from one or more options of things when using the checkbox type.
Note that checkbox cannot perform well as the native DOM querySelectorAll() method gives because the checkbox is the extension of jQuery, not part of the CSS specification.
Syntax:
$(":checkbox") – it is uses to selects input elements of type checkbox.Examples of jQuery UI checkbox Selector
Let’s look at a few examples.
Example #1
Code:
<!doctype html>
<html lang ="en">
<head>
<meta charset="utf-8">
<title>This is an example for jQuery UI checkbox selector </title>
<script src="https://code.jquery.com/jquery-3.5.0.js"></script>
<script>
$(document).ready(function(){
$(":checkbox").wrap("<span style ='background-color: red'>");
});
</script>
</head>
<body>
<h1> Welcome to vegetables and fruits shop </h1>
<form action="">
<h2> Select vegetables </h2
Cabbage : <input type ="checkbox" name ="vegetables" value ="v1">
Cauliflower : <input type ="checkbox" name ="vegetables" value ="v2">
Onions : <input type ="checkbox" name ="vegetables" value ="v3">
Broccoli : <input type ="checkbox" name ="vegetables" value ="v4">
Carrot <input type ="checkbox" name ="vegetables" value ="v5">
Spinach<input type ="checkbox" name ="vegetables" value ="v6">
Mustard greens : <input type ="checkbox" name ="vegetables" value ="v7">
<h2> Select fruits </h2>
Apple : <input type ="checkbox" name ="fruits" value ="f1">
Banana : <input type ="checkbox" name ="fruits" value ="f2">
Orange : <input type ="checkbox" name ="fruits" value ="f3">
Grapes :<input type ="checkbox" name ="fruits" value ="f4">
Melons : <input type ="checkbox" name ="fruits" value ="f5"><br>
<input type ="submit" value ="Submit"><br>
</form>
</body>
</html>
Output:

Once we select the item of the checkbox, the output is:
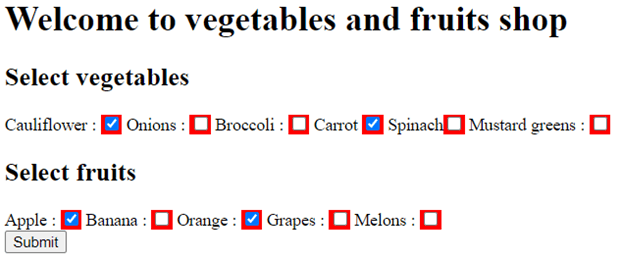
As in the previous program, checkboxes are created for the vegetable and fruit items by using the <input> element and defining the type attribute as “checkbox.” Now, the user can select any vegetables and fruits by selecting the checkboxes.
Next, let’s rewrite the above HTML code to demonstrate the usage of the jQuery checkbox selector. In this case, we will use the checkbox selector with the input elements. We will also utilize the jQuery prop() method to track and retrieve the current status of the checkboxes. Here’s the updated code:
Example #2
Code:
<!doctype html>
<html lang ="en">
<head>
<meta charset="utf-8">
<title>This is an example for jQuery UI checkbox selector </title>
<script src="https://code.jquery.com/jquery-3.5.0.js"></script>
<script>
$(document).ready(function(){
$('input[type="checkbox"]').click(function(){
if($(this).prop("checked") == true){
$("#sel").html("Item or items are checked.");
}
else if($(this).prop("checked") == false){
$("#sel").html("Item or items are unchecked.");
}
});
});
</script>
</head>
<body>
<h1> Welcome to vegetables and fruits shop </h1>
<div id="sel" style="background: red;"></div>
<h2> Select vegetables </h2>
Cabbage : <input type ="checkbox" name ="vegetables" value ="v1">
Cauliflower : <input type ="checkbox" name ="vegetables" value ="v2">
Onions : <input type ="checkbox" name ="vegetables" value ="v3">
Broccoli : <input type ="checkbox" name ="vegetables" value ="v4">
Carrot <input type ="checkbox" name ="vegetables" value ="v5">
Spinach<input type ="checkbox" name ="vegetables" value ="v6">
Mustard greens : <input type ="checkbox" name ="vegetables" value ="v7">
<h2> Select fruits </h2>
Apple : <input type ="checkbox" name ="fruits" value ="f1">
Banana : <input type ="checkbox" name ="fruits" value ="f2">
Orange : <input type ="checkbox" name ="fruits" value ="f3">
Grapes :<input type ="checkbox" name ="fruits" value ="f4">
Melons : <input type ="checkbox" name ="fruits" value ="f5"><br><br>
</body>
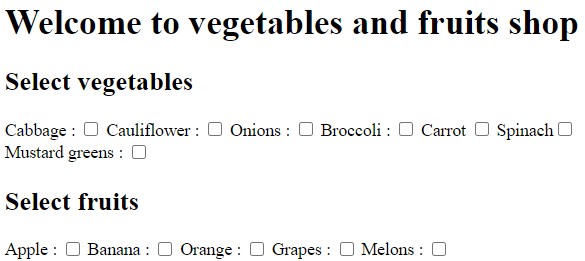
</html>Output:
Once we select or deselect the item of the checkbox, the message displays as-
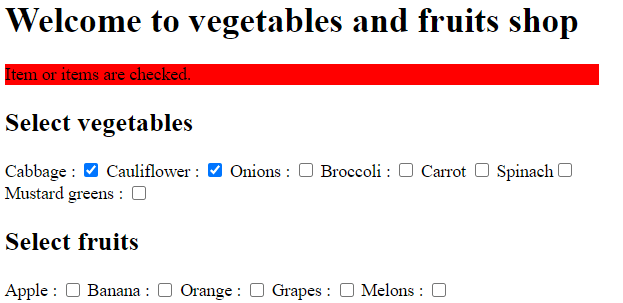
In this example, we construct checkboxes for vegetable and fruit items, and we utilize the prop() function to track the status of the checkboxes easily. When a user selects a checkbox, the program displays the message “Item(s) checked.” Conversely, when a user deselects a checkbox, the program displays the message “Item(s) unchecked.”
Example #3
Code:
<!doctype html>
<html lang ="en">
<head>
<meta charset="utf-8">
<title>This is an example for jQuery UI checkbox selector </title>
<script src="https://code.jquery.com/jquery-3.5.0.js"></script>
<script>
$(document).ready(function(){
$('input[type=checkbox]:checked').each(function () {
var status = (this.checked ? $(this).val() : "");
var name = $(this).attr("name");
$('#sel').append("<h3>" + name + " : " + status + "</h3>");
});
});
</script>
</head>
<body>
<h1> Welcome to vegetables and fruits shop </h1>
<div id="sel" style="background: red;"></div>
<h2> Select vegetables </h2>
Cabbage : <input type ="checkbox" name ="Cabbage" value ="10" checked="checked">
Cauliflower : <input type ="checkbox" name ="Cauliflower" value ="20">
Onions : <input type ="checkbox" name ="Onions" value ="25">
Broccoli : <input type ="checkbox" name ="Broccoli" value ="30">
Carrot <input type ="checkbox" name ="Carrot" value ="50" checked="checked">
Spinach<input type ="checkbox" name ="Spinach" value ="10">
Mustard greens : <input type ="checkbox" name ="Mustard greens" value ="40">
<h2> Select fruits </h2>
Apple : <input type ="checkbox" name ="Apple" value ="200" checked="checked">
Banana : <input type ="checkbox" name ="Banana" value ="30">
Orange : <input type ="checkbox" name ="Orange" value ="50">
Grapes :<input type ="checkbox" name ="Grapes" value ="55" checked="checked">
Melons : <input type ="checkbox" name ="Melon" value ="25"><br><br>
</body>
</html>
Output:
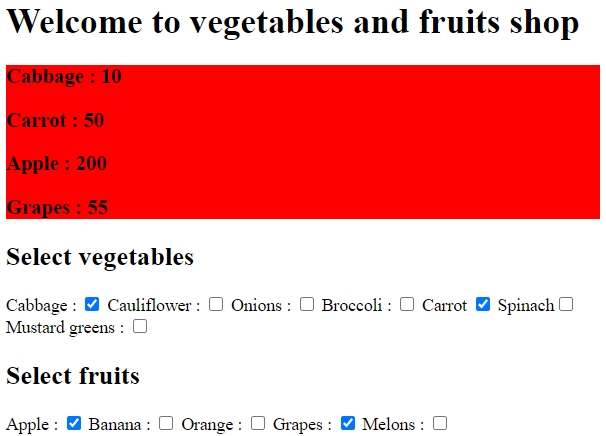
Checkboxes are once again made in the program above for the vegetables and fruits items; in this case, it selects all input elements of the type checkbox and only inserts input elements with a checkmark as “checked=” checked.
Conclusion
The jQuery UI checkbox selector is a built-in type of option for the input element of the jQuery UI library. It is used to choose a checkbox-type element. So with the checkbox selector, we can keep track of the status of the checkbox type of input.
Recommended Articles
We hope that this EDUCBA information on “jQuery checkbox Selector” was beneficial to you. You can view EDUCBA’s recommended articles for more information.

