Updated July 28, 2023
Overview of HTML Form Validation
HTML form validation is a process of examining the HTML form page’s contents to avoid errored-out data being sent to the server. This process is a significant step in developing HTML-based web applications, as it can easily improve the quality of the web page or the web application. There are two ways to perform the HTML form Validation, and they are by Using HTML5 built-in functionality and by Using JavaScript.
HTML Form Validation
There are mainly two ways by which HTML form validation can be performed,
- Using HTML5 built-in functionality
- Using JavaScript
1. Using HTML5 built-in functionality
HTML5 provides this feature of form validation without using JavaScript. Form elements will have validation attributes added, which will enable the form validation for us automatically. Validation attributes allow us to specify various kinds of rules on our form elements. They allow us to set the length of the data, set a restriction on the values of the data, etc.
Let’s see one simple example of HTML form validation using built-in form validating elements and will then proceed further for HTML form validation using JavaScript.
Example
Form Validation using HTML5 validation attribute – In this example, we will use the form validation tag required, which will cause data in that field to be mandatory to be entered; otherwise, the form will not be submitted. Below is the code snippet for the same, along with some styling of a web form.
<!DOCTYPE html>
<html>
<head>
<style>
.formData {
padding-top: 20px;
padding-bottom: 20px;
padding-left: 10px;
background-color: darkcyan;
}
form {
font-size: 30px;
}
form input {
margin-left: 10px;
font-size: 15px;
}
</style>
</head>
<body>
<div class = "formData" >
<form action = "#" >
Name: <input type = "text" name = "name" required>
<input type = "submit" >
</form>
</div>
</body>
</html>
So we have a very simple web form along with only one input data field as “Name”. Please note that we have used the required keyword in the input tag element.
Output:

Let’s try to submit the form without entering any value in the name field. Upon submitting, you will get the error message as “Please fill out this field”, and the form will not be submitted.
Output with blank data:
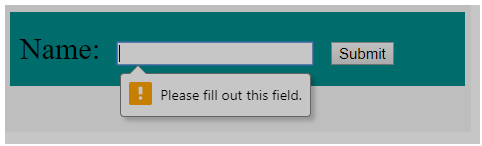
So it can be seen that the error message is not added by us and is provided by HTML itself.
Like the required attribute provided by HTML, there are various form tags available to use. Below is the list of some form validation tags,
- minlength: Used to set the required minimum length of an element
- maxlength: Used to set the required maximum length of an element
- pattern: Used to define a regex expression
2. Using JavaScript
JavaScript is used widely for HTML form validation as it provides more ways to customize and set the validation rules; also, some of the tags provided in HTML5 are not supported in the older versions of Internet Explorer. JavaScript is being used for a long time for form validation.
In JavaScript form validation, basically, we define functions to validate the data before submitting it to the server. We can implement any logic required for achieving the validation rules. JavaScript is more flexible in this way because there is no restriction on defining rules. But it is necessary to know JavaScript to implement this compared to form validation using built-in tags.
Let’s see the example of form validation using JavaScript. We will implement the same example of the form with only one input as the name element.
Example
<!DOCTYPE html>
<html>
<head>
<style>
.formData {
padding-top: 20px;
padding-bottom: 20px;
padding-left: 10px;
background-color: darkcyan;
position: absolute;
width: 100%;
}
form {
font-size: 30px;
}
form input {
margin-left: 10px;
font-size: 15px;
}
.errorMessage {
background-color: white;
width: 143px;
padding-left: 10px;
padding-right: 10px;
padding-top: 5px;
padding-bottom: 5px;
margin-left: 107px;
visibility: hidden;
border-radius: 10px;
position: relative;
float: left;
}
.errorMessage.top-arrow:after {
content: " ";
position: absolute;
right: 90px;
top: -15px;
border-top: none;
border-right: 10px solid transparent;
border-left: 10px solid transparent;
border-bottom: 15px solid white;
}
</style>
</head>
<body>
<div class = "formData" >
<form name = "simpleForm" action = "#" onsubmit = "return validateForm()" >
Name: <input type = "text" name = "name">
<input type = "submit" >
</form>
<p class = "errorMessage top-arrow" > </p>
</div>
<script>
function validateForm() {
var nameVal = document.forms["simpleForm"]["name"].value;
if(nameVal == null || nameVal == "") {
document.getElementsByClassName( "errorMessage" )[0].style.visibility = "visible";
document.getElementsByClassName( "errorMessage" )[0].innerHTML = "Please Fill out this field";
return false;
} else {
return true;
}
}
</script>
</body>
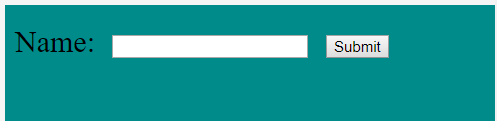
</html>From the previous example, we have removed the required tag from the form element “name”. Instead, we have added one tag onsubmit in the form element. As mentioned before, we will be writing a function for validation for which the <script> tag is added.
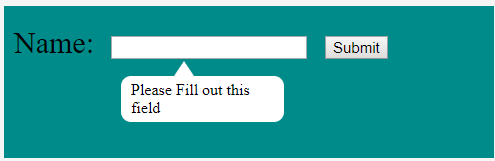
We have written a function named validateForm() which will do the validation. We are implementing the same rule of checking whether the entered data in the name field is blank or not. The logic to check this is upon a click of the submit button, this function will be called, and the entered value will be checked whether it is null or either blank. The function will return true in case of data is not null or blank, but if the data is blank or null, then the error message is displayed to the user.
Output:
If we try to submit the form without entering any data, we should get the error message on the screen. As can be seen from the example, we have designed the error message in the same way possible.
Output with blank data:
Conclusion- HTML Form Validation
So we have seen a very simple example of form validation at the client side. Mainly there are two ways to perform HTML form validation. The first is using the built-in functionality provided in HTML5, and the second is by using JavaScript. Using the first method, we don’t need to write extra code.
Recommended Articles
This has been a guide to HTML Form Validation. Here we discuss the overview and two ways of HTML Form Validation by which they can be performed. You may also have a look at the following articles to learn more –

