Updated April 19, 2023
Introduction to Flask upload file
Flask upload file is defined as functionality that can be built on Flask application that enables users to transmit binary and normal files to the server. This is a common feature in almost all web applications of allowing files to be uploaded to the server through a mechanism mentioned in RFC 1867, which is a mechanism for a form-based file upload. Flask has full support on the HTTP protocol of the mechanism. While enabling the process to file upload there is a high chance of malicious file uploads and needs attention for safeguarding. So, this article will take you through all the questions necessary to create functionality for file upload in a robust Flask application.
Syntax
In cases of web applications, we generally start with a basic web application and then start building on complex functionality as per the requirement of the application. One of those requirements is to enable the upload of a file to the web application. Handling a file upload is very easy and requires an HTML form with its enctype attribute. This property of enctype should be set to “multipart/form-data” to make sure that the file is published to the URL. In this section, we will look only at the syntax and then deep dive into the working of file upload.
Defining the path of the upload folder:
app.config['UPLOAD_FOLDER']Defining the maximum size of the file that would be uploaded (Size to be mentioned in bytes):
app.config['MAX_CONTENT_PATH'] Importing required modules in Flask:from flask import Flask, request
from werkzeug import secure_filenameRequesting the file from the path:
request.files['<name of file as mentioned in html>']Saving the file in the designated folder as mentioned in the instance of Flask object:
f.save(secure_filename(f.filename))How does the upload file work in Flask?
Before we jump on to working of file upload in Flask, we need to understand that there is various other web application framework, like Django and the debate of Django vs Flask is an age-old debate and can be continued for years. For anyone comfortable with one, should preferably stay on the same to build the expertise or else experiment on the other to improve the more wide scope of the tech stack. Flask is the one that is simple and easy to get started, but as and when required Django can be used as per the requirement. Another piece is as we are developers in the era of cloud, and moving away from monolithic servers, Flask is more preferable as it doesn’t have all built-in apps in it.
Now, to understand the working let us understand the architecture of the flow of how the code is structured. First, we need to write a template file that will be rendered when a URL endpoint is hit. This HTML consists of various features of the page, like submit button, enctype = “multipart/form-data”, URL of the destination where it will point to in case of the click of Submit radio button, and finally the name of the file when it is uploaded through this form. Apart from the template file, we need to build a python code that will consist of 2 functions that serve their respective purposes. The first function is to have the URL endpoint of the home page which will be rendered from the above-said template file. The other function consists of the URL endpoint as mentioned in the HTML template and comprises the file upload process within that function. Once the file is uploaded successfully, we return either a success status code or any text as deemed fit in the use case.
It is now time for us to look at the process of upload for a file in Flask. The file is taken from the local location as specified by the user of the application. When the user hits the submit button, it is saved into the temporary location on the server and after careful inspection of the file about its credibility and size it is then saved into the final location as specified in the ‘UPLOAD_FOLDER’. One can also take chance to hard code the file that is getting uploaded or by default it will be taken from the filename property of the request.file object. We might see another function i.e. secure_filename( ) for obtaining the secure version of the file and is a must to be used in the application.
An important configuration parameter that needs to be set up is MAX_CONTENT_LENGTH which will limit the size of the file that is being uploaded. This will in turn improve the upload as the file will only be stored in the webserver’s memory if the condition of file size is met. If the file uploaded is above the allowed payload a RequestEntityTooLarge exception is thrown. In case one wants to limit the extension, we can do that using the ALLOWED_EXTENSIONS parameter! Now let us look at a simple Flask application that is built from scratch and has the file upload utility.
Examples
Here are the following examples mention below
Example #1
Flask application with the File upload utility:
Syntax
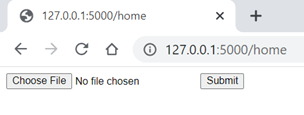
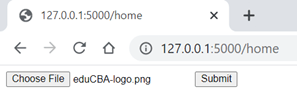
Template.html
<html>
<body>
<form action = "http://localhost:5000/fileUpload" method = "POST"
enctype = "multipart/form-data">
<input type = "file" name = "uploadedFile" />
<input type = "submit"/>
</form>
</body>
</html>
Python File
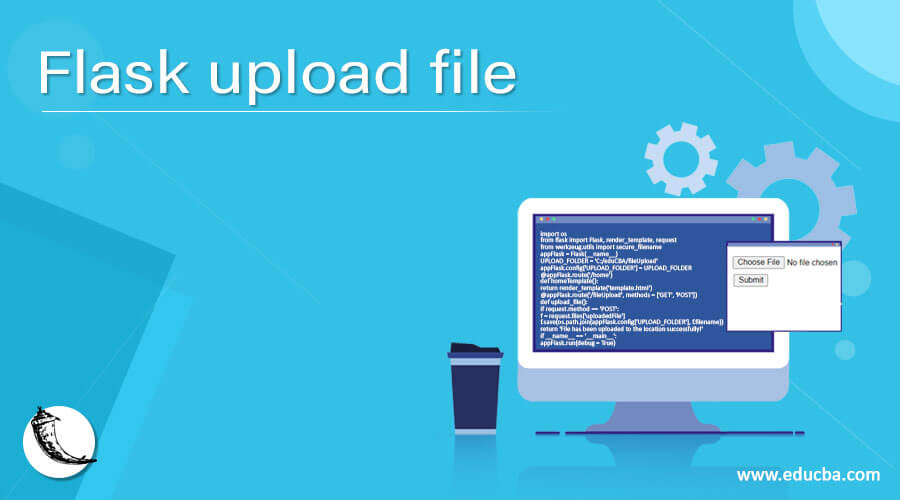
import os
from flask import Flask, render_template, request
from werkzeug.utils import secure_filename
appFlask = Flask(__name__)
UPLOAD_FOLDER = 'C:/eduCBA/fileUpload'
appFlask.config['UPLOAD_FOLDER'] = UPLOAD_FOLDER
@appFlask.route('/home')
def homeTemplate():
return render_template('template.html')
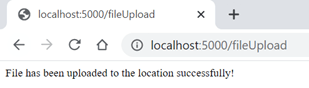
@appFlask.route('/fileUpload', methods = ['GET', 'POST'])
def upload_file():
if request.method == 'POST':
f = request.files['uploadedFile']
f.save(os.path.join(appFlask.config['UPLOAD_FOLDER'], f.filename))
return 'File has been uploaded to the location successfully!'
if __name__ == '__main__':
appFlask.run(debug = True)Output:

Conclusion
In conclusion, in this article, we have learned about the different functionality of file upload through Flask and the bigger picture of file upload work. We should also know how to use the uploaded file later as required and there should be robust architecture around the same. Finally, as we say it always, we want our readers to experiment with the size in the same way we applied the ‘UPLOAD_FOLDER’ parameter in this article!
Recommended Articles
This is a guide to Flask upload file. Here we discuss the different functionality of file upload through Flask and the bigger picture of file upload work. You may also have a look at the following articles to learn more –
