Updated April 19, 2023
Definition on Flask Template
Flask template is defined as a methodology that enables developers to reuse visuals in the Flask web applications being built. The reuse of visuals enables developers to not only utilize the inputs of user experience which was already a success and hence not reinvent the wheel again but also helps in dividing the business logic and the presentation part. For example, we are building a web application and we would want to keep the same header and footer for the page so that the web pages look consistent and some data like contact, email id, the address is present on every page eventually pointing to the design being same. This can be achieved through templates. Let’s see how!
Syntax
As we have learned that templates need to have some static data and placeholders for the dynamic data. The dynamic data is what is sent through parameters from the python file to produce a final document. In this section, we will learn some from the syntax perspective so that when we know the working of templates, it is easier to map it back with the syntax learned here for a complete picture of the topic in discussion. We also need to understand that the template files need to be stored in a “templates” directory within the flaskr package.
Defining the HTML template:
<html>
<head>
<title>{{ < variable 1 > }}</title>
</head>
<body>
<h1> {{ < variable 2 > }}</h1>
</body>
</html>
Importing the rendering library:
from flask import render_template
Using the render template within a URL endpoint:
render_template('< template file name>', < variable_1> ='< value of the variable 1 >', <variable 2>=< value of the variable 2 >)Here everything within the ”< >” needs to be replaced with the variable that goes as an input to the HTML template file.
Using if loop in the HTML template:
{% if <variable 1> == "< value to be matched with > ": %}
{% else %}
{% endif %}
Using for loop in the HTML template:
{% for < variable > in < list >: %}
{% endfor %}
How to create and use the template in Flask?
Before we jump on to the creation of templates and using them, let us understand a bit more in detail what goes at the backend of the Flask template. Generating HTML data through python and especially when the data is dynamic needs a lot of escaping from HTML as it would need conditionals or loops to be put. Now, using the advantage of an engine named as Jinja2 template engine, instead of returning hardcoded HTML from a function we can render using a render_template( ) function. Within the function itself, one can create loops and add if statements in the template. So, the flask function sends values of the variable to the Jinja engine, which grans the template from the pre-defined HTML template. The Jinja engine, which is a full-featured template engine for Python which replaces the variables in the template with the dynamic data shared by the Flask server and finally returns the page with the replaced values.
Now that we understand the working let us look at the creation of the template in Flask. For that we need to adhere to some prerequisites as mentioned below:
- A local Python 3 programming environment in the machine where we would be building our Flask application.
- Some brief understanding of the python concepts like data types, conditional statements, etc.
Post having the above pre-requisites, we are now ready for building our template in Flask. For that we need to follow the steps below:
Step 1: Installation of Flask
The very first step is to install Flask in the Python environment we created. We can achieve this by pip install command i.e. pip install flask.
Step 2: Creation of Base application
Once the required modules are installed, we would need to create a base Flask application, which will be sufficient to run the Flask server. This can be as simple as having a URL endpoint at ‘/’ so that we ensure that we have no problems with running a Flask server on the system. To test out if the application is running, we can go to a command window, enter the command python <filename.py>. With this, a web server will start and the required URL will be visible in the command prompt.
Step 3: HTML template building
Here, we build the HTML, in a way we have envisioned our webpage to look like. Jinja template provides some delimiters which provides usage of dynamic data as can be created as per the requirement.
- {% … %} is used for For statements
- {{ … }} Printing to template output
- {# … #} Comments that are not a part of the template output
- # … ## Used for Line statments
Step 4: Building the URL endpoint for template rendering
Once the template is fixed, we would set up the URL, where we would call the render_template( ) function and pass the necessary values to the variables we used in templates. This is how templates are used by the python file, as the template filename along with variables is fed to finally output the rendered template. The templates can now be used for presentation purposes and making sure that the business logic and presentation part are separated, and we maintain a consistent layout!
Step 5: Running the final python file
Since we have already tested our application running, we will use a similar way to run it for the final time and expect the result on a web page with the required URL.
Examples
Flask application using template explaining, a dynamic data, an if loop, and a for loop:
Syntax
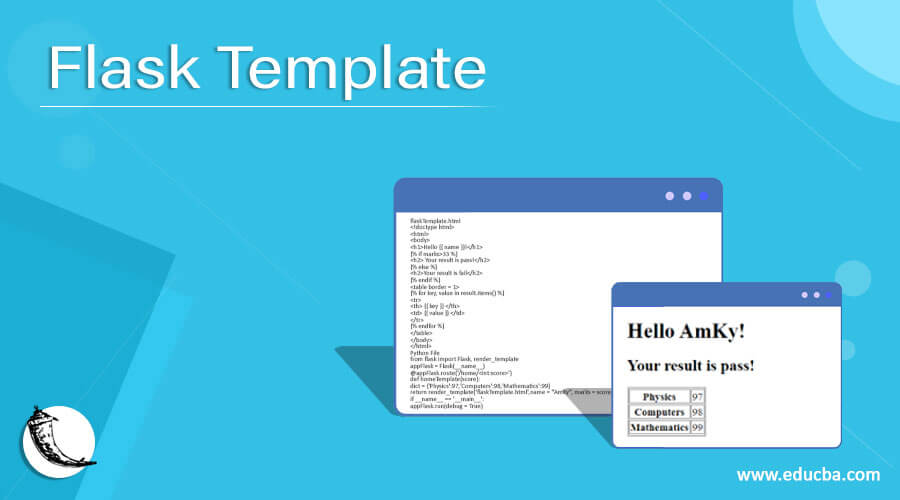
flaskTemplate.html
<!doctype html>
<html>
<body>
<h1>Hello {{ name }}!</h1>
{% if marks>33 %}
<h2> Your result is pass!</h2>
{% else %}
<h2>Your result is fail</h2>
{% endif %}
<table border = 1>
{% for key, value in result.items() %}
<tr>
<th> {{ key }} </th>
<td> {{ value }} </td>
</tr>
{% endfor %}
</table>
</body>
</html>
Python File
from flask import Flask, render_template
appFlask = Flask(__name__)
@appFlask.route('/home/<int:score>')
def homeTemplate(score):
dict = {'Physics':97,'Computers':98,'Mathematics':99}
return render_template('flaskTemplate.html',name = "AmKy", marks = score, result = dict)
if __name__ == '__main__':
appFlask.run(debug = True)
Output:
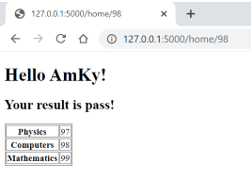
When input score is 98:
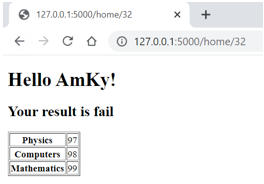
When input score is 32:
Conclusion
In conclusion, in this article, we have learned about how to create and use Flask template. Now as we generally say the readers can use the foundation discussed here to build some awesome web pages and expand their horizon of knowledge! Beware of some errors like the TemplateNotFound error by making sure to put the HTML in the templates folder!
Recommended Articles
This is a guide to Flask Template. Here we discuss the definition, syntax, How to create and use templates in Flask? and examples with code implementation. You may also have a look at the following articles to learn more –
