Updated May 29, 2023
Introduction to Excel Evaluate Formula
Have you ever felt difficulties checking long formulas in Excel? The different values of cells in a long formula can confuse. There exists a chance to get the wrong result as a final output of a lengthy formula. You can find a solution using Excel’s ‘Evaluate Formula’ feature. A step by step evaluation helps to catch the bugs easily when it produces a wrong answer. Instead of wasting your time by manually evaluating the long formula, evaluate the formula feature and performs it more precisely and accurately.
How to Evaluate Formula in Excel?
It is very easy to ‘Evaluate Formula’ within your calculations. Evaluate formula comes under the Formulas menu once you apply the large formula in a cell, including calculation with multiple arithmetics and logical operators. It will make it difficult to evaluate the formula partially or completely. The only way available is to calculate manually by finding the result of each operation included. You can find Evaluate Formula under the Formulas tab.
If you note any bug, you can stop the evaluation and change the portion of the formula. After editing, you can again start the evaluation.
Example #1 – Calculate Price Using Excel Evaluate Formula
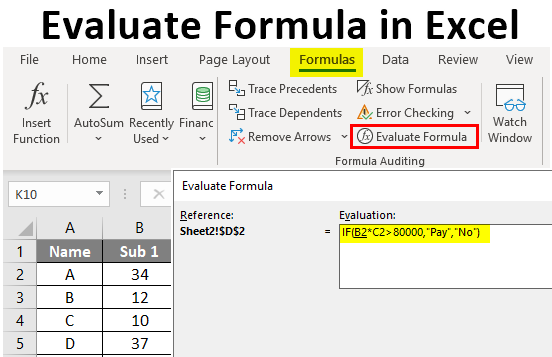
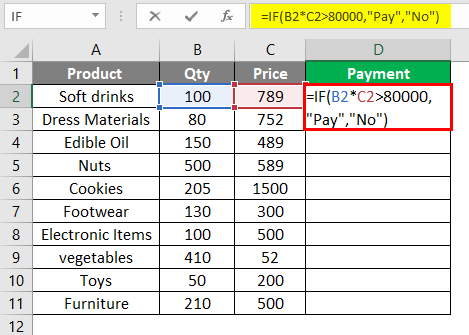
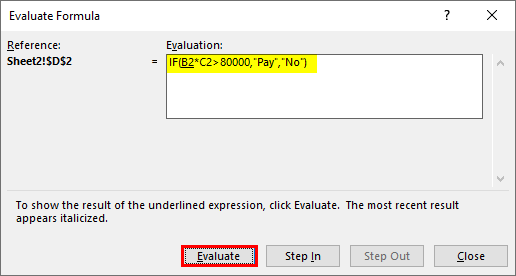
- Let us try to evaluate a formula using the feature. Pay the bill by checking a condition in the table provided. We need to pay the bill if the bill amount is greater than 80000. To check this, we have applied the formula =IF(B2*C2>80000, “Pay”, “No”).
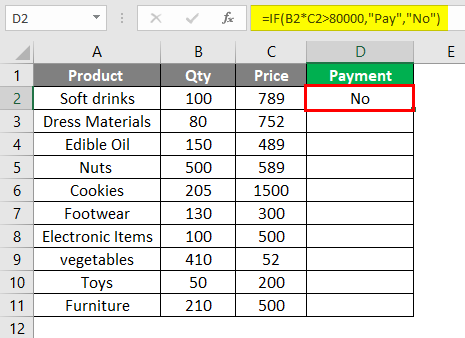
- The output is shown below once you apply the formula in cell D2.
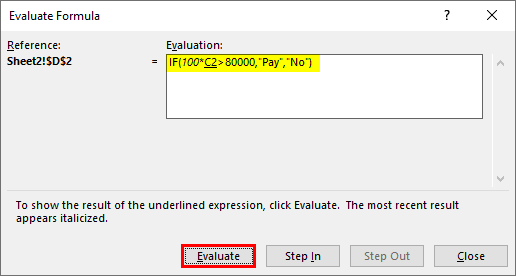
- Select the cell in which you want to evaluate the formula. Go to the Formulas menu and click on evaluate formula option. The applied formula =IF(B2*C2>80000, “Pay”, “No”) calculates the price for each item by multiplying the quantity and price for each product.

If the result of this calculation is greater than 80000, then the amount should pay.
- Once you start the evaluation immediately, a dialog box displaying the applied formula and an evaluate button will appear. Click on the Evaluate button, and the value of the referred cell will be replaced. Now the formula will appear as =IF(, 100*C2>80000, “Pay”, “No”), where the value of C2 will be replaced.
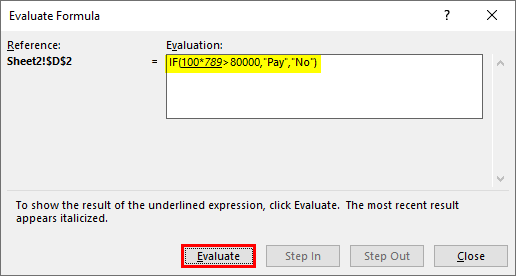
- If you continue pressing the evaluate button, the next step will be performed by replacing the next reference value. D2 will be replaced with a value of 789. The evaluation formula is changed to
=IF (100*789>80000, “Pay”, “No”).
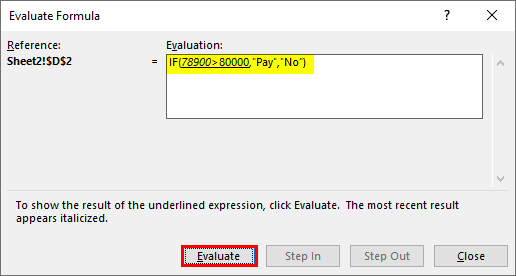
- In the next step, the value again changed, which will result from the operation performed between two numbers. The formula shows as =IF (78900>80000, “Pay”, “No”).
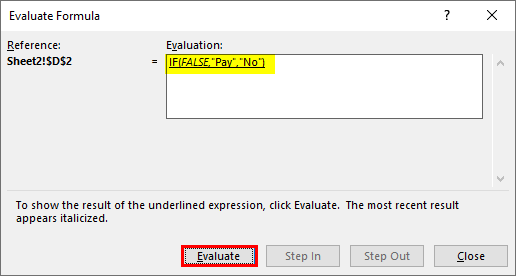
- This again gets evaluated where the condition’ 78900>80000′ is false, and the formula transforms to =IF(FALSE, “Pay”, “No”). From this, we can understand if any mistakes happen in our calculation.
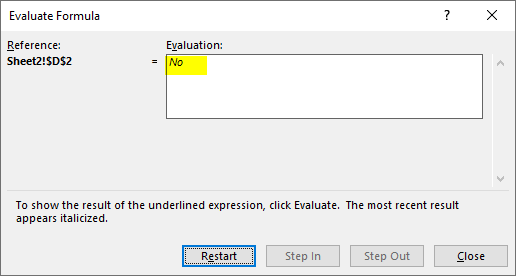
- If the evaluation continues, you will reach the final result: ‘No’. The complete formula gets evaluated step by step, producing the final result.
- Once the evaluation is completed, the evaluate button automatically transforms into a restart button, allowing you to restart the evaluation. The evaluation button will be changed to the ‘Restart‘ button. Again several times, you can repeat the evaluation.

- If you click on Restart, it again shows the first step of evaluating the formula. The evaluation process will evaluate the entire step and show the final result.
Example #2 – Evaluating Formula for Student’s Average Marks
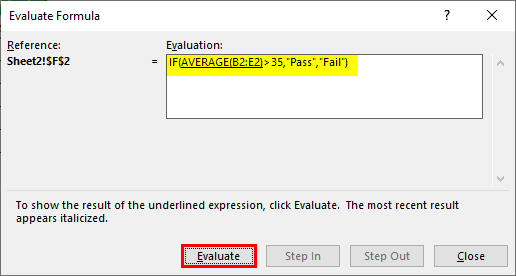
A table with the student’s name and the marks obtained in four different subjects is provided. The student has passed only if the average marks gained are greater than 35.

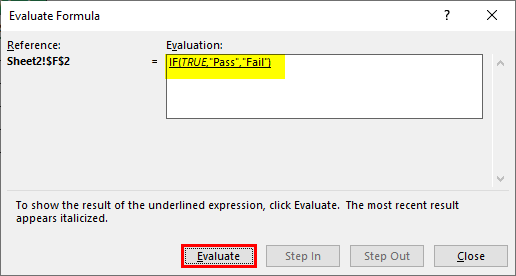
- Here applied a formula to calculate the student’s status by calculating the average of marks scored. The formula is =IF(AVERAGE(B2: E2)>35, “Pass”, “Fail”). Go to the ‘Formulas’ menu, then click ‘Evaluate formula’. Select cell F2 and start evaluating the formula.
- The value of AVERAGE (B2: E2) is replaced with its value 36.25 in the formula =IF (AVERAGE(B2: E2)>35, “Pass”, “Fail”). Now the formula changes to =IF (36.25 >35, “Pass”, “Fail”).
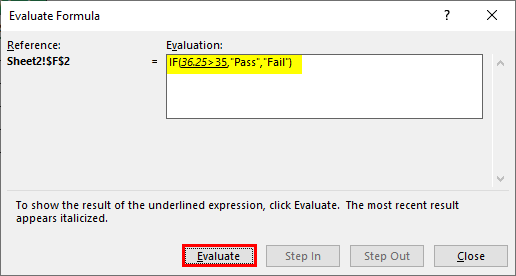
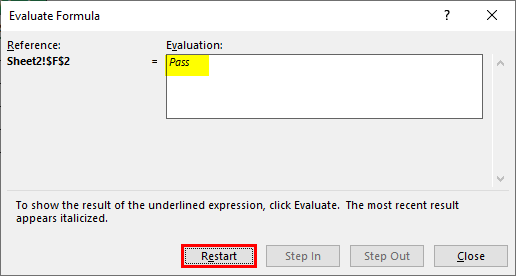
- Continue evaluating to move to the next step =IF (36.25 >35, “Pass”, “Fail”). The formula transforms to =IF (TRUE, “Pass”, “Fail”) since the condition is true.
- Since the condition is true, it will execute the first true block of the IF condition. The final output is all students have passed.
Conclusion
- Excel Evaluate formula is a feature available with Excel for examining the applied formula.
- Instead of wasting your time by manually evaluating the long formula, evaluate the formula feature and performs it more precisely and accurately.
- Trace precedents are another option available in the ‘Formulas’ menu, which helps you show a result’s precedents. This will show you the cell reference used in the formula by drawing an arrow from the cell reference to the result.
Things to Remember About Excel Evaluate Formula
- An easy method to evaluate a complex formula helps to break long formulas into small pieces and evaluate them step by step.
- One effective method to evaluate formulas nested through worksheets is using the following approach.
- By selecting the portion of the large formula, press F9 to evaluate the result.
- The final result is easy to evaluate.
Recommended Articles
This is a guide to Excel Evaluate Formula. Here we discuss how to Evaluate Formulas in Excel, practical examples, and a downloadable Excel template. You can also go through our other suggested articles –
