Updated June 8, 2023

Excel Divide Cell (Table of Contents)
Introduction to Divide Cell in Excel
When we work with the text files in Excel, it has all the data in a single row instead of in different columns. The data is often aligned in a single row with some delimiter or separator, such as a comma or space. If you open such files in Excel, you’ll not get the data populated across columns for different attributes, which is a problem in its own ways. It makes dividing the cells into different columns extremely important, and that is exactly what we will walk you through in this article.
Data Structure in a Text File:
The data is comma-separated if you see the below screenshot and has the first row as column headers. Below is one blank row, and the data values are comma-separated. This type of data is called delimited data or with delimiters (in this case, comma as a delimiter).

Let us see the other data set that we are going to use.

This data set simply consists of EmpID and EmpName, as it seems, and this data has no special delimiter. We need to divide the cells into different columns for both types of data.
Excel has a Text to Column tool, which helps us divide the cells into different columns.
Examples of Divide Cell in Excel
We will see how it works with two examples in this article.
Example #1 – Divide cells with Delimiter in Excel
See the data below. The same text file is opened with Excel, which we have seen through the above screenshots, and has comma-separated values within a single row of the sheet.

We need to use the Text to Column utility in Excel to divide it into different columns per field value.
Step 1: Select all the cells from column A (spread across the cells A1 to A12) containing comma-separated data.

Step 2: Navigate to the Data tab under the Excel ribbon, placed at the uppermost corner of the worksheet, and click on it.

Step 3: As soon as you click on the Data tab, you’ll see different options associated with the data using which we can manipulate the data in Excel. However, you need to navigate to the Data Tools group, where Text to Column is an option.

As soon as you click on the Text to Column option, you’ll see Convert Text to Column Wizard popping up on your Excel screen, as shown below:
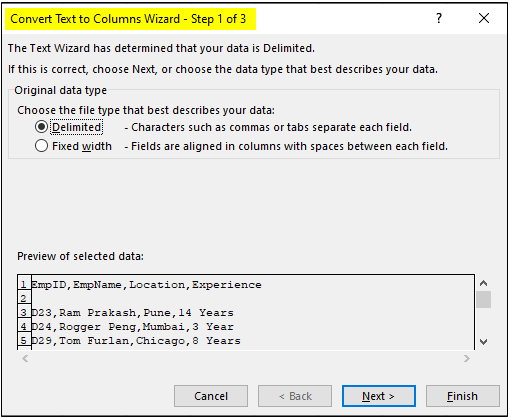
By default, the Delimited option is checked for you. Since our data has a delimiter (comma), we will go with the same selection. Click on the Next > button.
Step 4: Under the Delimiters section, tick the select Comma option (since we have comma-separated data with us). You have different delimiter options such as Tab, Semicolon, Space, etc.; if your data has any delimiter apart from these standard ones, you can use other options to add it as a delimiter for the data to be divided. Since we have a comma, we will use the comma as a delimiter. Once you click on the comma, the cell values are divided into separate columns under the Data Preview section after each comma. Click on the Next button after you are done.

Once you click on the next option, several options will allow you to change the column data type for various columns the data gets split in. Ex. Whether you wanted to store any specific column as a Text or Date format or choose not to import that column with the option, do not import the column (skip) option. Well, these are the options; right now, we are not going to use and just will use the standard Text to Column settings, in which the Column Data Format is set as General.
Step 5: Set the Column data format as General by clicking the General radio button. Under the Destination,: section, set the destination as cell A1 and click on the Finish option to complete the dividing data into cells procedure.

Once you click on the Finish option, you can see data divided across different columns, as shown in the screenshot below:

You can see the data which was in a single cell with a comma as a separator or delimiter is now populated across the different columns such as EmpID (column A), EmpName (column B), Location (column C), and Experience (column D).
This is one way to divide cells in Excel when you have delimited data.
Example #2 – Divide cells with Fixed Width in Excel
The Other example is something where you don’t have any delimiter but data with fixed, and you need to divide the cells containing that data into different columns.
See the data below:

Step 1: Follow the first three steps from the previous example (Example 1) as it is to be able to open the Text to Column Wizard in Excel, which helps in dividing the cells.
Step 2: As soon as the Convert Text to Columns Wizard gets opened, you need to click the Fixed Width radio button instead of the Delimited (which is set by default). Click on the Next button.

Step 3: After you click on the Next button, you can make the split after a specific length. For Example, we can split after the first three characters, part of EmpID. See the screenshot below. After you are happy with the split, click the Next button.

Step 4: On the next screen, you can set the data type as General, Date, etc. And set the Destination Range as well. Once done, you can click on the Finish button. See the screenshot below:

Once you click on the Finish button, you can see the data divided into two different columns, as shown below:

This is how we can divide cells in Excel into different columns using the Text to Column wizard.
Things to Remember
- Your data should have a common delimiter for all the fields for dividing the cells. Otherwise, it is not possible to divide the data into different columns.
- If the data doesn’t have a delimiter, you can also use the Fixed Width option. However, your data should have a fixed number of characters where a split can happen for that to happen. For Ex. after every third character, you may create a split (as shown in Example 2.)
Recommended Articles
This has been a guide to Divide Cells in Excel. Here we discuss How to use Divide Cell in Excel, practical examples, and a downloadable Excel template. You can also go through our other suggested articles –
