Updated June 22, 2023

Introduction to Cursor in Oracle
Cursors are very important while writing PL/SQL queries. In this article, we are going to discuss Cursors in Oracle. So basically, Cursor is a pointer to a context area. The context area is a memory space for processing an SQL statement. Thus context area contains all information that is required to process the statement. So, the Cursor points to this particular area. On executing the statement, the Cursor holds the returned result set containing single or multiple rows. As we go on, we will learn about Cursor in more detail.
Cursor Types and Syntax
There are two types of cursors in Oracle: implicit Cursors and Explicit Cursors.
1. Implicit Cursors
As the name suggests, implicit cursors are created by an oracle. Whenever an SQL statement is executed implicit Cursor is created. DML statements like UPDATE, INSERT, and DELETE automatically creates implicit Cursor. In the case of UPDATE and INSERT DML statements, the Cursor holds the information of the rows to be affected, and in the case of INSERT, it has the information of the data to be inserted.
The whole execution of the implicit Cursor is managed internally by Oracle, and it reveals the cursor status through specific attributes like %ROWCOUNT, %ISOPEN, and %ISFOUND.
- %ROWCOUNT: It tells how many rows are returned by the Cursor.
- %ISOPEN: This attribute returns Boolean, meaning TRUE if the Cursor is open or else FALSE.
- %FOUND: This attribute also returns Boolean. TRUE if a successful fetch has been executed and FALSE if an unsuccessful fetch (no row returned).
- r%NOTFOUND: This attribute returns the opposite of the %FOUND attribute. FALSE if the row is fetched and TRUE if no row is fetched.
2. Explicit Cursors
The users in the Oracle database create these cursors. In this type of Cursor, the programmers can create their context area. In explicit Cursor, the programmer gets their context area to get more control to execute their DML statements. When using the Oracle database, we can declare explicit cursors within the SELECT statement.
Syntax
CURSOR <cursorname> IS <select_statement>;

<cursorvariable declaration>

BEGIN

OPEN <cursorname>;

FETCH <cursorname> INTO <cursorvariable>;

CLOSE

END;
Parameters:
- cursor_name: It is used to give the name of the Cursor.
- select_statement: Here, we provide the select query, which returns single or multiple rows.
Cursor Action in Oracle
There are four actions that we need to use explicit cursors.
- DECLARE: In this section, the programmer creates a named context area for the Select statement. This section of the PL/SQL program declares the select statement.
- OPEN: In this section, the oracle allocates memory for the Cursor.
- FETCH: In this section, actual execution starts. The select statement fetches the database records and stores them in the allocated memory. The data is fetched record by record way. It is a record-level activity. Therefore, we also refer to the set of records as an Active Set.
- CLOSE: You use this statement to close the Cursor, thereby releasing the memory allocated to the Cursor.
Example of Cursor in Oracle
In this example, we will only get the employee id from the employee table for those from Mumbai. We are going to use Cursor for this situation. Let us look at the PL/SQL block for displaying the id of the employees based in Mumbai.
Code:
PL/SQL BLOCK

SET SERVEROUTPUT ON;

DECLARE

v_empid varchar2(20);

CURSOR emp_cur IS

SELECT employee_id from employee WHERE CITY ='Mumbai';

BEGIN

OPEN emp_cur;

LOOP

FETCH emp_cur INTO v_empid;

EXIT WHEN emp_cur%NOTFOUND;

dbms_output.put_line('The employee id is' || v_empid);

END LOOP;

CLOSE emp_cur;

END;
The SET server output allows the DBMS output command to print the messages in SQL Developer. Since we are going to use it for our execution. In the above PL/SQL block, we have the first DECLARE section in which we declare the Cursor and the cursor variable. Next, we have the execution section, where we OPEN the Cursor, which means the memory space has been allocated. You use FETCH to execute the SELECT query and store the result in the previously declared cursor variable.
We will use LOOP to transverse the records in the whole table and dbms_output.put_line statement to print the record after every iteration. You use the attribute %NOTFOUND to exit the LOOP when there are no records. The CLOSE cursor statement closes the Cursor and releases the memory. You use the END statement at the end to close the PL/SQL block. One important point to remember is that we need to close the Cursor before the end statement, and the LOOP should end before closing the Cursor.
Let us now execute the PL/SQL cursor block in SQL developer, and the below screenshot shows us the output after executing the block successfully.
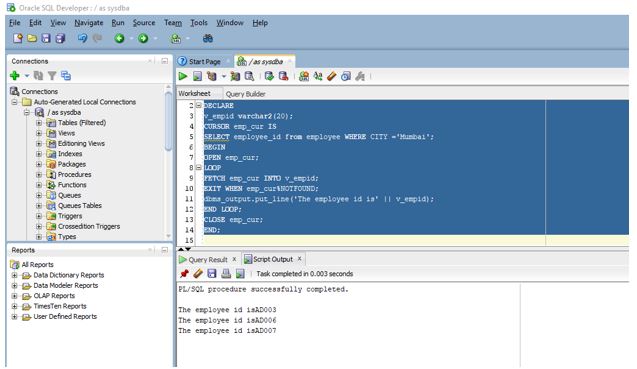
The output shows the records. In this case, only three records are from Mumbai.
Advantages and Disadvantages of Cursor in Oracle
Given below are the advantages and disadvantages:
Advantages
- The Cursor fetches the data Row wise, so Row Wise validation is possible using the Cursor.
- It retrieves one row at a time, unlike SQL select query, which selects all rows simultaneously.
- The While Loop is faster than it but does have more overhead.
- It provides traversals over records of the database.
Disadvantages
- They decrease the performance of inserts, updates, and deletes.
- They also take up space which depends on the number of fields used.
Conclusion
In the article, we discussed what a cursor is in the introduction part and then the different types of cursors along with their attributes and syntax. We got to see the working of the Cursor through examples as well as the advantages and disadvantages of using the Cursor.
Recommended Articles
This has been a guide to Cursor in Oracle. Here we discuss the introduction, cursor types, advantages, disadvantages, and examples of Cursors in Oracle. You may also have a look at the following articles to learn more –
