Updated June 13, 2023

Introduction to CSS Pointer Events
The CSS pointer-events property controls the behavior of HTML elements in response to mouse or touch events. It determines how elements interact with CSS hover or active states, JavaScript clicks or tap events, and whether the cursor is visible. By setting the CSS pointer-events property, you can define whether or not a specific graphic element can be the target of pointer events. These pointer events, triggered by a pointing device, are DOM events. They are designed to provide a unified model for handling pointing input devices such as a mouse.
The property of pointer-events is even more, JavaScript-like to prevent:
- Click on actions to do something
- Default cursor pointer to show
- CSS hover and cause an active state
- Click on JavaScript to fire events
Syntax
The syntax for CSS pointer events is as follows:
pointer-events: auto|none;- auto: This parameter specifies that the element must respond to the pointer events.
- none: This parameter defines that the element should not respond to pointing events.
For instance,
Consider the below code:
<div class="myclass"> click here <a href="https://www.google.com/html"> Google </a> </div>For this class, we will give CSS with pointer event property as shown below:
div.myclass {
pointer-events: auto;
}
The element will react to the pointer-events when you hover or click the above link.
How does CSS Pointer Events property work?
A single pointer event model could facilitate website and application development and provide a great user experience irrespective of the user’s hardware. Even then, when device-specific handling is required, pointer-events identify a pointer-type property to inspect the type of device that generated the event. The events needed to handle generic pointer input are comparable to mouse events, such as mouse down / pointer down, mouse move/pointer move, etc. Thus, the types of pointer events are purposely equivalent to the types of mouse events.
Examples to Implement CSS Pointer Events
Here are some examples of CSS pointer-events usage:
Example #1
Code:
<!DOCTYPE html>
<html lang="en">
<head>
<meta charset="utf-8">
<title> CSS pointer-events Example </title>
<style>
.mytext {
pointer-events: auto;
}
</style>
</head>
<body>
<h2> Pointer Events - Auto </h2>
<br>
<div class = "mytext">
<a href="https://www.educba.com/"> EDUCBA (Corporate Bridge Consultancy Pvt Ltd) </a> is a leading global provider of skill based education addressing the needs of 500,000+ members across 40+ Countries. Our unique step-by-step, online learning model along with amazing 2500+ courses prepared by top-notch professionals from the Industry help participants achieve their goals successfully.
</div>
</body>
</html>
Output – Open the file in a browser, and it will produce the following result:
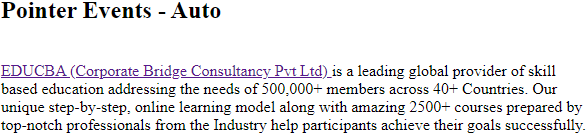
Explanation: As shown in the above example, we have set the pointer property to auto, which determines that when the user hovers on the link, the element will react to the pointer event. In other words, we can see the mouse pointer when we hover over the link, as we have set the property for pointer events.
Example #2
Code:
<!DOCTYPE html>
<html lang="en">
<head>
<meta charset="utf-8">
<title> CSS pointer-events Example </title>
<style>
.mytext {
pointer-events: none;
}
</style>
</head>
<body>
<h2> Pointer Events - None </h2>
<br>
<div class = "mytext">
<a href="https://www.educba.com/"> EDUCBA (Corporate Bridge Consultancy Pvt Ltd) </a> is a leading global provider of skill based education addressing the needs of 500,000+ members across 40+ Countries. Our unique step-by-step, online learning model along with amazing 2500+ courses prepared by top-notch professionals from the Industry help participants achieve their goals successfully.
</div>
</body>
</html>
Output:

Explanation: As shown in the above example, we have set the pointer property to none, which determines that when the user hovers on the link, the element will not react to the pointer event. In other words, we cannot see the mouse pointer when we hover over the link, as we have set the none property for pointer events.
Example #3
Code:
<!DOCTYPE html>
<html lang="en">
<head>
<meta charset="utf-8">
<title> CSS pointer-events Example </title>
<style>
.one {
fill: grey;
}
.two {
fill: cyan;
}
.three {
fill: orange;
pointer-events: none;
}
.pntrevnt:hover {
stroke: red;
stroke-width: 3;
}
</style>
</head>
<body>
<h2> Pointer Events - SVG </h2>
<br>
<svg width="250" height="250">
<g transform="translate(30, 30)">
<path class="one pntrevnt" d="M 0 0 L 100 0 L 100 100 L 0 100 z" />
<path class="two pntrevnt" d="M 50 50 l 100 0 l 0 100 l -100 0 z" />
<path class="three pntrevnt" d="M 100 100 l 100 0 l 0 100 l -100 0 z" />
</g>
</svg>
</body>
</html>
Output:

Explanation: In the above example, we used the SVG element and stroke value, which specifies the target of the pointer event when the user moves the mouse pointer over the perimeter of the element. The fill value sets the target of the pointer event when the user moves the mouse pointer over the element’s interior.
Conclusion
So far, we have used CSS pointer event property along with examples. Adopting pointer events to prevent an element from becoming the target of pointer events does not imply that it will not trigger pointer event listeners. The CSS pointer events are very effective when set to none to turn off the target click and allow elements underneath to click.
Recommended Articles
We hope that this EDUCBA information on “Perl print hash” was beneficial to you. You can view EDUCBA’s recommended articles for more information.

