Updated August 8, 2023
Introduction to Block in AutoCAD
A block is a fundamental and potent component in AutoCAD that is used to effectively build, organize, and reuse groupings of geometry or complicated objects.
Blocks make drawing easier and encourage design consistency by combining several entities. Blocks can be constructed once and added to the picture several times, significantly minimizing the amount of repetitive work. In addition, any changes made to a block update all instances, guaranteeing smooth design changes across the project. Whether a straightforward symbol or a complicated assembly, employing blocks in AutoCAD’s flexible drafting environment speeds up the process and boosts productivity.
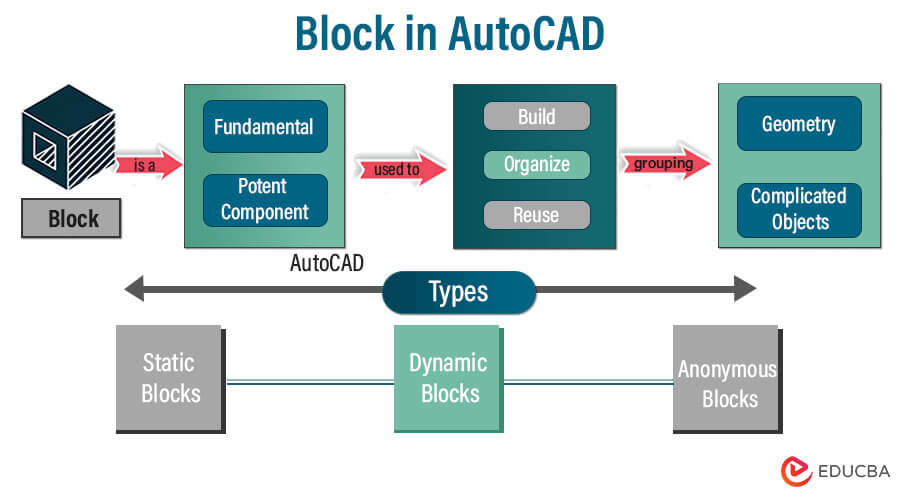
Table of Content
Key Takeaways
- A “Block” in AutoCAD is a grouping of one or more entities joined together to form a single object.
- It facilitates the efficient reuse of common elements and simplifies complex graphics.
- Designers can simplify editing many instances of the same object, reduce file size, and organize drawings better by creating and using blocks.
Creating Block in AutoCAD
In AutoCAD, blocks combine several items into a single, self-contained object that can be used repeatedly inside a drawing or in other drawings. In AutoCAD, blocks are a crucial concept that lets you organize complicated parts effectively and keep your designs consistent.
The following steps are involved in creating blocks:
1. Defining Block Objects
- It would be best if you first chose the things you wish to include before creating one. These items may be text, polylines, polygons, lines, arcs, circles, or any other drawing component.
- To choose numerous objects fast, you can utilize a variety of selection techniques like “Window,” “Crossing,” or “Select All.” Alternatively, you can manually choose each item individually or use the “Select” command.
2. Selecting Objects for Block Creation
- Type “BLOCK” into the command line after choosing the objects, or use the “Home” tab in the “Block” panel to access the “Block” command.
- AutoCAD will prompt you if you use the “PICKFIRST” setting or provide a basic point for the block. When a block is put into a drawing, its position is determined by a reference point called the base point. AutoCAD would automatically use their base points if you had selected the objects before using the “BLOCK” command.
3. Specifying Base Point and Insertion Point
- AutoCAD will ask you to enter the block’s base point when you have chosen your objects. Use the cursor to select a specific location or the command line to enter exact coordinates.
- AutoCAD will then prompt you to enter the block’s insertion position. The base point will be in this location when you install the block. You can choose a different spot or keep the base point in the same area.
4. Setting Block Scale and Rotation
- Following the definition of the base and insertion points, AutoCAD can ask you to provide the block’s scale factor and rotation angle. You can skip this step if you don’t want to scale or rotate the block.
- You can enlarge the block during insertion by adjusting the scale factor. For instance, the block will be put at twice its original size if the scale factor is set to 2.
- When inserting the block, you can specify its orientation using the rotation angle. The block will be rotated by the angle you select, expressed in degrees.
5. Assigning a Name to the Block
- Finally, you’ll be asked to give the block a name. Give the block a distinct and illustrative name because this will be how people will recognize and insert it.
- Pick a name that accurately describes the block’s content or goal. In the block name, stay away from using spaces or special characters.
Inserting Block in AutoCAD
You can reuse pre-defined entities by inserting blocks in AutoCAD, which improves drawing consistency and speed. Blocks can be added using various techniques, such as the INSERT command, DesignCenter, and Tool Palettes.
Here is an explanation of each technique:
1. Using the INSERT Command
Using the INSERT command is the simplest approach to insert a block. Take these actions.
- In the command line, type “INSERT” or go to the “Home” tab in the “Block” panel to access the “Insert” command.
- Browse the drawing file containing the block you wish to place, then pick it in the “Insert dialogue box.”
- You can specify the block’s insertion place by clicking in the drawing area or entering the exact coordinates in the command line.
- Set the block’s rotation angle and scale factor if desired. The block can be scaled uniformly or in relation to the X, Y, or Z axes.
2. Exploring the DesignCenter and Tool Palettes
More sophisticated techniques for inserting blocks are available in the DesignCenter and Tool Palettes.
- DesignCenter: Open the DesignCenter by typing “ADCENTER” in the command line or by selecting it from the “Home” tab’s “DesignCenter” button. Please navigate to the block’s drawing file in the DesignCenter and drag it into the drawing area to insert it.
- Tool Palettes: Blocks and other drawing elements can be stored and accessed via the tool palettes, which offer a customized interface. Right-click the palette area, choose “New Palette,” then drag the block from the design into the brand-new palette to add it to the tool palettes. The block can then be added by selecting it from the Tool Palettes by clicking on its icon.
3. Specifying Insertion Point and Scale
- You’ll be asked to enter the insertion location when inserting a block. This point establishes the location of the block’s base point in the drawing. You can choose a point by clicking in the drawing area or typing coordinates on the command line.
- When placing the block, you may decide whether to keep the block’s original scale or apply a custom scale factor. You can enlarge the block during insertion by adjusting the scale factor. For instance, a scale factor of 1 keeps the size the same, a scale factor of 2 doubles the size, and a scale factor of 0.5 reduces the size.
Editing Block in AutoCAD
When you edit a block in AutoCAD, you can alter the definition of the block as a whole or change its constituent parts. To edit block components, save your changes, and update the block definition for later usage, launch the Block Editor.
Here is a thorough procedure description:
1. Opening Block Editor (BEDIT Command)
It would be best if you first launched the Block Editor to alter a block. There are several methods to get to it:
- In the command line, type “BEDIT” and hit Enter.
- In the drawing area, right-click a block and choose “Block Editor” from the context menu.
- To access the Block Editor, double-click a block.
2. Modifying Block Components
- When you enter the Block Editor, the drawing area transforms into a unique editing space where you can modify the block’s elements.
- Now, you may choose and change specific objects within the block. Replace current objects with new ones as necessary, and move, rotate, resize, or stretch individual elements. The block components can also be edited using other normal AutoCAD editing tools.
- Remember that any adjustments you make will only apply to the block instance now selected in the Block Editor and not to any instances of that block that may exist in the drawing.
3. Saving and Updating Blocks
When you’re done making changes to the block, save your work and update the block definition so that the changes are applied to every block instance in the drawing.
One of the following options is available for saving changes made inside the Block Editor:
- In the command line, type “SAVE” and hit Enter.
- Utilize the “Save Block Definition” button on the Ribbon of the Block Editor.
- You’ll be prompted to update the current block definition after saving. To update the block with your modifications, select “Yes”.
- Pick “No” and give the block a new name if you wish to create a new block with the updated components. With the adjustments you made, a new block will be created.
Types of Blocks in AutoCAD
Below are the different types:
1. Static Blocks
Regular blocks, commonly called static blocks, are simple building blocks devoid of unique characteristics or dynamic behavior. They are made up of a grouping of one or more objects joined together to form a single thing.
Usage:
The main purpose of static blocks is to produce reusable and constant pieces for use throughout a drawing. For instance, you may make a static block for a typical door, window, or other regularly used object in your design.
2. Dynamic Blocks
Specialized forms of blocks known as “dynamic blocks” provide dynamic and interactive capabilities. By utilizing grips or custom properties, you can change the block’s appearance, size, and behavior thanks to the parameters and actions they include.
Usage:
Dynamic blocks are beneficial when you must design adaptable components that can be quickly changed to fit different configurations. For example, you could design a dynamic block for a door that allows for interactive size, flipping, and swing direction changes.
3. Anonymous Blocks
Anonymous blocks are transient and lack a name. They are produced when the BLOCK command is used without a block name.
Usage:
Typically, anonymous blocks insert grouped objects quickly and only once. After saving and closing the drawing, you cannot access or use these blocks. They are frequently helpful for impromptu item placements within drawings.
The best type of block to utilize will rely on the particular specifications of your drawing and will serve various purposes.
Here is a quick breakdown of how they differ:
|
Block Type |
Reusability |
Dynamic Functionality |
| Static Block | It is reusable | No |
| Dynamic Block | It is reusable | Yes |
| Anonymous Block | It is not reusable | No |
Advantages of Using Block in AutoCAD
Blocks in AutoCAD have several benefits that greatly increase drawing productivity, consistency, and manageability.
Here are some of the key advantages:
- Reusability: You can design complicated things or sets of items using blocks once, then reuse them throughout the drawing or even in different drawings. This saves time and effort by removing the need to redraft the same pieces.
- Consistency: Using blocks may ensure that the same components repeatedly show throughout the drawing. Every time a block is modified, all instances are automatically updated, upholding the design’s precision and consistency.
- Simple Editing: Block editing is quick and easy. All occurrences of a block are simultaneously updated when the content of a block is changed. This saves time and lessens the possibility of mistakes while manually editing numerous instances of comparable items.
- Reduced File Size: Blocks do not hold redundant data because they are instances of the exact definition, so save file size. This enhances the overall performance of the AutoCAD drawing and keeps the file size smaller.
- Layer and Attribute Management: When a block is put into a drawing, its layers and attributes can be configured to override the drawing’s default settings. This enables more effective organization and management of intricate drawings with numerous aspects.
- Dynamic Blocks: By enabling the creation of parametric components, dynamic blocks increase versatility. Dynamic control over the appearance and behavior of the block is provided by the ability to modify the size, shape, and configuration of dynamic blocks using grips and custom attributes.
- Library Creation: Blocks make creating libraries of commonly used elements easier, such as fixtures or standardized features. Sharing these libraries among teams, projects, or businesses encourages standardization and streamlines the design process.
- Data Extraction: Attributes, or specific data fields linked to a block, are a feature of blocks. Information like part numbers, descriptions, or quantities may be stored in these characteristics. You can extract attribute data from AutoCAD for use in bills of materials (BOMs) and other types of documentation.
- Isolation and Manipulation: Blocks are simple to isolate from the rest of the drawing, allowing you to concentrate on particular sections or components while editing. Working with intricate designs is more productive while using this isolation option.
How to Use Block Command in AutoCAD?
We can use the block command in this software by following some steps and making good use of it, but before starting, we should get introduced to the working screen of this software to understand this command throughout this article better.
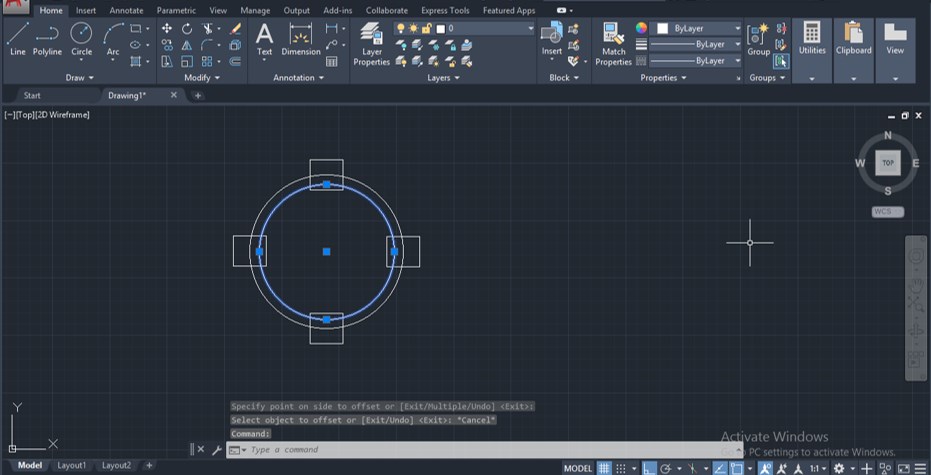
Step 1: At the top of the working screen, there is a ribbon that has a number of tabs such as Home, view, annotation, insert, and some others; below this, we have a working window in which we can see our current working, below this working window we have some navigation commands for handling our drawing work in this software.

Step 2: Now, let us understand the purpose of the block command. This is a simple drawing; here in this drawing, we have different shapes made by other commands, and when you select it, you can see only one object is selected by your click. If you want to group these shapes in one block, you can use the block command of this software.
Step 3: So now, let us analyze the block command. For the block command, you can press the B button from the keyboard and then press the enter button on the keyboard.
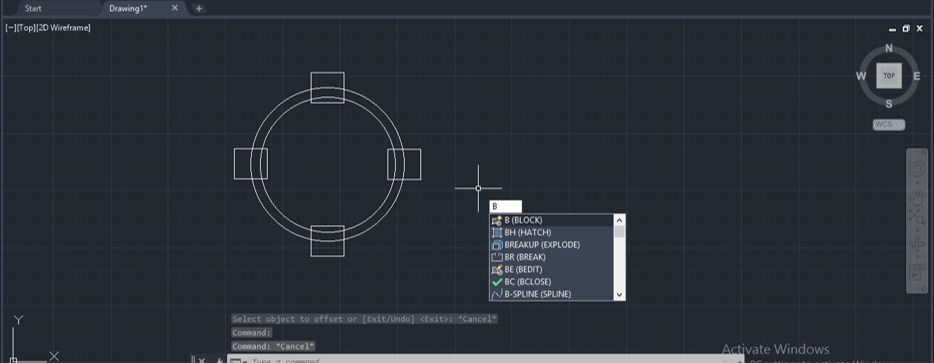
Step 4: Or you can click on this Create button of this block menu of the Home tab of this software.

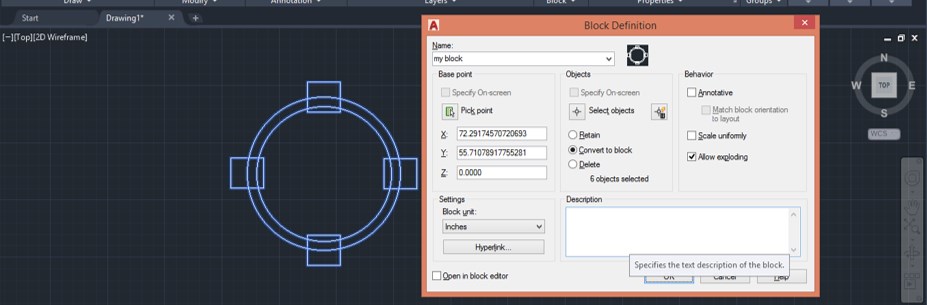
Step 5: Once you make click on the block command, a Block Definition box will open like this. We have different types of parameters of block commands in this box. Here you can name your block according to you. I will name it My Block.
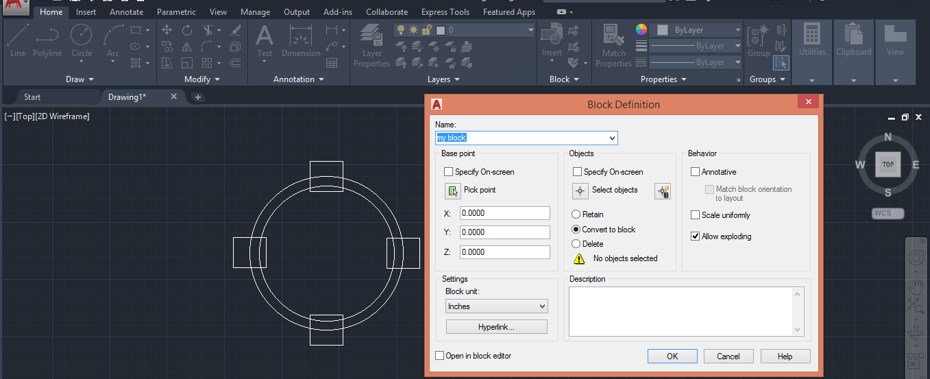
Step 6: Now click on the Pick Point option of this box to select the point on your object that you want to make the selection point of your block.
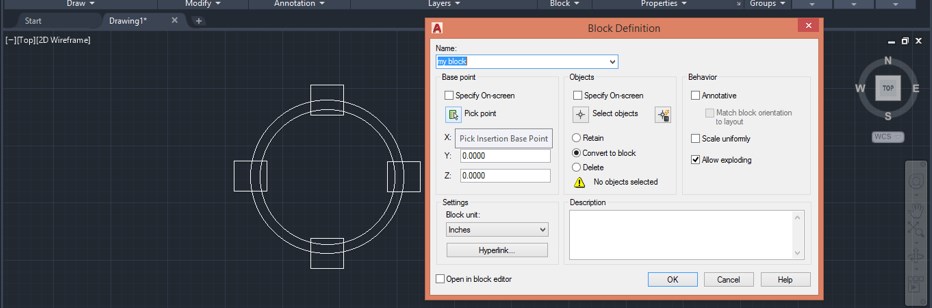
Step 7: Now command will ask you to select a point on your shape in which you want to make the selection point of your shape. You can take it inside your block or at the boundary of your block, according to you. I will take it as the center of this block.

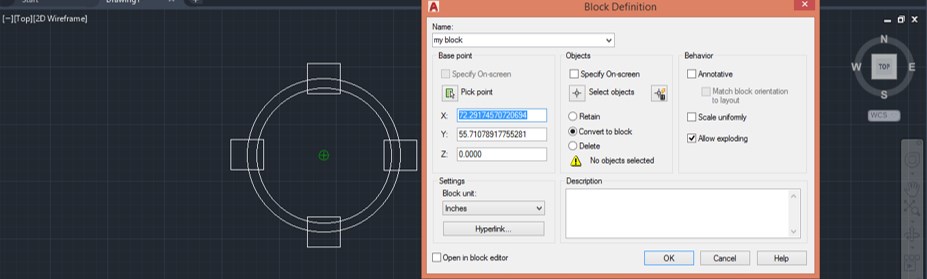
Step 8: Take the x and y values in the pick point box once you choose the point block command. Now press the Ok button on this box.
Step 9: Now, if you have not selected your object before setting the block command parameters, this block command will ask you to choose an object at this step by showing this message. So click on the Select Objects tab of this message box to select your desired object that you want to make a block with this command, or if you have selected your object earlier, click on the Continue tab of this box.
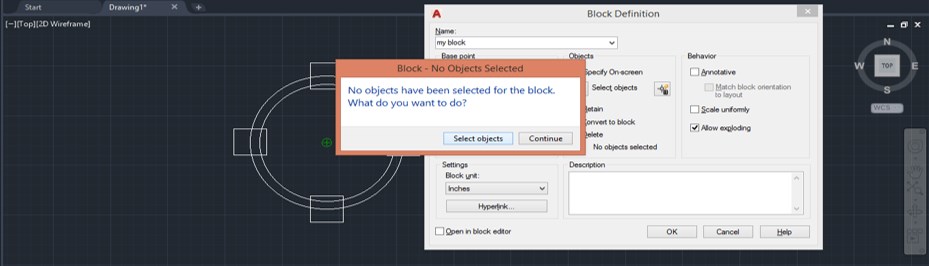
Step 10: I have not selected my object previously, so now I will select the object that wants to make the block.
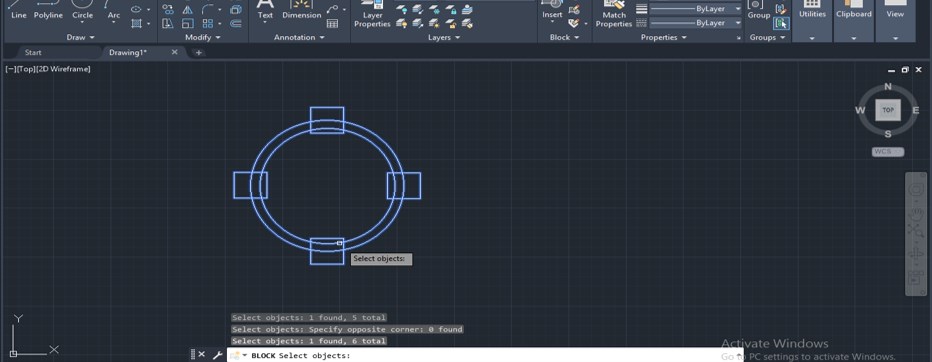
Step 11: And now press enter button on the keyboard after selection. Now block dialog box will select your shape for making it block. Press the Ok button on this box again, and your shape will convert into one block.
Step 12: When you select it, you can see this object has only one selection point.
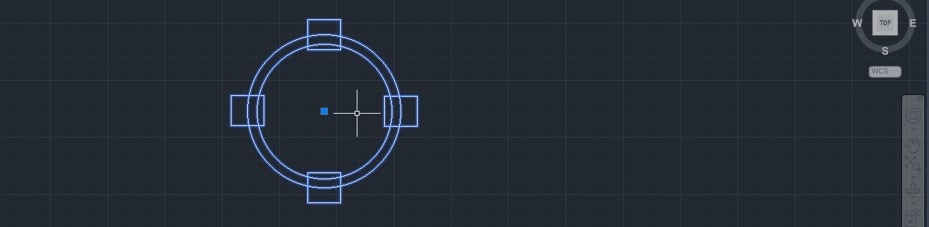
Step 13: Now, if you want to make any changes in this block, you can edit this block from this Block Editor option of the Block menu of the Home tab of this software. So click on it with the mouse button to open the block editor dialog box.

Step 14: Or you can press the BE button from the keyboard and then press the enter button of the keyboard to open the block editor dialog box.

Step 15: The block editor box dialog box will open once you enter. In this block, choose your block from the list if you have several blocks in your drawing that you want to edit by clicking on it, then press the Ok button of this dialog box.
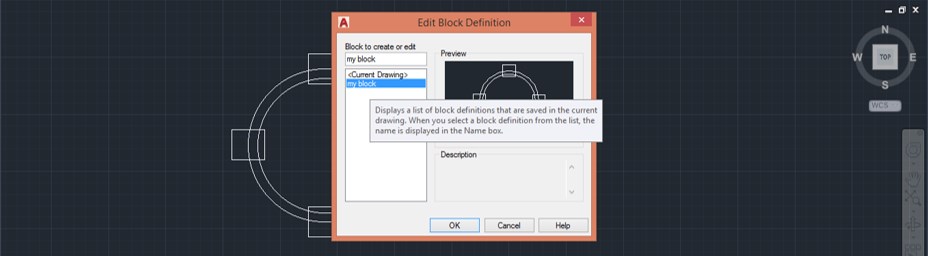
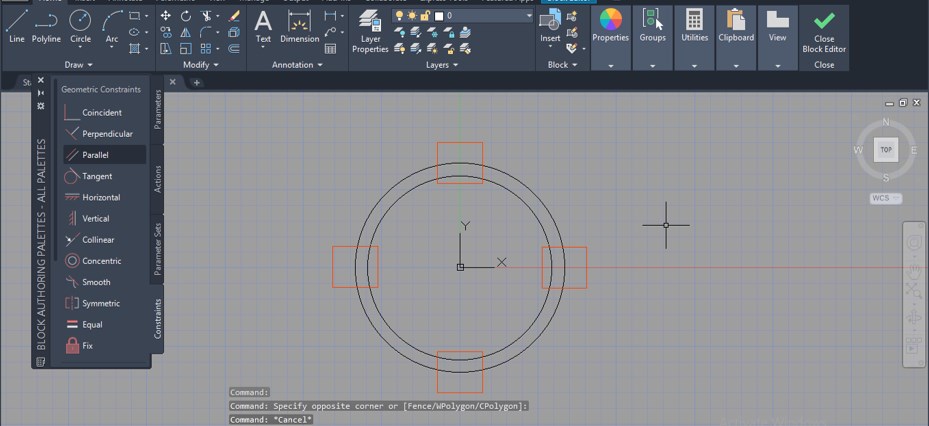
Step 16: Once you click on the Ok button of this dialog box, a Block Editor page will open like this on the working window screen of this software.
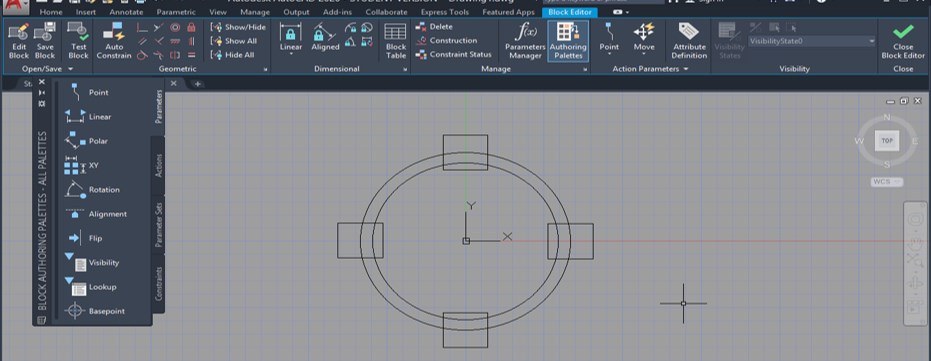
Step 17: Here, you can change part of this block according to your requirement at any point of your work, such as I want to change the color of these squares of this block to red color. So I will select them by clicking on them and changing color by the layer option of the Layer menu of the Home tab.

Step 18: The square of this block will change to a red color like this.
Step 19: You can add more shapes of different parameters in this block by using the other commands of an auto cad. For example, I want to add one more circle in this block, so I will use the offset command and offset value to draw one more circle.
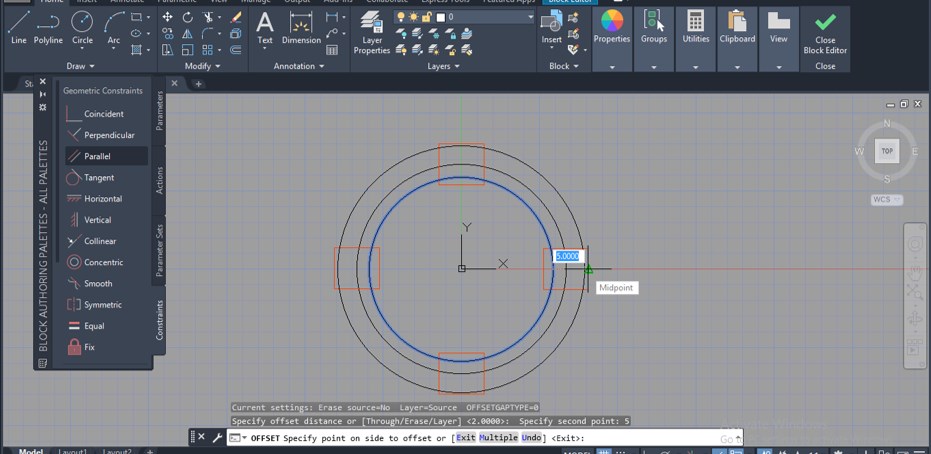
Step 20: Once you are done editing your block according to your requirement, click on the Save Block button of this block Editor menu of the Home tab of this software to save your changes.
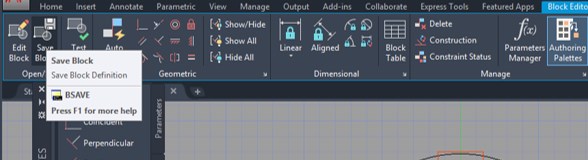
Step 21: To close this box click on the close button of the Block Editor menu of the Home tab of this software.

Step 22: And change made by you come on this block of your drawing like this.

Troubleshooting Block in AutoCAD
In AutoCAD, troubleshooting blocks entails locating and fixing problems that could occur when working with blocks, such as insertion issues, attribute mistakes, or unexpected behavior.
Here are a few typical steps for troubleshooting block-related issues:
1. Block Not Inserting Properly
- Insert Point Verified: Ensure the block’s insertion point is correctly set. Occasionally, a bad insertion point can cause the block to be placed outside of the viewable region of the drawing.
- Verify the Units: Check if the blocks and the drawing units are identical. When inserted, a block made using a different unit of measurement could look out of proportion.
- Explode and Re-insert: Try exploding the block first, then reinserting it afterward. Insertion problems can occasionally occur with complicated blocks or blocks with nested components.
2. Attributes Not Displaying or Incorrect
- Verify Attribute Values: Double-check that the attribute values are entered correctly when entering blocks with attributes. Attributes could not display as intended if the values were incorrect.
- Check Attribute Layer: Check the attribute layer to ensure it is visible and not frozen. If you hide or freeze the attribute layer, the drawing won’t display the attributes.
3. Block is Not Updating
- Use the REGEN Command: Use the REGEN command to rebuild the drawing if the block is not updating after you make modifications. This will update the block instances and refresh the display.
- Check Block Definition: Make sure you are changing the right block definition by checking the block definition. There may occasionally be several block definitions with similar names, which might confuse them.
4. Dynamic Block Grips Not Working
- Verify Dynamic Block Settings: Check the dynamic block’s settings to ensure the desired grips and characteristics are defined. Look for mistakes in the dynamic block settings if the grips are broken or absent.
- Check Dynamic Block Visibility States: Verify the visibility statuses for dynamic blocks because they sometimes don’t display all grips. Check your visibility level to make sure you can see the required grips.
5. Block Library Path Issues
- Check Block Library Paths: If you use block libraries or external block references (XREFs), ensure the file paths are accurate and reachable. The blocks won’t load if there are any missing or invalid routes.
6. Block Nesting Problems
- Verify Nested Blocks: If your block is nested within another block, ensure the other nested blocks are operating properly. Problems with nested blocks can impact the behavior of the main block.
7. Corrupted Block
- Try Recreating the Block: If you suspect that the block might be corrupted, begin anew and recreate it. Then, test the block’s functionality once more.
8. Consult AutoCAD Documentation and Forums
- Consult the official AutoCAD manuals and online discussion boards if problems continue. Perhaps others have encountered such issues and discovered answers.
Before performing any troubleshooting actions, remember to save a backup of your design so you may return to a prior state if necessary.
Best Practices for Block in AutoCAD
A few best practices while using blocks in AutoCAD can enable a seamless workflow and better drawing management. Some essential block-working best practices are:
1. Keeping Blocks Simple and Efficient
- Keep blocks as straightforward as possible, with only the essential components. Avoid unnecessary details that may not be useful.
- A block should contain fewer objects to enhance drawing efficiency and maintain a manageable file size.
- Consider employing dynamic blocks with parameters and actions when constructing complex blocks that need several variants. Dynamic blocks provide flexibility without over-crowding the library of blocks.
2. Properly Naming Blocks
- When naming your blocks, make sure the names are clear and consistent. Meaningful names make it simpler to quickly determine the block’s purpose and content.
- Block names shouldn’t contain spaces, special characters, or too lengthy names because they can cause problems and confusion.
3. Organizing Block Libraries
- To categorize and group relevant blocks, create organized block libraries. Organizational structures simplify finding specific blocks and maintaining a disciplined workflow.
- Use tool palettes or folders to group and save blocks according to their type or purpose. For instance, make distinct files for mechanical components, electrical symbols, and furnishings.
4. Standardizing Block Attributes
If you utilize attributes in your blocks, ensure the drawing or project adheres to a uniform standard for their formats and values.
Adopting uniform attribute standards facilitates data extraction and reporting processes, including producing bills of materials (BOMs).
5. Back Up Your Block Libraries
Store block libraries in backup copies on a separate storage medium. This guarantees that, in the event of any unanticipated problems or unintentional deletions, you can recover your blocks.
Advanced Techniques of Block in AutoCAD
Advanced techniques for working with blocks in AutoCAD include:
- Dynamic Blocks with Actions and Parameters: To interactively change a block’s size, form, and behavior, create dynamic blocks with your unique properties and actions. While actions allow for dynamic alterations utilizing grips, parameters let you define restrictions and controls.
- Dynamic Blocks with Visibility States: To specify alternative settings for a dynamic block, use visible states. Moving between variations of the same block is simpler when each state can reveal or conceal particular block components.
- Lookup Tables for Dynamic Blocks: Lookup tables can control repeated occurrences of dynamic blocks with predetermined parameter values. Choosing values from the table rather than changing parameters manually makes manipulating blocks simpler.
- Dynamic Blocks with Multiple Rotation States: Create dynamic blocks with different rotation states so you may rotate items depending on precise angles or cycle through preset configurations.
- Dynamic Blocks with Stretch and Scale Actions: Use stretch and scale actions in dynamic blocks to change the size of particular items as the block changes.
- Block Tables and Attributes: Use block tables and attributes to store block versions with varying attribute values. This helps extract attribute information from blocks to create part lists or bills of materials (BOMs).
- Nested Dynamic Blocks: You can create nested dynamic blocks by putting one dynamic block inside another. This makes it possible to create intricate assemblies with moving parts.
Conclusion
In conclusion, AutoCAD blocks provide priceless advantages, including reusability, efficiency, and uniformity. Users may store and inject reusable material by establishing block definitions, which helps them save time and effort. The Block Editor makes simple changes possible without affecting already running instances. Organize blocks with purposeful headings and subheadings to enhance effective content management. Attributes further enhance their usefulness by providing dynamic information. By enabling customized characteristics and interactivity, dynamic blocks improve functionality even further. Collaboration and content exchange are facilitated via external referencing (Xref). Blocks are a crucial tool for AutoCAD users because they enable users to work more productively, maintain high-quality drawings, and work smarter.
FAQs
Q1. Can I redefine a block without losing its attributes?
Ans: You can change a block’s qualities without losing them. AutoCAD will launch the block editor when you use the “REFEDIT” command and choose the block that needs to be changed. After making the necessary adjustments, save the block. All block uses will still set the attributes to their initial values.
Q2. Can I extract a block from a drawing and use it in another drawing?
Ans: You can take a block out of one drawing and save it as a different DWG file to utilize it in other drawings. Select the block with the “WBLOCK” command, then select the name and location for the new DWG file.
Q3. How do I modify a dynamic block’s properties?
Ans: You can double-click on a dynamic block to launch the Block Editor or use the “BEDIT” command to change the properties of the dynamic block. The parameters and actions of the block can be changed inside the Block Editor as necessary.
Recommended Articles
We hope that this EDUCBA information on “Block in AutoCAD” benefited you. You can view EDUCBA’s recommended articles for more information.
