Updated May 19, 2023
Introduction to Autodesk Desktop Connector
Autodesk Desktop Connector can be understood as a desktop service that combines the data management source of Autodesk with our desktop folder as well as file structure for making file management easy. It replicates the data source of files in a connected drive, and with this connected drive, one can manage its files. The best part of it is that if you make any change in the connected drive, then that change automatically updates the data source. Here in this article, I will not only explain the desktop connector to you but also tell you how you can install it on your computer in step by step manner. Before I tell you how you can install it, let us have an overview of it. So let us start our discussion about this topic.
Before we start discussing the installation process of it, let us have a quick overview of the desktop connector. So it becomes easy for you to understand it in a better way.
Autodesk Desktop Connector application
After getting introduced to this application, you have a question in your mind what is its basic requirement to install it.
- So If I tell you about its file size, it is 630 MB and was launched on Nov 07, 2021.
- Autodesk Desktop connector has a Freeware license type so that you can download and install it very easily.
- It has compatibility with different versions of Microsoft Windows, such as Windows 7 (64-bit), 8 (64-bit), and 10 (64-bit).
You can go to the official website of Autodesk and check its updated version so that it works properly if you have installed an older version.
If I talk about how it works so, in Explorer, it creates virtual drives to connect our desktop with the cloud server. It makes the challenging work of file management and sharing easy, which we faced while using the online storage system of the cloud. Autodesk Desktop Connector creates transparency in data management between you can your team member.
Now let us have a discussion about how we can install it on our desktop to start using it.
How to install the Autodesk desktop connector?
Installation of a desktop connector is quite an easy process, and you can do it in just a few steps. These steps are as follows:
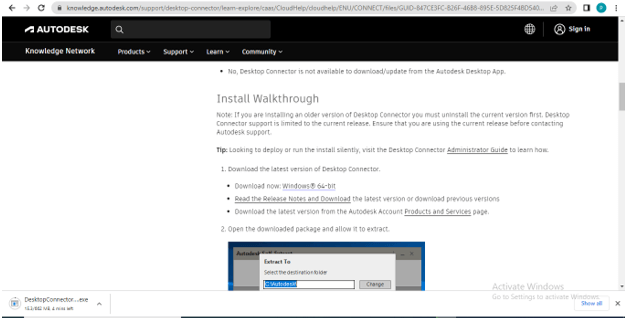
- First of all, go to the official website of Autodesk, or you can search for Autodesk Desktop Connector on the internet browser. Once you reach this page, scroll down it and go to the download link (named Download Now), which is under the Install Walkthrough section, then click on it.
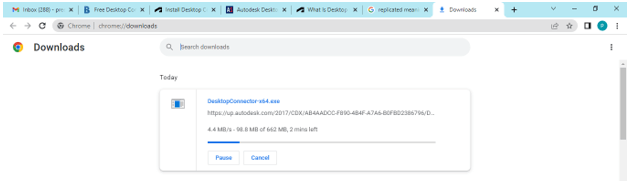
It will start downloading the installation file once you click on the download link like this.
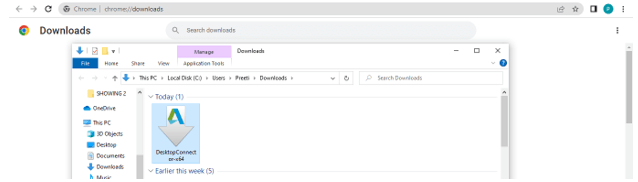
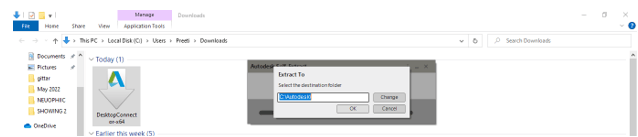
Open the folder in your computer where this installation file of Desktop Connector has been saved. It has been saved in the Download folder on my computer. So make, double-click on its .exe file to start its installation process.
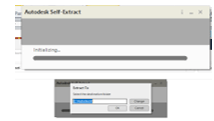
Once you click on it, you will have this ‘Extract To’ dialog box. Here in this folder, you can choose the location where you want to save it on your computer. By default, it saves the Desktop Connector files into the Autodesk folder of the C drive of your computer. For now, I will go with this default location and click on the Ok button in this dialog box.
Once you click on the OK button of this dialog box, it will take a few seconds to initialize the installation process.
Once it initializes the installation file, you will have this dialog box here. This is a Legal agreement point from Autodesk, so read it properly and once you satisfy with it, make a tick mark in the ‘I agree to The Terms of Use box, which is at the bottom left side of this box. Now click on the Next button in this dialog box.

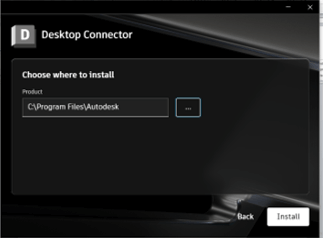
Once you click on the Next button, a new section of this dialog box will open. Here you can choose where you want to save it on your computer. You can choose your desired location by clicking on the three dots of the box which is next to the Product box.
Once you are done with your desired location, click the Install button in this dialog box. I will go with this default location. If you want to change the previously chosen location, you can click on the Back button of this dialog box to go back into the previous step.
Once you click on the Install button, it will start the installation and will again take some time to install. So wait for it.
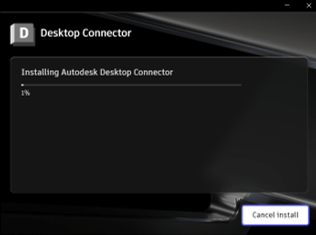
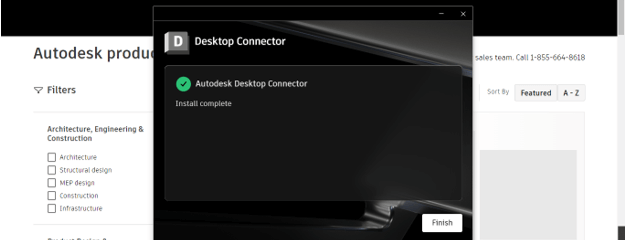
Once it gets completely installed, you will have the message ‘Install Complete’ on the same dialog box. Now you can log in for your desired software to start working with your files of that software and managing them by using Desktop Connector.
Now I will tell you how this desktop connector works to manage files with the connector drive step by step.
Step-by-step Autodesk desktop connector
- After installation, go to Windows Explorer and navigate your computer in it, then locate the icon of the data source there.
- Here you will have the team group’s icon shown, which you have accessed inside the connected drive.
- Now expand your desired team group hub node so that you can view its details and start managing folders and files of your project as per your requirement and the needs of your teammates.
- Now when you make any change, it automatically gets updated in the corresponding hub with which the data source is incorporated.
These are a few steps that are majorly involved in desktop connector working methodology. You can explore it more and more so that you can have more and more command of its file management techniques and processes.
Conclusion
Now I think you have a good understanding of Autodesk Desktop Connector, and it is easy for you to install it on your computer to start working with it. I will suggest you install this once on your computer because it is free to use then start managing your file with a connective drive to analyze how effective it is for the management process.
Recommended Articles
This is a guide to Autodesk Desktop Connector. Here we discuss the Introduction, overviews, How to install Autodesk desktop connector and steps to install. You may also have a look at the following articles to learn more –
