Updated June 19, 2023
Introduction to ASP.NET Hyperlink
We use the ASP.NET HyperLink control to create a hyperlink, which operates as a server-side control. The main purpose of this control is to refer to any web page on the server; it acts in response to the click event. For creating a Hyperlink, we can either use the drag and drop function on Visual Studio IDE or code for hyperlinking. Hyperlink control that generates the link allows users to navigate from one page to another. It contains several properties like text property, imageUrl, navigateUrl, etc.
Syntax:
ASP.NET makes it available with its tag to build it, and ASP.NET Hyperlink is a server-side control. Let’s see the format for the hyperlink control below,
<asp:HyperLinkID="HyperLink_ID" runat="server" Text="Name to be displayed" NavigateUrl="~/PageLink.aspx"></asp:HyperLink>Properties of ASP.NET Hyperlink
The different properties of ASP.NET Hyperlink are explained in the description below.
| Property | Description |
| AccessKey | Access Key is used for setting shortcuts of controls in the keyboard. |
| TabIndex | TabIndex is used for setting the control to the tab order. |
| BackColor | This property is used for setting the background color of the control. |
| BorderColor | This property is used for setting the border color of the control. |
| BorderWidth | We use this property to set the width of the control’s border. |
| Font | This property is used to set the font for the control text. |
| ForeColor | This forecolor is used to set the color of the control text. |
| Text | This property is used to show the text for the control. |
| ToolTip | This property is used to show the text to be displayed when the mouse is over the control. |
| Visible | This property is used to set the visibility of control on the form; it may be true or false. |
| Height | This property is used to set the height of the control. |
| Width | To set the width of the control. |
| NavigateUrl | We use this property to set the navigation URL and move from one page to another. |
| Target | This property is the Target frame for the navigate URL. |
How to Implement ASP.NET Hyperlink?
ASP.NET Hyperlink controls create a form design; the implementation converts the design into actual code. We complete the form design or implementation method after finishing the design task. The objective is to offer the logical order for developing the modules and creating the system. The system implementation in the server and checked for its performance and accuracy. We have successfully implemented the software. An effort works made to satisfy the following goals in the orders specify,
- Minimization of response time.
- Minimization of the amount of memory used.
- Clarity and simplicity of code.
Steps to Access HyperLink Control in ASP.Net:
- Open the Visual Studio –> Create New Website
- To add a Web Form for redirecting pages, Add New Item – > Add Web Form for display hyperlinks and others for navigation to corresponding WebPages.
- Drag and drop the HyperLink control on Web Form from the Toolbox.
- Set properties in your desired way, such as font name, border color, text, and so on, for the Hyperlink Control.
- The important property is to set NavigateUrlProperty for redirecting the destination web page.
Examples of ASP.NET Hyperlink
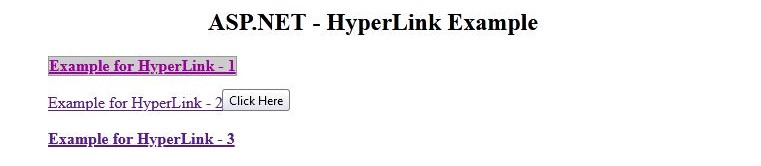
This control ASP.Net Hyperlink is a server-side control. Let’s see the example for HyperLink on ASP.Net; here, in the below implementation, I have designed the webpage “HyperLinkExamples.aspx” In this have created three hyperlinks Example for HyperLink – 1, Example for HyperLink – 2, and Example for HyperLink – 3; for each hyperlink have set the property of NavigateUrl, which defines the link to another webpage.
Example #1
HyperLinkExamples.aspx:
Code:
<%@ Page Language="C#" AutoEventWireup="true" CodeFile="HyperLinkExamples.aspx.cs" Inherits="HyperLinkExamples" %>
<!DOCTYPE html>
<html xmlns="https://www.educba.com/">
<head id="Head1" runat="server">
<title>Demo On HyperLink</title>
</head>
<body>
<form id="form1" runat="server">
<div style="margin-left: 40px">
<h2 style="color:black; margin-left: 160px;">ASP.NET - HyperLink Example</h2>
<asp:HyperLink
ID="HyperLink1"
runat="server"
Text="Example for HyperLink - 1 "
NavigateUrl="~/SignIn.aspx"
></asp:HyperLink>        <br />        <br />
<asp:HyperLink
ID="HyperLink2"
runat="server"
Text="Example for HyperLink - 2"
NavigateUrl="~/ForgotPassword.aspx"
></asp:HyperLink>
<br/>
<br/>
<asp:HyperLink
ID="HyperLink3"
runat="server"
Text="Example for HyperLink - 3"
NavigateUrl="~/HOMEPage.aspx"
></asp:HyperLink>
</div>
</form>
</body>
</html>
Output:

When we click on Link-1, it redirects to the corresponding webpage called “~/SignIn.aspx” Let’s see the hyperlink webpage when clicking on it.
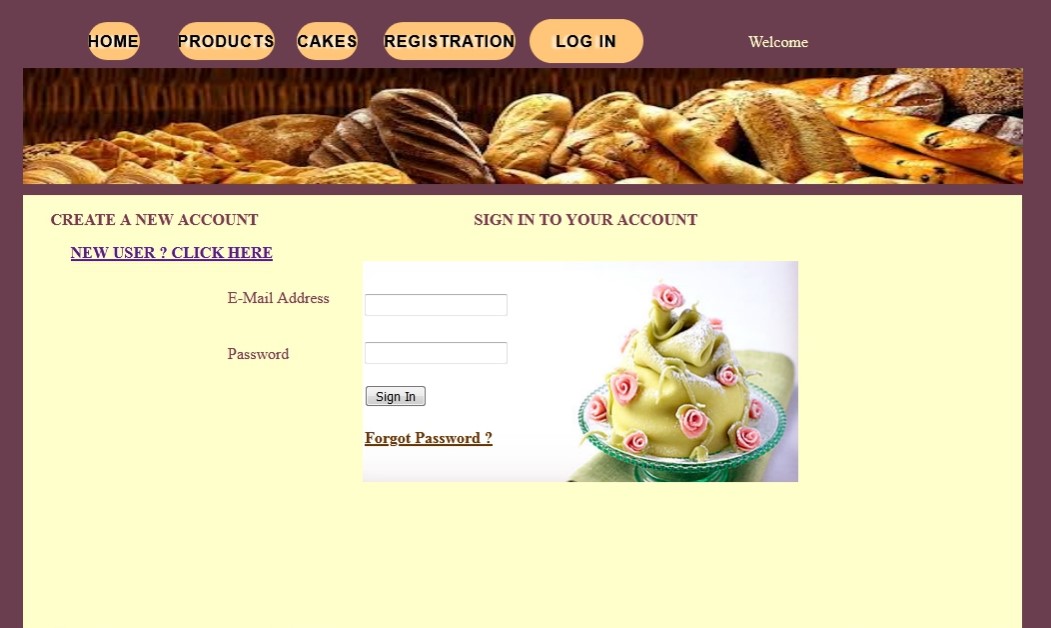
We can create hyperlinks either in link format or set images by clicking on this; it redirects to the path mentioned in the NavigateUrl property. In the above image, you can see the hyperlinks like New User and Forgot Password as links and have designed the image/button hyperlinks like the Home button, Log-In page, etc. Clicking on it redirects you to the corresponding WebPages.
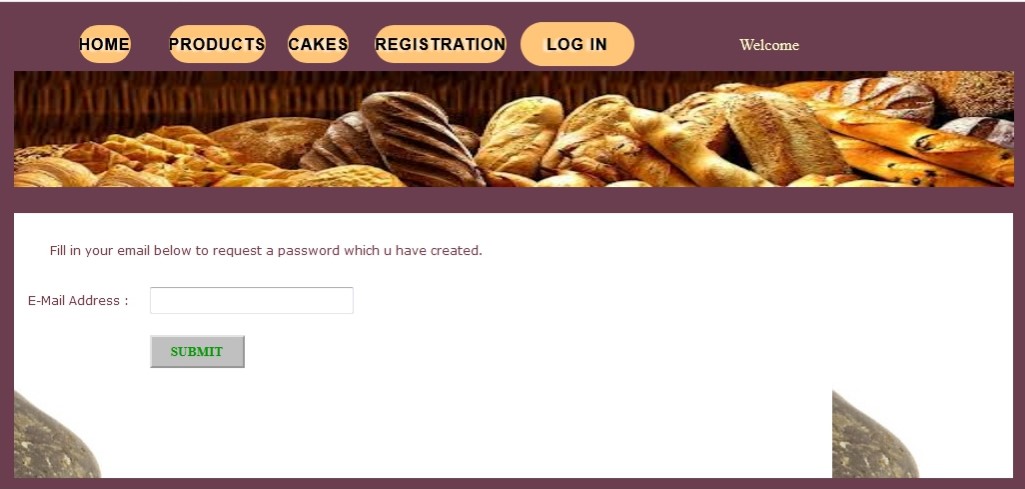
When we click on Link-2, it redirects to the corresponding webpage called “~/ForgotPassword.aspx” Let’s see the hyperlink webpage when clicking on it.
Let’s see a few codes for the above example webpage redirection to the corresponding page linked clicked,
Example #2
ForgotPassword.aspx:
Code:
<asp:Panel ID="Panel2" runat="server" BackColor="#FFFFCC"
BackImageUrl="~/IMG/bgPetal.jpg">  <br/>  <br/>
<asp:Label ID="Label2"
runat="server"
Text="Fill in your email below to request a password which u have created."></asp:Label>
<br/>
<table cellpadding="7" cellspacing="7">
<tr>  <td>
<asp:Label ID="Label1" runat="server" Text="E-Mail Address :"></asp:Label>
</td>
<td>
<asp:TextBox ID="txtEmail" runat="server" Height="21px" Width="198px"></asp:TextBox>
</td>  </tr>  <tr>  <td>  </td>
<td>
<asp:Button ID="btnSubmit" runat="server" BackColor="Silver" Font-Bold="True"
Font-Names="Times New Roman" ForeColor="#009900" Height="33px"
onclick="btnSubmit_Click" Text="SUBMIT" Width="95px" />
</td>  </tr>  <tr>  <td>  </td>
<td>
<asp:Label ID="lbltxt" runat="server"></asp:Label>
</td>
</tr>
</table>
</asp:Panel>
Output:
We can set any properties as we like, let’s see the same form attributes with additional property samples,
In the above form output, the first link contains properties such as ForeColor, BorderColor, ToolTip, etc. The properties are shown below,
<asp:HyperLink
ID="HyperLink1"
runat="server"
Text="Example for HyperLink - 1 "
NavigateUrl="~/SignIn.aspx"
BackColor="#CCCCCC"
BorderColor="#999999"
BorderWidth="1px"
Font-Bold="True"
Font-Names="Times New Roman"
Font-Size="Medium"
ForeColor="#990099"
ToolTip="Click Here">
</asp:HyperLink>
Conclusion
In this article, we learned about the working process of ASP.NET Hyperlink and its properties to use in WebPages. I hope this article has helped you place its control and usage in the WebPages. I hope in this article; you understand everything that has been shared with examples.
Recommended Articles
We hope that this EDUCBA information on “ASP.NET Hyperlink” was beneficial to you. You can view EDUCBA’s recommended articles for more information.

