
Introduction to Trapcode in After Effects
After Effect is video editing software, we can make a number of animation and edit videos according to our requirement; in this software, we have different features that help edit work. Trapcode is also one of them; you can understand it as an effect through which you can apply particle motion on a particular path and can make a professional animation for your project work. Here in this article, we will understand the Trapcode of After Effects software and also learn how to handle parameters of Trapcode for particular animation.
How to Use Trapcode in After Effect?
We will understand Trapcode in a very simple manner but before starting it, let us go through the important sections of the working screen of this software so that we can better understand this software throughout this article.
Step 1: At the top of the working screen, we have a Menu bar and Toolbar for making our work easy in this software; below these ribbons, there are three sections that are Project Panel at the left end to the working screen, at the middle, there is Composition window which shows our current composition, at the right end we have parameters sections for making any composition in this software, at the bottom of the working screen we have Layer section for making changes in layers of composition and at the right end there is Timeline section for handling the parameters of any particular animation of any composition.

Step 2: Now go to the Composition menu of the Menu bar for a new composition at the top of the working screen.

Step 3: Another option through which you can take a new composition is by right-clicking anywhere on the Project panel section and Choosing the ‘New Composition’ option from the drop-down list.

Step 4: You can click on this icon of the Project panel, which is named ‘Create a new Composition’ for a new composition.

Step 5: A new Composition setting box will be open. Make your desired settings here according to you and press the Ok button of this dialog box.

Step 6: Now go to the Layer section of this software, which is at the bottom of the working screen and right-click anywhere in this section. A drop-down list will be open, go to the ‘New’ option and choose the ‘Solid’ option from the new drop-down list.

Step 7: A Solid Setting dialog box will be open. Name this solid layer as ‘Particular’ and press the Ok button of this dialog box for applying the settings.

Step 8: Now go to the Effect menu of the Menu bar. A drop-down list will be open, go to the RG Trapcode option of this list and click on the ‘Particular’ option of the new drop-down list.

Step 9: Trapcode Particular parameters lists will be open in the Effect Control panel, which is next to the Project panel of this software, at the left side of the Composition window.

Step 10: We have a different type of parameter in this section which we can understand after practicing on it. Here I will discuss some of them. There is an Emitter option which is the most important parameter of Trapcode particular feature of After Effects software.

Step 11: Let us have a look at it. Click on the small arrow icon of the Emitter option, a list of its parameters of Emitter will be opened.

Step 12: You can see the scattering of particles by playing it from the keyframe.

Step 13: The first option is Emitter Behavior. There are two main options that are ‘Continuous’; it will emit particle continuously like this.

Step 14: And second is Explode it will emit particle like this.

Step 15: You can adjust the number of particles which will emit per second. When you increase the value of this option number of a particle will increase, and if you decrease, the number of particles will be decreased.

Step 16: The type of scattering of particles will depend on this option which is Emitter Type. You can choose anyone from this list. I will explain to you one of them as an example of Trapcode Particular.

Step 17: So let us understand Trapcode with an example. Make right-click on the Layer section. A drop list will be open, go to the ‘New’ option and choose the ‘Lights’ option from the new drop-down list.

Step 18: A light setting dialog box will be open. Name this layer as ‘Emitter’ for using light Emitter and press the Ok button of this dialog box.

Step 19: Light ranger will be generated on the composition screen. You can adjust the size by choosing the size percentage from this list.

Step 20: Now, choose the ‘Light’ option in Emitter Type from the parameters of the Trapcode Particular option.

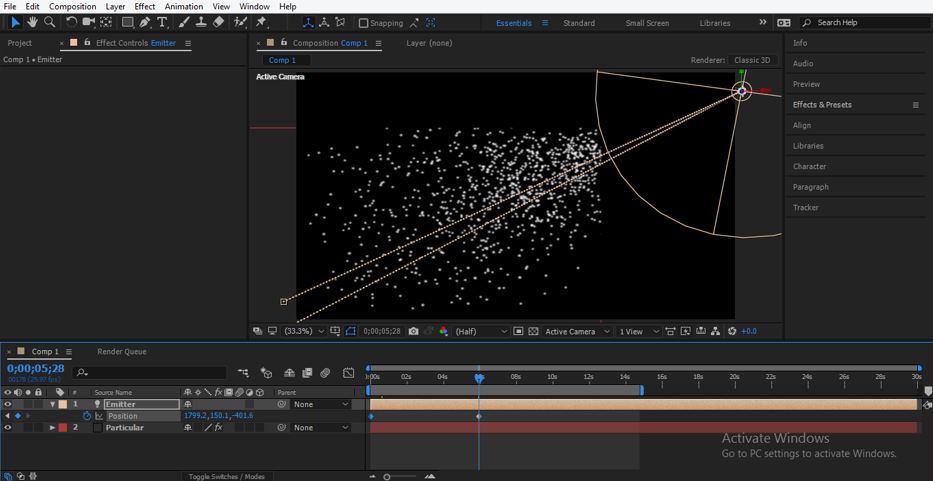
Step 21: Now, place the play head some frame forward in the timeline section so that we can see the particles.

Step 22: Now click on the Emitter layer in the layer section of this software and press the P button from the keyboard for the position property of Emitter. We will animate the position of the emitter.

Step 23: Now, place the play head of the key frame at the starting point and then place the light ranger at this option by moving it with the help of its moving arrow of X and Y directions. Now add a key in position property of this emitter at this point.

Step 24: Now, place the key frame head a few frames forward in the key frame timeline section and then place light ranger at this option.
Step 25: Now play the animation by pressing the keyboard’s space bar, or you can play it from the Preview tab of the parameter section of this software. Your animation will look like this.

In this way, you can use the Trapcode in After Effect for getting particle scattering effect in your project work.
Conclusion
Now, after this article, you can understand ‘what Trapcode it is in After Effects software’ and can also handle its different type of parameters for getting a different type of result. You can understand all the type of Emitter of Trapcode in this software after practicing on this feature of After Effects software.
Recommended Articles
This is a guide to Trapcode in After Effects. Here we discuss the Introduction and how to create Trapcode in a step by step manner. You may also have a look at the following articles to learn more –
