Updated April 7, 2023
Definition of Spring Boot HTTPS
HTTPS stands for Hypertext transfer protocol secure, this is basically an extension for HTTP protocol and we use this protocol to send the data between a web browser and websites. It is a secure version of HTTP, it uses an encryption mechanism to secure the data transfer over the network. We used it very often like when we have to transmit the sensitive data which consist of password or other confidential credentials, so it helps us to transfer those data with security over the network. If we have an application which requires the original credential from the user those type of application should be protected using the HTTPS protocol, we can make our spring boot application secure by the use of this protocol. but as usual, we have to make a few configurations and install some certificates to make it work properly inside our application. In the coming section, we will see how we can make these configurations to secure our application, step by step to be able to understand it properly for beginners.
Syntax:
There is no such syntax for HTTPS because it is a mechanism to secure our data over the network. Let’s take a closer look at the syntax for configuring the HTTPS see below;
server. ssl.key-store= path to certificate
server.ssl.key-store-password= password
server.ssl.keyStoreType= type of keyStoreType
As you can see in the above line of code, we have made some changes to the application file with properties related to SSL in our project. We will discuss more this in detail in the coming section of the tutorial. Let’s take a closer look at the practice syntax for this see below;
e.g.:
server. ssl.key-store=classpath:path
server.ssl.key-store-password=abcd
server.ssl.keyStoreType=Type
How Spring boot HTTPS works?
In this section, we will see how it works internally, to secure our application, as we already know that it is used to make secure communication between two parties by using the encryption mechanism it has. In the case of SSL, it generates and HTTPS it generates an SSL certificate that contains the public and the private key, and other information which is needed to make it secure like owner details, etc. Now let’s have a detailed look at the internal working of HTTPS in general and also in spring boot see below;
Now we will see how HTTPs works internally to secure the transfer of data over the network lets have a closer look at it.
HTTPS uses the encryption mechanism or protocol we can say to secure the communication, this protocol is known as TLS, which stands for Transport Layer Security. This protocol uses a key to transfer data among the two parties and hence encrypt the communication among them. Below we have the following type of key which are described as follows;
1) public key: This type of key is public means available to everyone who wants to interact with the server in a secure way. We encrypt some information by using the public key and that information can only be decrypted by using the private key at another end.
2) private key: This type of key is not at all public to everyone because it is controlled by the owner itself. This key we kept on the server to decrypt the public key information.
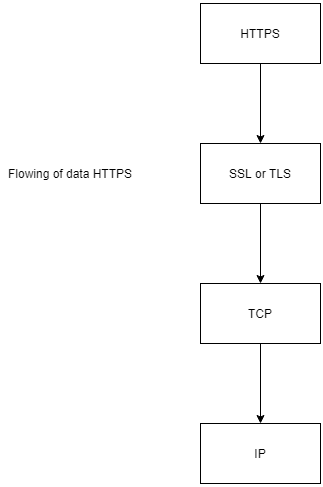
Now we will see one basic flow for HTTP and HTTPS and underrated it step by step let’s get started,
1) HTTPS is a secure layer between the HTTP and the TCP, and this layer is nothing but the TLS which stands for Transport Layer socket, HTTPS runs on port 443.
2) If we talk about HTTP then it does not really use secure communication for data transfer. There is no layer like TLS in between.
Follow the below flow chart for better understanding;
In the spring boot application, we will now make the HTTP URL to HTTPS by using the certificates we will generate let’s understand them one by one using the below steps;
1) First step is to create the spring boot project, go to spring unitizer to create it, and also we will have to fill in the required details to generate the project properly. Click generate and import it inside the editor you have.
URL: https://start.spring.io/
2) Add the web dependency as well, do not forget to add this while creating the project, for reference please see the below code, and add this inside the build file of your project see below;
e.g.:
<dependency>
<groupId>org.springframework.boot</groupId>
<artifactId>spring-boot-starter-web</artifactId>
</dependency>
3) Now in this step we will create the certificate for our project, just open the command prompt and type in the below command to get the certificate for your project. have used the file name as ‘educba’ here you can change it to your organization name, for reference see the below output and command to get started with it,
e.g :
keytool -genkeypair -keyalg RSA -keysize 2048 -storetype PKCS12 -keystore educba.p12 -validity 365Output:
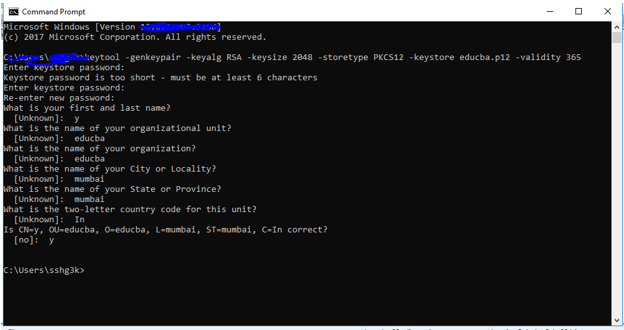
You have to mention the password here and all other necessary details it will ask you to enter.
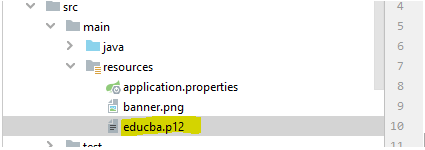
4) Now go to the certificate path where you have generated it, and copy-paste it to the classpath of your project. For reference see the below screenshot attached;
Output:
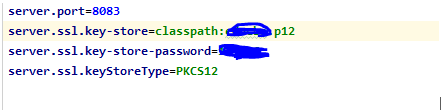
5) After making all these changes now we have to tell spring about the HTTPS certificate that we have generated for your application, we will do this by mentioning the details inside the application.properties file we have, let’s get started with the configuration part see below;
e.g. :
server.port=8083
server.ssl.key-store=classpath:filananem.p12
server. ssl.key-store-password= your_password
server.ssl.keyStoreType=PKCS12
Output:
6) Now all the things are done and we do not need to make any configuration change at the main class, it will be like always.
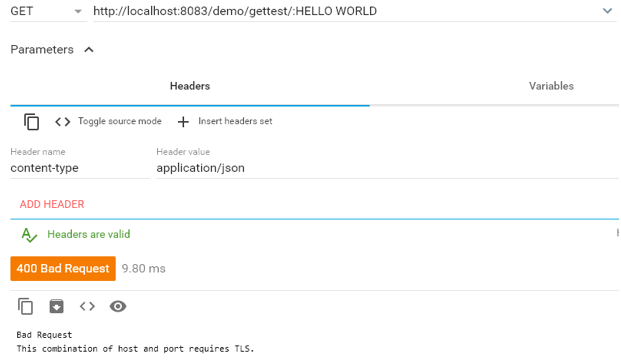
7) run the application and now you will see some logs which will tell it is HTTPS secure now;
Output:

Conclusion
It is very easy to use and configure indie our project, we can create from scratch or we can do it in the existing project as well, less configuration, easy to understand and handle as well.
Recommended Articles
This is a guide to Spring Boot HTTPS. Here we discuss definition, syntax, How Spring boot HTTPS works? example with code implementation. You may also have a look at the following articles to learn more –
