


Most Shopify merchants put considerable effort into getting customers to checkout. Far fewer give the same attention to what happens afterward, even though delivery is one of the few reasons customers are guaranteed to think about their purchases again. Order tracking is more than just a customer service feature. A well-designed tracking page can bring shoppers back to a retailer’s website, provide reassurance during delivery, and create opportunities for additional sales. Ordertracker for Shopify helps merchants improve the post-purchase experience through AI-powered shipment tracking, branded tracking pages, automated email notifications, product recommendations, and shipment analytics.
This guide explains how to install the Ordertracker app on Shopify and configure it to benefit from its AI shipment tracking, from branded tracking pages and notifications to product recommendations and shipment analytics.
What Is Ordertracker and Why Use It on Shopify?
Ordertracker is an international parcel-tracking platform that also provides dedicated tools for online retailers. Its Shopify application connects shipment information with a branded tracking page, automated emails, product recommendations, and delivery analytics.
Shopify already offers basic shipment tracking through its order status pages and notifications. Ordertracker extends that experience by giving merchants a dedicated tracking page on their own storefront, with additional control over presentation and customer engagement.
For a retailer shipping across several countries, consolidating tracking information from different carriers is particularly useful. Customers no longer need to navigate unfamiliar logistics websites simply to find out whether a package is on its way.
The commercial opportunity matters too. Every return visit to a tracking page is a chance to maintain customer confidence and introduce shoppers to other relevant products.
How to Set Up Ordertracker for Shopify?
Follow these steps to install Ordertracker for Shopify, customize your tracking page, configure automated notifications, and make the most of its shipment management features.
Step 1. Install Ordertracker on Your Shopify Store
Begin by opening the Ordertracker listing in the Shopify App Store.
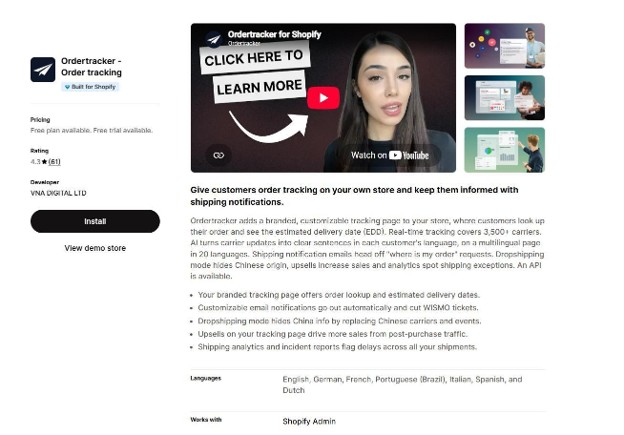
Image Source: Shopify App Store
Click Install, select the Shopify store you want to connect, and review the permissions requested by the application. Once you have authorized the installation, follow the onboarding instructions to access Ordertracker through Shopify Admin. Ordertracker’s App Store listing shows a free plan and a free trial. After installation, the setup wizard guides you through configuring the tracking page and email notifications. You can also access it again anytime through Settings.
The process does not require building a tracking system from scratch or adding a custom shipping integration. The app is designed to work with existing Shopify stores.
Step 2. Set Up the Basics: Language, Color, and more
A tracking page should not look like an unrelated service attached to your store.
Open the Tracking page in the Ordertracker menu. The settings are on the left, and the live preview on the right lets you switch between Mobile and Desktop.
By default, the page inherits your store theme’s font and colors, so you only need to change what does not match your brand.
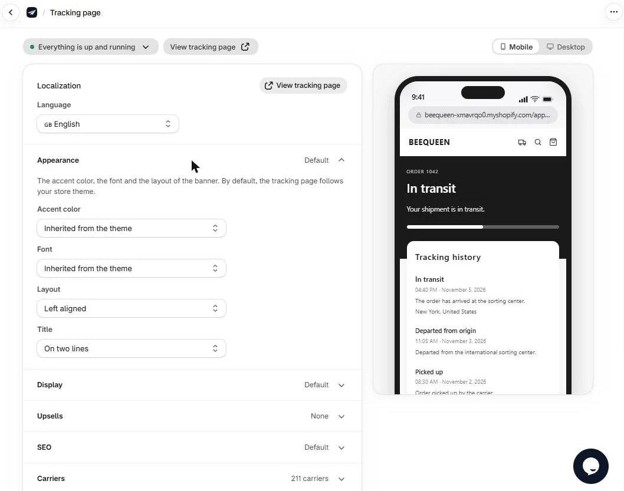
Image Source: Shopify App Store
Start with these settings:
- Language (Localization): the language customers see on the tracking page.
- Accent color and Font (Appearance): both are inherited from your theme by default. Pick your own if your brand differs from your theme.
- Layout and Title (Appearance): control how the banner at the top of the page is aligned and displayed.
- Tracking numbers (Display): hidden by default. Show them if you want customers to see the carrier’s tracking number.
- Carriers: the same tracking number can match several carriers. Edit carriers lets you keep only yours, so customers never see another carrier’s information. Ordertracker recommends changing this only if you know what you are doing.
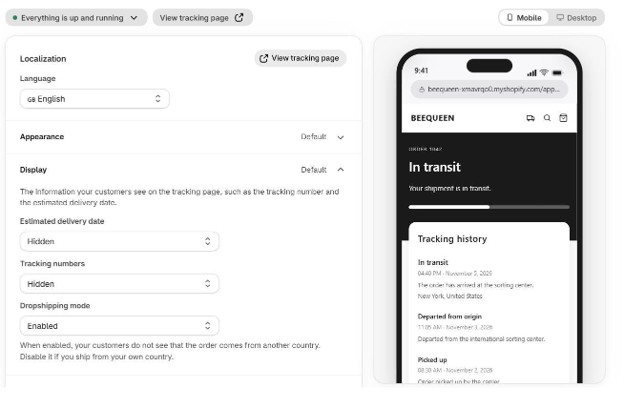
Image Source: Shopify App Store
The Display section also holds Dropshipping mode, covered right below, and Estimated delivery date, covered in Step 5.
Use the preview to check the result. The View tracking page button opens the live page on your store.
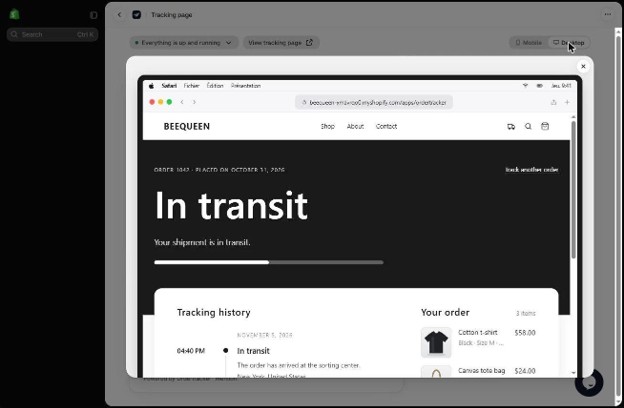
Image Source: Shopify App Store
A consistent design helps preserve the confidence established during checkout. Customers should not feel as though they are dealing with a different business when they want delivery information.
Optionally, use Dropshipping Mode If You Ship from Abroad.
Dropshipping merchants face an additional challenge. Orders can travel through several countries and logistics providers, sometimes displaying unfamiliar carrier names or poorly translated shipping events. Imagine a customer purchasing from a carefully branded online store, then receiving a tracking link filled with confusing international logistics references. That disconnect can undermine confidence in the retailer.
Ordertracker includes a dropshipping-friendly tracking experience designed to simplify these details. This is Dropshipping mode, a setting under Tracking page > Display. When it is enabled, customers do not see that the order comes from another country. Make sure it is enabled if you ship from abroad, and disable it if you ship from your own country.
Chinese carrier references, origin details, and certain tracking-history information are filtered or translated for the customer-facing page. The goal is to present a clearer delivery journey while preserving useful shipment status information.
Merchants should still communicate shipping times and policies accurately. A cleaner tracking interface should make delivery information easier to understand, not hide delays or mislead customers about where products ship from.
Step 3. Monitor Deliveries Through the Dashboard
Once the basics are set up, the dashboard lets you track deliveries from a single place.
It brings together shipment information, delivery performance, and potential shipping problems.
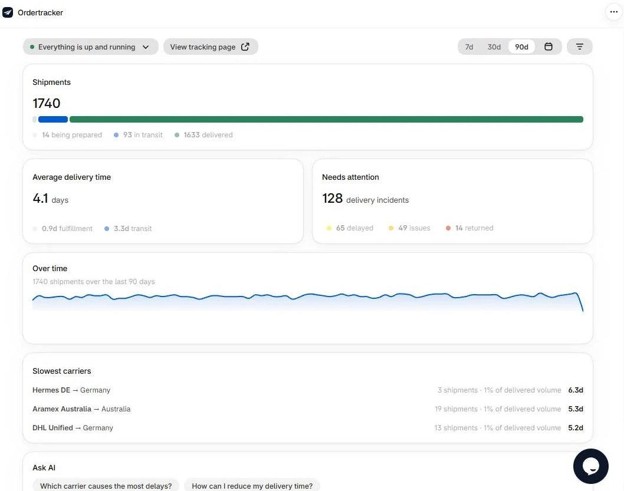
Image Source: Ordertracker
The dashboard shows your Shipments split into Prepared, In Transit, and Delivered; average delivery time; a Needs Attention card for ongoing delivery incidents; and a slowest-carriers ranking.
Step 4. Follow Every Order in Shipments
Open Shipments in the Ordertracker menu. The All, Delays, Issues and Returns tabs sort your orders, the search bar finds a specific one, and the filter menu narrows the list by delivery status, carrier, destination country, delivery incidents or time in transit. Open any shipment to see its tracking history, and use CSV Export to download the list.
Pay particular attention to orders that are delayed, returned, or affected by delivery exceptions. This information allows merchants to do more than answer customer questions. They can identify recurring problems with particular delivery routes or carriers and investigate problematic shipments before complaints accumulate.
For stores handling large order volumes, that visibility can be especially valuable. Ordertracker also provides shipment exports and additional analysis tools, which may help retailers assess shipping performance over time.
Step 5. Finish and Publish the Tracking Page
This is the tracking page customers will use to check their orders. Add it to your store menu and choose whether to display estimated delivery dates. You can configure product recommendations later in Step 7.
Add the Tracking Page to Your Store
One of Ordertracker’s main advantages is that customers can track their purchases directly on the merchant’s website.
The tracking page uses the following address structure.
https://yourstore.com/apps/ordertracker
Open this address after installing the application. The tracking page should inherit the general appearance of your Shopify theme, including its fonts and colors.
Customers can look up an order using their order number and email address, rather than finding a carrier-specific tracking number.
This distinction is important. A customer returning to a familiar website is likely to feel more comfortable than someone redirected to an unrelated delivery service.
Make the Tracking Page Easy to Find
A tracking page is only useful when customers can access it.
In Shopify Admin, open Content > Menus, select your main menu or footer menu, and add a new item named for example, Track My Order. Paste your store’s Ordertracker tracking-page URL into the link field, select the destination, and save the menu.
Check your storefront afterward to confirm that the new link appears. You now have a permanent tracking destination that shoppers can find independently, even if they have misplaced their confirmation email.
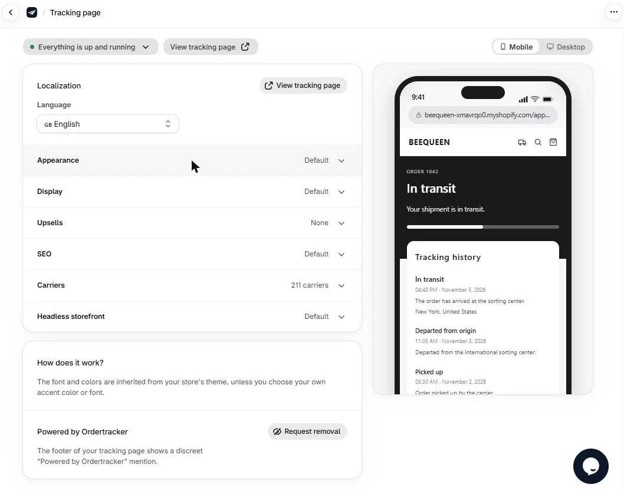
Image Source: Ordertracker
Review Tracking Information and Delivery Estimates
A professional design would not help much if the shipment information is difficult to understand. Ordertracker consolidates available tracking updates from supported carriers, helping shoppers follow deliveries that may involve several logistics providers.
Ordertracker can also show an estimated delivery date, giving customers an indication of when their purchases may arrive. This is hidden by default, so switch it on under Tracking page > Display > Estimated delivery date if you want it on the page.
Review the tracking and carrier-related options in the app, then test how a real shipment is displayed. Pay attention to the wording, the sequence of tracking events, and whether the information is understandable to someone unfamiliar with shipping terminology.
A delivery estimate should be presented as an estimate, not a guarantee. Carrier delays and customs processing can still affect arrival times.
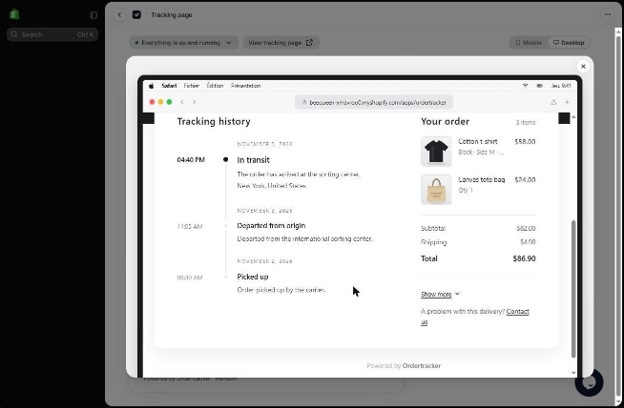
Image Source: Shopify App Store
For merchants, the benefit is fewer unanswered questions. Clear shipment information gives customers somewhere to look before contacting support.
Step 6. Configure Automated Email Notifications
This is one of the most important steps because the tracking page needs a reliable way to reach customers. Ordertracker’s initial tracking email is enabled automatically when the app is installed. According to its documentation, customers receive an email containing their store’s tracking-page link after placing an order, even before the shipment has been dispatched.
Open the Email notifications area in Ordertracker to review the configuration. Under Customer emails, you can turn four messages on or off: Order placed, In transit, Delivery incident, and Delivered. Only Order placed is on by default, so decide which of the others your customers should receive.
You can customize the email’s color and language to keep the message consistent with your brand. Save your changes and inspect the result using the preview and the Send a test email button, which shows exactly what customers will receive.
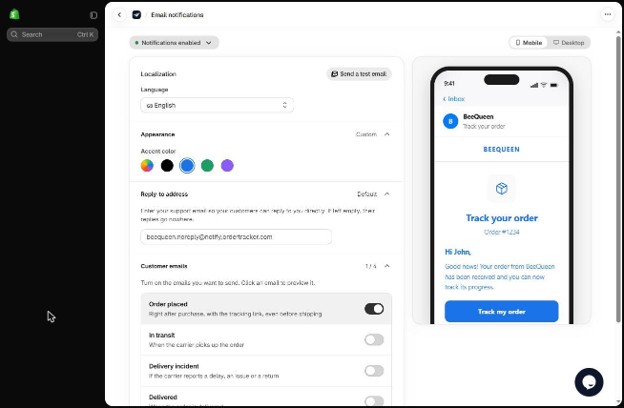
Image Source: Shopify App Store
The email gives customers a direct reason to revisit the store after checkout. It also helps establish where they should look for order information.
Avoid Competing Tracking Emails
Shopify has its own shipping notifications, which may contain links to carrier websites. If customers receive separate messages pointing to different tracking destinations, the experience can become confusing.
Ordertracker recommends reviewing Shopify’s Shipping updated and Local delivery notifications to avoid duplicate messages. These controls are available through Shopify’s notification settings. Ordertracker also flags this under Settings > Shopify notifications, where an Open notification settings button takes you straight there.
Before changing Shopify’s templates, check which messages your customers currently receive and which are being handled by Ordertracker. Merchants who want to retain Shopify’s shipping emails can also review their templates to avoid unnecessarily directing shoppers to external tracking websites. The objective is to make the branded tracking page the customer’s primary destination without accidentally removing important delivery communications.
Step 7. Add Product Recommendations to the Tracking Page
Once the essential tracking experience is working, it is time to explore the feature that can turn returning traffic into additional sales opportunities. Ordertracker supports product upsells directly on the tracking page.
Open the tracking-page settings and find the product recommendation or upsell controls. Review the available options for displaying products, then configure the recommendations using the controls provided in your account. Where product selection is available, prioritize items that complement what customers already buy.
A customer waiting for running shoes, for example, might be interested in socks, sportswear, or running accessories. Recommendations that relate naturally to the original purchase are more useful than an unrelated selection of discounted products.
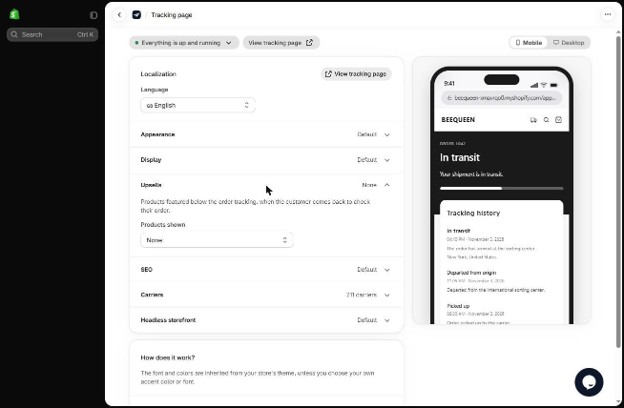
Image Source: Shopify App Store
Check how recommendations appear in the tracking-page preview.
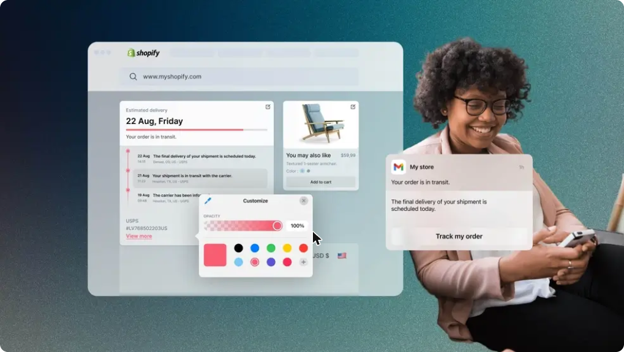
Image Source: Shopify App Store
The tracking details should remain the main focus. Customers visit this page to find their orders, and forcing them to navigate advertisements would defeat the purpose.
Used thoughtfully, however, the page can introduce shoppers to relevant products without spending additional advertising money to attract that visit.
Test the Complete Customer Journey
Before considering the setup finished, experience the tracking process as a customer would. Use a legitimate test order or an existing order for which you have permission to access the tracking details.
First, open the branded tracking page from your store’s navigation menu. Confirm that the page loads correctly and that the order lookup works.
Next, review the shipment information. Check that the tracking updates are understandable and that the displayed details are consistent with the actual delivery.
Then inspect the email experience. Confirm that the tracking link directs customers back to the correct store page and that no unnecessary duplicate notifications are being sent.
Finally, revisit the tracking page to examine product recommendations, branding, and mobile presentation.
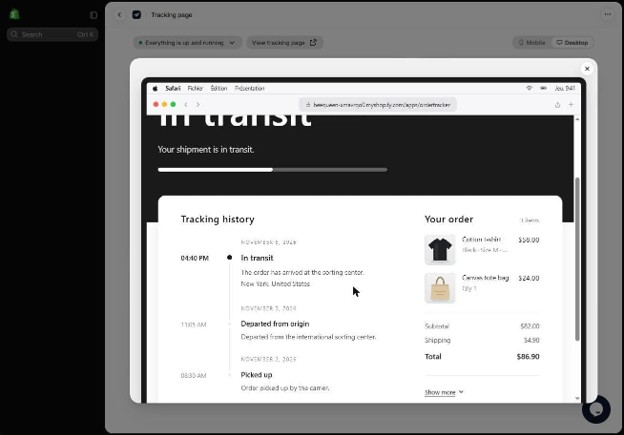
Image Source: Shopify App Store
This final check matters because customers will judge the complete experience, not the individual settings.
Optional Setup for Stores Using DSers
Merchants using DSers for dropshipping may have another tracking link to configure.
DSers supports a custom tracking URL in its shipping confirmation settings. This can be directed to the Ordertracker page instead of an external carrier website.
In DSers, locate the fulfillment email settings and select the custom tracking URL option. Ordertracker’s documentation provides the following URL structure.
https://yourstore.com/apps/ordertracker?trackingNumber=
Replace the domain with your store’s own address, leaving trackingNumber= at the end so DSers can append the shipment’s tracking number.
Save the setting and verify it with an appropriate test. This is particularly useful for merchants who want delivery communications from multiple services to point toward the same branded destination.
Bringing the Entire Delivery Experience Back to Your Store
A Shopify tracking setup should not end with a page that displays a package’s location. With Ordertracker for Shopify configured, customers can access tracking information on the merchant’s own website, receive branded communications, follow deliveries more easily, and discover relevant products while checking their orders.
Meanwhile, retailers gain better visibility over shipping performance and potential delivery problems. None of these features eliminates the challenges of e-commerce logistics. Packages can still be delayed, and customer support will always have a role to play. What changes is the experience surrounding those deliveries.
For merchants who want to offer the kind of consistent order-tracking experience customers expect from established online retailers, Ordertracker provides a practical starting point.
The installation is only the beginning. The real value comes from configuring the app so customers have a reason to return to the store every time they check an order.
Recommended Articles
We hope this comprehensive guide to Ordertracker for Shopify helps you improve shipment tracking, streamline delivery updates, and enhance the post-purchase customer experience. Check out these recommended articles for more insights and strategies to grow your and improve your eCommerce operations.