Updated February 15, 2023
Introduction to Redis WebSocket
Redis websocket protocol offers a unidirectional and bi-directional channel of communication which makes real-time chat applications suitable. The connected users send messages to the application and exchange messages with each other for the setting of peer-to-peer. At the time of connecting redis server websocket connection are created within the associated application instance. The specified websocket enables the broadcast of messages between the users.
Key Takeaways
- Websocket in redis allows bidirectional and unidirectional communication from client to server. Also, it will allow connection from server to client.
- Every web socket in Redis is identified by a URL that includes the ws prefix; we use different locators in WebSockets.
What is Redis WebSocket?
We are using publisher and subscriber for creating websocket in redis. The idea behind the publisher and subscriber is simple. The subscriber is a client which was listening to the changes from a set of data. The client who edits the data set is known as the publisher. When data is edited by publishers, it is heard by all subscribers who have subscribed to the publisher.
We are creating real-time notifications by using websocket. Nowadays it is common to get real-time notifications while navigating web applications. Notifications can come from the chatbot or an alerting system. It defines the notification service at the time of developing a real-time notification application.
Why do we Use Redis WebSocket?
Basically, websocket in redis allows bidirectional communication. In redis, different users are associated with different instances. As a result, they are not able to exchange messages with each other so at the same time we need to use the redis websocket. Redis is nothing but a versatile key that can support multiple data structures. Redis includes the feature of publisher and subscriber capability in that publisher sends the message to the redis channel and the subscriber listens to the messages from this channel.
The redis publisher and subscriber are independent of each other, this is used to solve the problem. The redis publisher and subscriber are independent of each other, this is used to solve the problem. The message is sending the websocket connection is piped by using the redis channel for ensuring that the application is receiving the same. Websocket is basically used to communicate to the redis server, the communication is bidirectional also it is a full duplex between sender and receiver.
How to Create Redis WebSocket?
We are using different uniform locators for distinguishing the channels of unrelated communications.
1. Client Side
Client subscriber for different channel is notified when the specified event occurs. Events are classified into four types: user, group, session, and broadcast notification. The client declares the initialization on the channel that publishes the messages. In general, later is not important for websocket implementation. In the following example, we achieve the same result by applying the XML http request method.
Code:
var web_socket = new WebSocket('web_socket://www.test.com/web_socket/ws?');
web_socket.onopen = function() {
console.log("WS connected"); };
web_socket.onmessage = function(e) {
console.log("Msg received: " + e.data);
};
web_socket.onerror = function(e) {
console.error (e); };
web_socket.onclose = function(e) {
console.log("con closed"); }
function send_message (msg) {
ws.send (msg); }
Output:

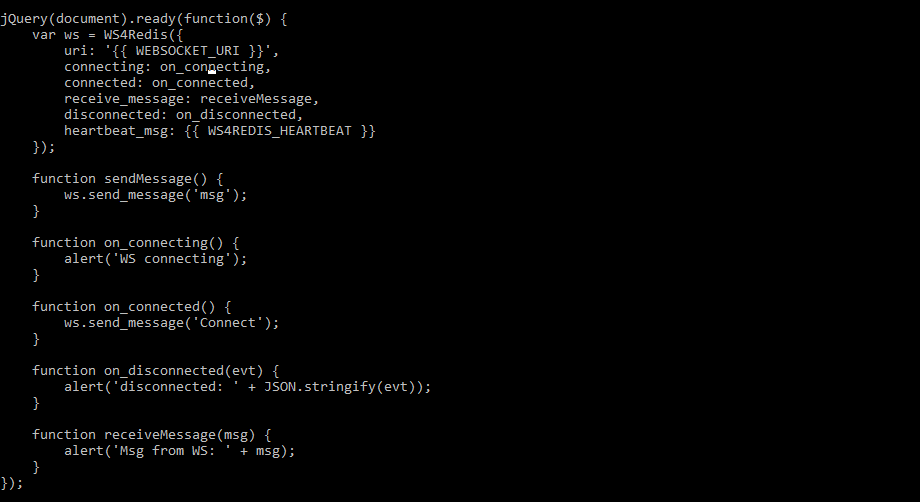
2. Client Javascript which depends on jQuery
At the time of using jquery clients are reconnecting to the websocket. We are accessing websocket as follows.
Code:
jQuery(document).ready(function($) {
var ws = WS4Redis({
uri: '{{ WEBSOCKET_URI }}',
connecting: on_connecting,
connected: on_connected,
receive_message: receiveMessage,
disconnected: on_disconnected,
heartbeat_msg: {{ WS4REDIS_HEARTBEAT }}
});
function sendMessage() {
ws.send_message('msg');
}
function on_connecting() {
alert ('WS connecting');
}
function on_connected() {
ws.send_message('Connect');
}
function on_disconnected(evt) {
alert('disconnected: ' + JSON.stringify(evt));
}
function receiveMessage(msg) {
alert('Msg from WS: ' + msg);
}
});
Output:
3. Server Side
Loop of django is triggered by using http requests of a client except for the cases which were special. Loop of websocket and django passes through the queue of messages.
4. Redis subscriber
In the websocket loop message queue is controlled by using a redis subscribers.
5. Redis publisher
In the django loop message is controlled by using the class name as redis publisher.
6. Subscribe to broadcast notifications
This is the simplest form of notification. We need to subscribe to every websocket by using the broadcast channel. The below example shows how we can subscribe to the broadcast notification as follows.
Code:
red_pub = RedisPublisher(facility='web_socket', broadcast=True)
msg = RedisMessage('Web socket')
red_pub.publish_message(msg)
Output:

7. Subscribe to user notification
We are initializing web notifications by using URLs. The below example shows how we subscribe to the user notification as follows.
Code:
red_pub = RedisPublisher(facility='web_socket', stud=['ABC', 'XYZ'])
msg = RedisMessage('web socket')
red_pub.publish_message(msg)
Output:

8. Subscribe Group Notification
The below example shows how we are subscribing to the group notification as follows.
Code:
red_pub = RedisPublisher(facility='web_socket', grp=['stud'])
red_pub.publish_message('web socket')
Output:

9. Subscribe Session Notification
The below example shows how we are subscribing to the session notification as follows.
Code:
red_pub = RedisPublisher(facility='web_socket', session=['w0nqd'])
red_pub.publish_message('web socket')
red_pub.publish_message(msg)
Output:

10. Publish and broadcast the group, session, and user
This configuration used websocket is triggering from the client side.
Code:
red_pub = RedisPublisher()
fac = 'web_socket'
aud = 'stud'
red_pub.fetch_message (request, fac, aud)
Output:

11. Message Echoing
Some application requires holding the state of the object on the server side which is the copy of the javascript object. That message requires the echoing of the message.
12. Safety Considerations
The default setting allows the client to subscribe to publish on every channel. The below example shows safety considerations as follows.
Code:
def get_allowed_channels(request, channels):
if not request.user.is_authenticated():
raise PermissionDenied('Not allowed')
Output:

Redis WebSocket Server Application
Redis websocket server is the simple script of nodejs which is used to interact with the redis server by using a web socket. To define the redis server application we need to send the necessary web socket request to the payload as follows.
Code:
{
command: 'SET key1 15',
sessionId: this.sessionId,
date: Date.now()
}
Output:

At the time of defining the web socket server application, we need to send the broadcast notifications to the server. The below example shows how we are sending the broadcast notification as follows.
Code:
pub = RedisPublisher(facility='ws', broadcast=True)
msg = RedisMessage('Web socket')
pub.publish_message (msg)
Output:

At the time of creating websocket server application, we need to publish the user and group session as follows.
Code:
pub = RedisPublisher()
fac = 'ws'
aud = 'emp'
pub.fetch_message (request, fac, aud)
Output:

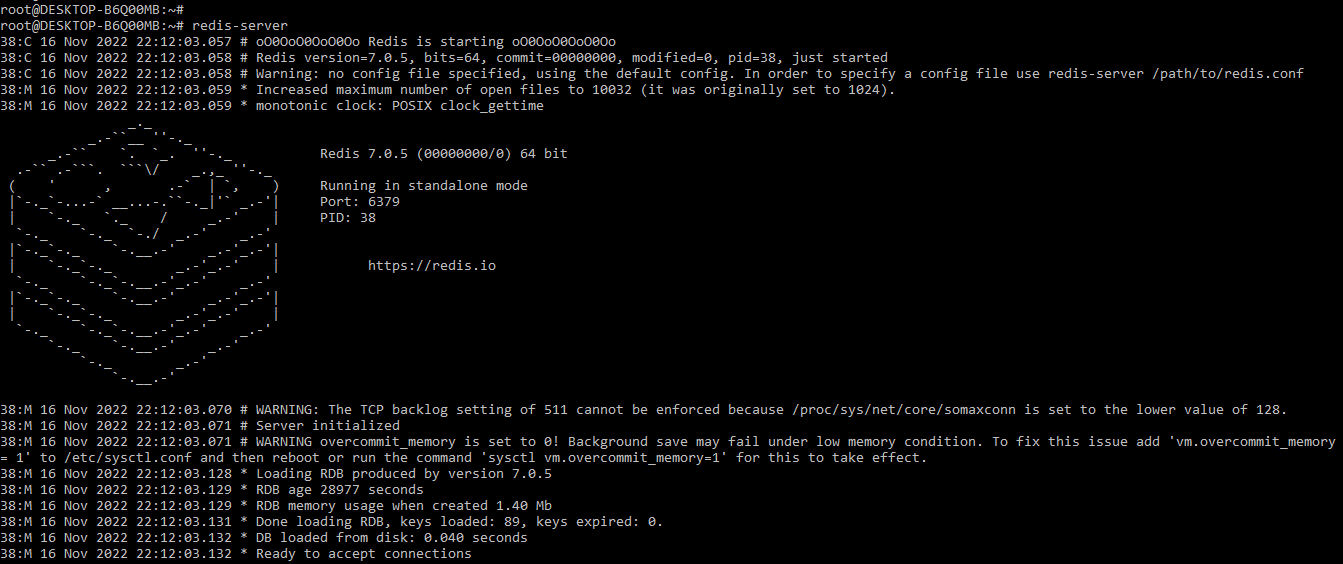
Redis WebSocket API
The websocket API was powered by the architecture of microservices, in that redis is used in a primary database and the simple cache. The websocket API is also used in the communication layer between services that we are using in redis streams. To define the websocket API first we need to start the redis server using the below command.
Code:
# redis-serverOutput:
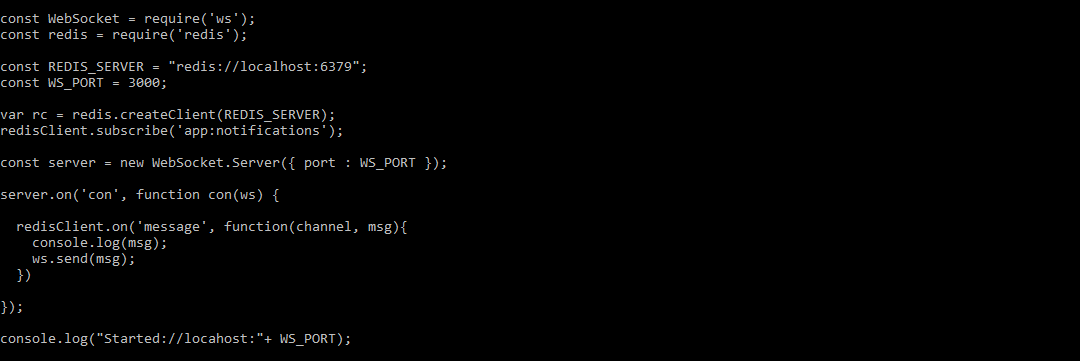
After starting the redis server now in the below example we are defining the websocket API as follows.
Code:
const WebSocket = require('ws');
const redis = require('redis');
const REDIS_SERVER = "redis://localhost:6379";
const WS_PORT = 3000;
var rc = redis.createClient(REDIS_SERVER);
redisClient.subscribe ('app:notifications');
const server = new WebSocket.Server ({ port : WS_PORT });
server.on ('con', function con(ws) {
redisClient.on ('message', function(channel, msg){
console.log(msg);
ws.send(msg);
})
});
console.log ("Started://localhost:"+ WS_PORT);
Output:
Conclusion
In redis, we use publishers and subscribers to create WebSockets. The concept of the publisher and subscriber is simple. The subscriber is a client that has been listening for changes in a set of data. The protocol provides both unidirectional and bidirectional communication channels, making real-time chat applications possible.
Recommended Articles
This is a guide to Redis WebSocket. Here we discuss the introduction, use, steps to create redis WebSocket and server applications. You can also look at the following articles to learn more –
