Updated April 15, 2023

Introduction to React Portals
Many time when we are rendering any child components on any main components then it happens that child component gets overflow on the main component, due to which the layout of the application gets disturbed, so to deal with such type of situations we can use the concept of the portal. it allows us to insert directly a child component inside another show that it will stick to that component and will not get overflow. we can use the ReacDOM.createPortal (the child, Our container will be here), with this we will be able to handle overflow type of disturbance in the rendering of the components.
Syntax:
We can see the simple syntax below where we are passing the child and the container. Here We have passed two attributes to the ReacDOM.createPortal function out of which first is the renderable child component. We can create a react Portal with the help of the below syntax.
ReacDOM.createPortal (the Child goes here, the container goes here)How do Portals Work in React?
Before going into a deeper analysis of the working of the portal we need to understand in which situations we need to use the concept of the portal. You have seen many times an overflow happens while displaying the component, it happens because the child components may not be inside the actual node of the component. with the help of the portal, we can directly insert the child component inside another component and it will handle the overflow condition. We pass the two attributes at the time of the creation of the portal, out of which the first is the child and second is the container. Here the first attribute which child is any renderable components (renderable means it can be rendered and can be visible to the end-users )
Examples of React Portals
Below we have written an example, this example contains three sections: the first section is the HTML section, the second is the JavaScript section and 3rd section is the CSS sections. let us understand each section for the implementation of the portal concept in the react js. In case if we want to run the below example we can create an HTML file and we can put html css and javascript all together with required dependency and we can run the examples or we can use some online react compilers and we can execute the below examples.
Example #1 – Html contents
Below is the HTML section, in this we have taken two div tags in which one is for the main component and another one is for displaying the popups with some message.
<!--Div for showing main component -->
<div id="example"></div>
<!--Div for popup showing -->
<div id="popup"></div>
Example #2 – Javascriptcontents
Below we have written the code for the react javascript, here we have written two components one component is for displaying the main component and another is used for displaying the popups. On the main component there will be a button, on clicking the button the status of the display will change from false to true and a popup will be visible and once we click to close on the open popups the status will again change to the false and the pop-ups will not be visible. We have initialized the display status for thee pop-ups as the false.
Example #3 – First components, used for the popups
//Here we are creating a component which will display in the form of the popups and we can also include some text messages on this model
class Pop extends React.Component {
constructor(props) {
super(props)
//Creating or capturing details of the div element
this.element = document.createElement('div')
}
//This function called automatically after rendering of the components
componentDidMount() {
//Appending of the element to the popup model
document.getElementById('popup').appendChild(this.element)
}
//This function unmount the displayed popups and this also et automatically called
componentWillUnmount() {
//removing the element popups from the appended previously
document.getElementById('popup').removeChild(this.element)
}
render() {
//Creating a portal for handling our cases
return ReactDOM.createPortal(
//Taking child and element
this.props.children,
this.element
)
}
}
The main component and second component or default components, this component contains the child component of pop-ups.
class Portalexample extends React.Component {
constructor(props) {
super(props)
//Initializing the model as the false which means the popups will be closed at the starting time and later according to the operations the value will be either true or false.
this.state = {showhideModel: false}
this.manageShowHide = this.manageShowHide.bind(this)
this.manageHide = this.manageHide.bind(this)
}
//Changing of the true and false of the show hide will be managed in this function and it will be called when clicked the button .
manageShowHide() {
this.setState({showhideModel: true})
}
manageHide() {
this.setState({showhideModel: false})
}
render() {
//Show and hide will be handles here on clicking the button
constshowpopups = this.state.showhideModel ? (
<Pop>
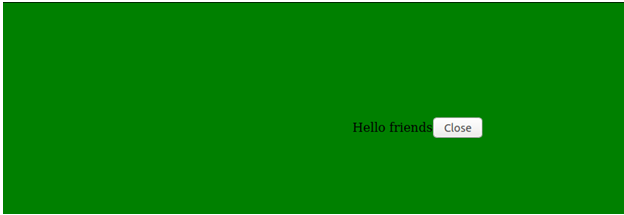
<div>
Hello friends <button onClick={this.manageHide}>Close</button>
</div>
</Pop>
) : ''
return (
<div>
The portal example <button onClick={this.manageShowHide}>Display Model</button>
{showpopups}
</div>
)
}
}
//Attaching the component with the div of html which we have created
ReactDOM.render(<Portalexample />, document.getElementById('example'))Example #4 – CSS Contents
Below is the css code for designing the popup which we will open on the clicking on the button of the main components.
#popup {
position: fixed;
z-index: 997;
}
/* popup designing with css is goes here */
#popup div {
background-color: green;
/*  Defining the height of the popups */
height: 99%;
/*  Defining the position of the popups */
position: fixed;
top: 0;
/*  Defining the display of the popups */
display: flex;
align-items: center;
left: 0;
/*  Defining the width of the popups *
width: 99%;
justify-content: center;
}
Images Explanation
In the below we have given two images of the screen out of them the first image is for the main components and the second image of the screen for the pop-up. The second image will appears when the display model button will be clicked and on clicking the close of the second image again the first image of the screen will appear.

Recommended Articles
This is a guide to React Portals. Here we also discuss the introduction, syntax, and working of react portals along with different examples and code implementation. You may also have a look at the following articles to learn more –

