Introduction to React Login Form
In this article, we will see how you can design login forms using react. Also, we will see some examples showing how to create login forms in react.
Syntax:
Here is a basic syntax is given below:
class TestLoginForm extends React.Component {
constructor(props) {
super(props);
// handle initialization activities
}
handleChangeEvents(event) {
//handle change events
}
handleSubmitevents(event) {
// handle submit events
}
handlePasswordChange(event){
//handle password change events
}
render() {
return (
<div className=" TestLoginForm ">
<form onSubmit={this.handleSubmitevents}>
{
//handle error condition
}
<label>User Name</label>
<input type="text" data-test="username" value={this.state.username} onChange={this.handleChangeEvents} />
<label>Password</label>
<input type="password" data-test="password" value={this.state.password} onChange={this. handlePasswordChange } />
<input type="submit" value="Log In" data-test="submit" />
</form>
);
}
}
The above syntax shows how a form is created in react. It will require creating a class extending React. The component and render method will have a form tag in it. As we can see render contains form tag within which we have a label for showing text followed by input type tag similar to HTML. Here we have specified submit events and change events on button and text respectively.
How to Create a Login Form in React?
Let us consider a basic form having username and password fields along with submitting button. Here is a code snippet showing how a form is created:
Code:
export default function Login(props) {
const [username, setUsername] = useState("");
const [password, setPassword] = useState("");
function performValidation() {
return username.length > 0 && password.length > 0;
}
function handleSubmit(event) {
event.preventDefault();
}
return (
<div className="Login">
<form onSubmit={handleSubmit}>
<FormGroup controlId="username" bsSize="large">
<ControlLabel>Username</ControlLabel>
<FormControl
autoFocus
type="text"
value={username}
onChange={e => setUsername(e.target.value)}
/>
</FormGroup>
<FormGroup controlId="password" bsSize="large">
<ControlLabel>Password</ControlLabel>
<FormControl
value={password}
onChange={e => setPassword(e.target.value)}
type="password"
/>
</FormGroup>
<Button block bsSize="large" disabled={!performValidation()} type="submit">
Login
</Button>
</form>
</div>
);
}
From the above example the following concepts need to be understood:
- useState is used in order to read the current value of username and password that would be saved to state.
- Then comes two functions setUserName and setPassword. These are used to save a new state of two variables username and password. After the new state is saved, our react component gets re-rendered.
- We have attached state change listeners to username and password fields and their new state is saved using respective set functions. This type of form component is called a controlled component.
- On click of submit button, validate function is called. This function checks if values of username and password are valid or not.
- After perform validation function returns true, handle submit will be triggered.
The above code is a very basic example. On the basis of our requirements, more customizations can be performed.
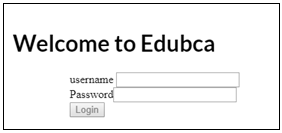
Example of React Login Form
To start things lets design a simple login form that is used for validating a particular user.
Code:
import React, { Component } from 'react';
import { render } from 'react-dom';
import Hello from './Hello';
import './style.css';
import React, { useState } from "react";
import { Button, FormGroup, FormControl, ControlLabel } from "react-bootstrap";
import "./Login.css";
export default function Login(props) {
const [username, setUserName] = useState("");
const [password, setPassword] = useState("");
function validateFormFields() {
return username.length > 0 && password.length > 0;
}
function handleSubmit(event) {
event.preventDefault();
}
return (
<div className="Login">
<h1> Welcome to Edubca </h1>
<form onSubmit={handleSubmit}>
<FormGroup controlId="Username" bsSize="large">
<ControlLabel>username  </ControlLabel>
<FormControl
autoFocus
type="text"
value={username}
onChange={e => setUserName(e.target.value)}
/>
</FormGroup>
<FormGroup controlId="password" bsSize="large">
<ControlLabel>Password</ControlLabel>
<FormControl
value={password}
onChange={e => setPassword(e.target.value)}
type="password"
/>
</FormGroup>
<Button block bsSize="large" disabled={!validateFormFields()} type="submit">
Login
</Button>
</form>
</div>
);
}
render(<Login />, document.getElementById('root'));
Output:
Recommended Articles
This is a guide to the React Login Form. Here we discuss the basic concept, how to create login form in react? along with the example and code implementation. You can also go through our other suggested articles to learn more –


