Updated May 15, 2023

Introduction to MySQL Root Password
Multiple users can have different privileges assigned to each of them in the MySQL database. But, when you want to perform database operations that require many higher privileges, you can use the account created by default in MySQL, which has almost all the privileges assigned to it that is the root user. During the installation process, MySQL automatically creates a default user named “root” on the machine and prompts the user to set a password for this account. If this does not happen and you want to set the password for the default root user, you can do so later. Further, there might be a situation in which you have forgotten your root password and wish to set the new one, or sometimes you will want to set the root user’s password stronger than the previous one. It is essential to set strong passwords for your root user from a security standpoint to ensure that the sensitive data stored in your MySQL database remains protected. In this article, we will learn how to change or set the password to the root user.
Login using Root User
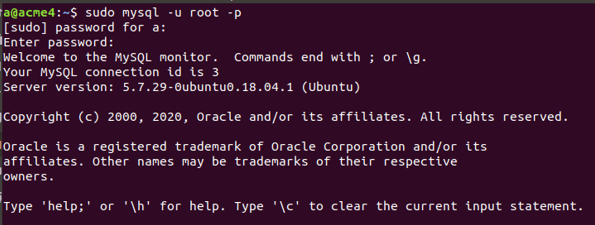
We can use the following command to enter the MySQL database using the root user –
sudo mysql -u root -pthat will further prompt for the password set by you while installation of MySQL on your machine and gives the following output –
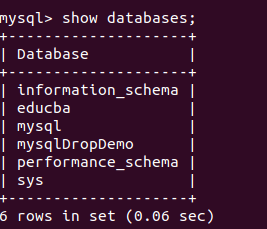
Now, you will see the MySQL shell and work on your database. Let us see the list of users in my MySQL database server. In MySQL, the table named “user” in the default-created database stores all the information related to users. Let us first check all the databases using the following command –
show databases;that gives the following output –
Now, we will specify that we have to use the mysql database using the following command –
use mysql;that gives the following output after execution –

Now, we will fire the select query on the user table in the mysql database using the following query statement –
select user, authentication_string, plugin, password_lifetime, password_last_changed, password_expired from user;The execution of the above query gives the following output.
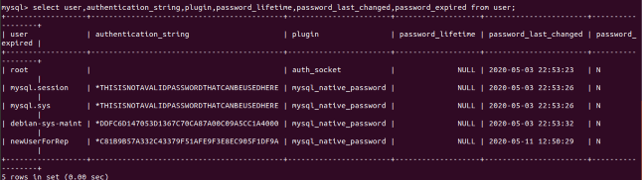
We have retrieved all the password-related fields of the user in the above select query statement. The user table stores various properties and information fields related to all the users in MySQL. You can describe the user table and see the list of the columns stored in the user table using the following command –
desc user;That gives the following output.
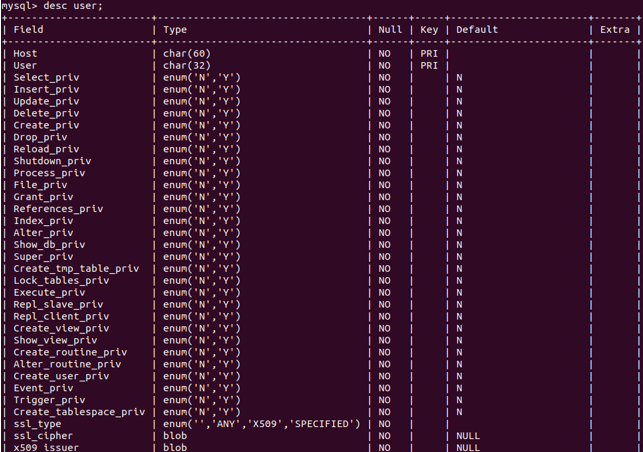
After selecting these columns for the root user, you will observe that the root user has almost all the privileges assigned to it and have a ‘Y’ value stored in the privilege column that stands for yes.
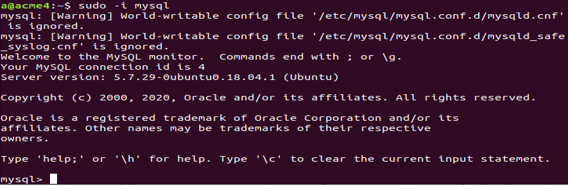
Alternatively, one more command can be used to login as the root user into a MySQL database that is as follows –
sudo -i mysqlThat gives the following output.
The reason why MySQL does not prompt for a username or password in certain configurations is that this information is already stored in the configuration files “my.cnf” or “mysqld.cnf”. These files are typically located at the path “/etc/mysql/mysql.conf.d/mysqld.cnf” on the machine.
Setting up the Password for Root User
Now, let us see how we can set the password for the root user or change the existing password. There are multiple ways in which we can change the root user’s password in case you have forgotten the current password or wish to set up a stronger password. They are listed below. We will see all the methods one by one in detail.
1. Using mysqladmin command
By default, a password is asked during the installation of MySQL for the root user. But suppose that for some reason it was not asked, and now you wish to set the password, then you can make use of the mysqladmin command in the following way to assign the new password to the root user –
sudo mysqladmin -u root password myPassWhichIWantthat gives the following output-

2. Using mysql_secure_connection command
We can use the alternative mysql_secure_connection command instead of mysqladmin. Setting the root password during installation is a more secure and advanced method as it not only allows you to set a strong password for the root user but also provides options to configure additional security features in your MySQL database. For instance, you can restrict the root user’s login from remote machines, remove anonymous users, and delete the test database. Simply type in the following command to use it:
mysql_secure_connectionthat asks you multiple questions whose answers will set all the properties you wish to assign.
3. Using ALTER command to change the password of the user
You can change the password of any user using the ALTER command. You can also use this command to set up the password for the root user in the following way:
ALTER USER 'root'@'localhost' IDENTIFIED BY 'a';a is the new password that I wish to assign. Executing the above command gives the following output –

Save that file for further reference as ~/mysql-password.
The next step lies in stopping the MySQL service by using the following command –
sudo systemctl stop mysqlFor this, you will have to exit the MySQL command prompt by clicking ctrl+z and then fire the command that gives the following output –

Now, fire the command for initializing the process of setting the password
sudo mysqld -init-file=~/mysql-passwordThen you will again have to start your MySQL service using the following command –
sudo systemctl start mysqlThat results in the following output.
![]()
Further, you can use mysql -u root -p command to log in with the changed password.
Conclusion
The root is the default user created when MySQL is installed. It has many privileges assigned to it. The user can change the password for the root user account during the installation of MySQL or by utilizing any of the methods mentioned below.
Recommended Articles
We hope that this EDUCBA information on “MySQL Root Password” was beneficial to you. You can view EDUCBA’s recommended articles for more information.
