Updated February 27, 2023
Introduction to MongoDB GridFS
Working with MongoDB, we often have to tackle the need for storing large files; these files can be images, video and audio files, etc. This is where MongoDB’s GridFS, also known as Grid File System, can be used. Basically, dividing such large files into small chunks and storing each chunk in a separate document is the main purpose of GridFS. This Grid File System is largely used to store files that cannot be stored in a collection while maintaining the limit. The MongoDB’s GridFS also has limitations like the files stored in GridFS can impact your working files saved in collections. Performance can be affected due to the storage of large files.
Syntax:
The syntax is an important aspect of any executable command. Here we have to see one notable thing: the query to insert a file into gridfs is not executed through mongodb shell, but instead from a Linux, Windows or Mac command prompt.
Given below is the standard syntax for inserting a simple file in GridFS.
mongofiles -d database-name put filename
The above syntax will insert a file into a database. The “put” does the insertion job, while database name and file names are destination and source. Along with put, there are multiple options for deleting, viewing in the form of a list and removing the files.
How GridFS works in MongoDB?
MongoDB has a limit for each document size that can be stored; now, the large files cannot be stored single-handedly due to file size; this is where GridFS can be used. MongoDB’s GridFS works by saving multiple numbers of chunks, of a single large file. This way, the large files can be stored and retrieved easily when needed. The usual recommended size for each separate chunk is 256kb.
Every file that exceeds the limit of 16 MB, which is for BSON document size limit, that file will be stored and retrieved using GridFS. It is also important to know that GridFS does not support Atomic Updating. So, to put it simply. GridFS is a file system, that stores data, of larger size, but in mongodb collections and the form of chunks.
Examples of MongoDB GridFS
Given below are the examples mentioned:
Example #1
We will experiment with our very first example with a simple audio file. Right now, we don’t have any specific collection for gridfs files, but as we know, MongoDB has an amazing feature of creating new collections when we insert a document into the non-existing collection.
Following is the query for inserting a file into gridfs, unlike other insert operations where we insert files through Mongo Shell, here we will insert to Machine Terminal.
Code:
/usr/bin$ mongofiles -d gridfs put /home/sulaksh/Desktop/potkesd/c.mp3
The above query is a standard format for inserting files into gridfs. We have navigated the terminal to the location where mongofiles, an executable file, are saved. Our query begins with the keyword, mongofiles, followed by the Storage Options code, “-d”. This -d specifies the database where the file is to be stored. This -d option is followed by the database name, here our database is named as gridfs. At the moment, we don’t have any database with such a name, but it’ll be created.
Output:

Now, how to retrieve the data that we saved using mongofiles is simply by executing the find query.
Code:
db.fs.files.find().pretty()
The above query will return all documents stored in the fs.files collection, and adding pretty() makes it represent the data in JSON format.
Output:
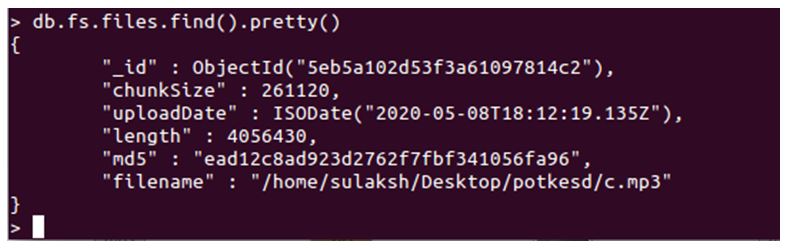
As you can see in the above screenshot, we have our filename, chunk size, and other insertion operation details.
Example #2
Upon insertion, we understood how the operation to insert a file in GridFS works, let us now delete the same file and see how Deletion works.
Code:
/usr/bin$ mongofiles -d gridfs delete /home/sulaksh/Desktop/potkesd/c.mp3
The major difference between the put and delete query is the delete keyword itself.
Output:

Example #3
Insert and Delete are important operation, just like Search. For our next example, we will implement a search option along with mongofiles to search for a file in gridfs.
Code:
/usr/bin$ mongofiles -d gridfs search Poster
Above query will search for any and all documents that store file which contains the Poster word.
Output:

And as you can see, it returned the record, that has a file with Poster as the file name.
Example #4
We will execute a list option, which will return every file stored in the database, here it won’t return the file in chunks or parts but as a whole.
Code:
mongofiles -d gridfs list
Output:

Like other queries, the -d denotes the database and gridfs is the name of the database and the command list. Upon execution, all the present files stored in the gridfs database in the form of chunks are retrieved.
Using these put, list, search options, we can easily use and implement the Grid File System in real-time application.
Conclusion
To Conclude, MongoDB’s amazing feature, GridFS, allows you to store files which exceed the size limit for a single document. Here, the files are stored in small chunks and two different collections. One collection stores the actual data, the file, while the other collection stored the file’s meta data. Put, Search, List, etc. are the options provided to work with the Grid File System. With the advantage of storing large files, GridFS can result in slow performance and can impact the working data set.
Recommended Articles
This is a guide to MongoDB GridFS. Here we discuss the introduction to GridFS in MongoDB, how does it work along with respective examples. You may also have a look at the following articles to learn more –
