Introduction to Metal Effect in Illustrator
Adobe Illustrator is a vector graphics designing software used by the graphics professionals for their professional work. We can apply different types of effects on the object in this software. Metal Effect is one of the effective features of this software. Here in this article, we will discuss ‘What is Metal Effect?’ and learn about ‘How to apply this effect on any object’? You can use this effect on any object of your project and make your object more realistic for its viewer.
Metal Effect is used for giving a metallic look to any object, and when you give a metal look to any object, it will make your object compatible with the real world. Now let us start our learning about ‘How to apply the Metal effect in our project?’ We will understand it by an example of making ‘Window’ of golden and iron metal effect. You can make any object according to you with these metal effects.
How to Apply Metal Effect in Illustrator?
Apply Metal Effect on any object in adobe Illustrator software is not a very big task. We will understand this in the step by step manner with a very easy way of learning:
Step 1: Take a new document. For taking a new document, click on ‘File Menu’ of the Menu bar of this software which is at the top of this software. A drop-down list will be open. Click on the ‘New’ option of this list.

Step 2: A ‘New Document’ box will be open. Set the parameter of this box according to your project requirement, and then click on the ‘Create tab’ of this box to apply these settings in your document.

Step 3: Now, take the Rectangle tool from the tool panel of this software on the left side of the working screen. Draw a rod-like structure with this rectangle tool as I have drawn.

Step 4: Now open a Gradient box from the right-side panel of the working screen.
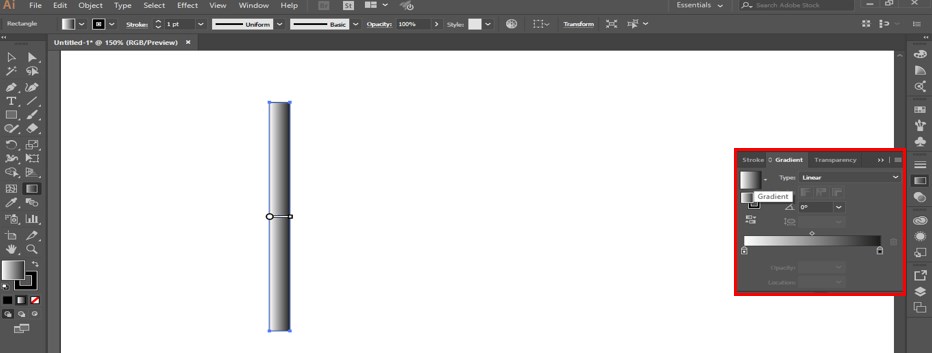
Step 5: If there is no gradient option in this list. Then go to the Window menu of the Menu bar at the top of the working screen. A drop-down list will be open. Click on the Gradient option of this list to activate this box.

Step 6: Now, open the Color box from the same panel.

Step 7: If this color box is not in this list, then again go to Window Menu of Menu Bar and Click on the Color option to activate it.

Step 8: Now select the first gradient head. For selecting this head, clicks on this with the mouse button and choose the light yellow color from the color panel. Again, select the gradient head of the gradient box and choose the orange color from the color panel. Make the combination of colors of the head in this way so that it gives a golden look to the rod.

Step 9: Now add one more color head in the gradient panel. For adding more gradient head in gradient scale, just click below the gradient scale.

Step 10: Select this new gradient head and choose a light color combination of yellow from the color panel to give it more real looks of gold.

Step 11: Now, hold the Alt button of the keyboard and drag this rod in another direction for copying it.

Step 12: Now press the Ctrl+ D keys from the keyboard for pasting more rods.

Step 13: Now again, take a rectangle tool from the tool panel and make the upper bar of this window-like structure. Once you make a bar choose gradient color for this bar by following the same process as we have done for a rod of the window.
Step 14: I will choose a combination of blue and light blue colors in gradient head of gradient scale for giving it a metal look.

Step 15: You can add many gradient heads to the gradient scale. I will add two more heads in the gradient of this bar and add dark and light blue color to make a more real metal effect.

Step 16: Now copy this bar at the button of the rods. For copying this, just select this bar, then hold the Alt button of the keyboard and drag it at the button end of the rods.

Step 17: Now select all objects and make a stroke off from the color panel of the tool panel section so the Metal effect can visualize more effectively.

Step 18: Once you of the stroke, the window will look like this.

Step 19: Now, let us take an ellipse command from the tool panel and drag a circle. Now apply gradient in it also by using the gradient tool of the tool panel. I will apply a diagonal gradient in it for giving a ball-like shape effect on this circle.

Step 20: Now, make a small circle on this ball by using the ellipse command of the tool panel of this software.

Step 21: And take white color in the fill of this small circle and make a stroke off from the color box of this circle.

Step 22: Now go to Effect Menu of Menu bar of this software. A drop-down list will be open. Go to the Blur option and choose Gaussian Blur from the new drop-down list.

Step 23: Gaussian Blur box will open. Set the value of Gaussian blur at 1.6 and press the Ok button of this box.

Step 24: Once you apply Gaussian blur on this circle. The ball will shine like metal at the top corner.

Step 25: Now, place the ball behind the window. For placing the ball behind the rods of the Window, select the ball and make right-click from the keyboard. A drop-down list will be open. Go to the Arrange option and choose the ‘Send to Back’ option.

Step 26: Now, make copies of this ball for making the copyhold Alt button of the keyboard and drag it to another position. Now press Ctrl + D for making more copies.

Step 27: Arrange all the balls like this.

In this way, you can make any object or logs or graphics design by using the Metal Effect option of this software.
Conclusion
After this article, you can easily understand Metal Effect and can apply this effect in your project. Once you have command of this effect, you can add plus point to your graphics designing skill. Now you can make a different type of variation in metal effect by practicing on this effect.
Recommended Articles
This is a guide to Metal Effect in Illustrator. Here we discuss how to apply Metal Effect in Illustrator in an easy and step by step manner. You can also go through our other related articles to learn more –
