Updated June 23, 2023

Introduction to Linux Join
In a certain situation in today’s world, when the data is sparse, it becomes necessary to join 2 files that contain parts of the same data. In other words, using join, one can achieve the utility of “joining” 2 files so that the join output makes more sense and is complete. There are many applications where the join command finds its use. Let us make it more clear to you with an example. Suppose there are 2 files; in one file, we have a list of employees, and in the other, their addresses. Join in Linux comes in handy for these kinds of join situations!
Syntax:
The basic syntax attached to the join is:
join [OPTION]… FILE1 FILE2Where FILE1 and FILE 2 are the files, where contents are located, and OPTION denotes the various options we would discuss here, which help achieve the desired requirement.
1. -a <FILE NUMBER> option: Way to also print non-paired lines.
Syntax:
join <FILE_1> <FILE_2> -a 12. -v option: Way to ONLY print non-paired lines.
Syntax:
join <FILE_1> <FILE_2> -v 13. Join custom columns from 2 files
Syntax:
join -1 <Column for join in File 1> -2 <Column for join in File 2> <FILE_1> <FILE_2>4. -i / –ignore-case option: Case insensitive join
Syntax:
join -i <FILE_1> <FILE_2>
OR
join --ignore-case <FILE_1> <FILE_2>
5. –check-order / –nocheck-order: Check for sort through all input lines.
Syntax:
join --nocheck-order <FILE_1> <FILE_2>
OR
join --check-order <FILE_1> <FILE_2>
6. –help option: Display of help message.
Syntax:
Join --helpHow does Join Work in Linux?
Join in Linux finds its application in various uses, and in this section, we will look into some of the most used ones during the explanation of each of them; we will take turns explaining the working of each in due course of the section.
The first and foremost is the basic join, where the intent is to join 2 files through a common key; here, the key is also referred to as an index and acts like matching 2 contents on similar grounds. Think of this as a sports tournament, where teams play against each other on some common ground, may it be goals scored in soccer, runs scored in cricket, and so on. Now since only 2 teams can play against each other in contrast to so many teams in the tournament, there are some common rules to judge the winners and runners-up.
Now, with the same analogous situation, the 2 files will be compared, and wherever the index would match, the contents corresponding to the index will be copied along with a gap. Now, one needs to be careful about any gap or empty character in place as they will tend to be concatenated along. In the next one, there might be conditions where the “index” might be missing from any one of the files, and hence the user may choose to add the non-paired ones during the join with the intent that the result file is something like a union of the files and would contain “best of both worlds”.
For this, a user might need to use “-a <FILE NUMBER>” where file number essentially means that file whose non-paired rows will be included during join. Also, in some situations, the user might need only to see the non-paired rows; for that, the user can use “-v a <FILE NUMBER>” option.
But, in some scenarios, users would want to use some custom numbered set of characters; for example, instead of the first set of non-break characters, the user would choose to use the third set of non-break ones. In this scenario, the -1 <Custom numbered> and -2<Custom numbered> are the arguments that would serve the purpose. To simplify it, if the position of the set of characters is the same for both files, the above command can be replaced by -j <Custom numbered>.
Also, one must be aware of the act that the join in Linux is case sensitive. In some scenarios, the user would like to neglect the case of the indexes used for joining. Now, obviously, if the index is a number, the case won’t matter, but in case the index is alphabets, the ascii value of small caps in comparison to all caps is different and hence problematic for Linux to join by default. Hence, the user can use -i to make the indexes case-insensitive during the join.
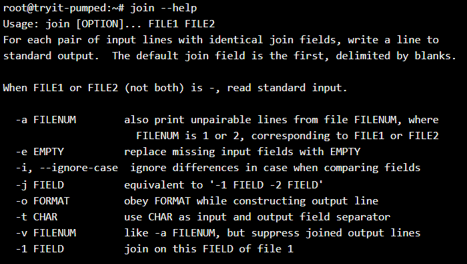
At last, there are other sets of commands which one can access using –help in Linux, should one feel the need to explore more of Linux join.
Examples of Linux Join
Given below are the examples mentioned:
Example #1
Join with printing all non-paired rows in File 2.
Syntax:
join file1.txt file2.txt -a 2Join with printing all non-paired rows in File 1.
Syntax:
join file1.txt file2.txt -a 1Output:
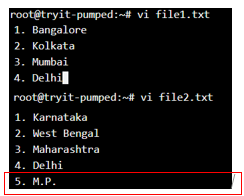
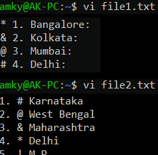
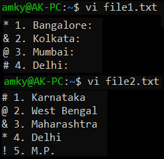
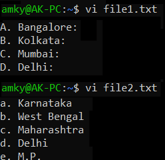
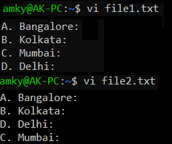
Inputs files:
Join with printing all non-paired rows in File 2:

Join with printing all non-paired rows in File 1:

Example #2
Join with printing ONLY non-paired rows in File 2:
Syntax:
join file1.txt file2.txt -v 2Join with printing ONLY non-paired rows in File 1:
Syntax:
join file1.txt file2.txt -v 1Output:

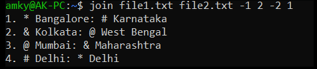
Example #3
Syntax:
When the order of custom columns is different:
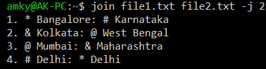
join file1.txt file2.txt -1 2 -2 1When the order of the custom column is the same:
join file1.txt file2.txt -j 2Output:
When the order of custom columns is different:
When the order of the custom column is the same:
Example #4
Syntax:
join -i file1.txt file2.txt
join --ignore-case file1.txt file2.txt
Output:
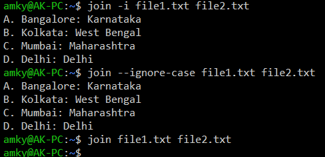
When no option is used, the join returns empty!
Example #5
Syntax:
No option
join -i file1.txt file2.txtUsing the option of check order
join -i --check-order file1.txt file2.txtUsing the option to not check the order.
join -i --nocheck-order file1.txt file2.txtOutput:
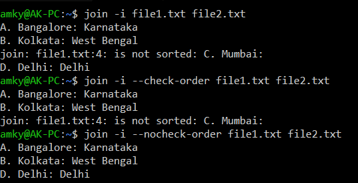
When the option “–nocheck-order” is not available, an error is reported if there is unsorted data. However, when the “–nocheck-order” option is used, the error is suppressed, and the unsorted line is simply omitted from the process.
Example #6
Syntax:
join --helpOutput:
Conclusion
With the set of examples and explanations to the working of join in Linux, you must be quite used to the usage of the same, and this will enable you to experiment more with other arguments of Linux join.
Recommended Articles
We hope that this EDUCBA information on “Linux Join” was beneficial to you. You can view EDUCBA’s recommended articles for more information.

