Updated April 19, 2023

Definition of Flask url_for
Flask url_for is defined as a function that enables developers to build and generate URLs on a Flask application. As a best practice, it is the url_for function that is required to be used, as hard coding the URL in templates and view function of the Flask application tends to utilize more time during modification. If we are using hard coding, and in case we would need to change our URL by inserting another element in the URL, we would have to visit each and every template or form in the code library and make the modifications and will lead to overkill. The url_for function is capable of changing this with just a snap of fingers!
Syntax:
It is time now for us to look into different syntax that is present to url_for function before we even dive into learning the working of url_for. This will help us map the syntaxes to the working methodology so that the learning is more practical and easier to grasp. So, without much further ado, let us get straight into the syntax!
Creating dynamic URL with no key passed:
url_for('<Function name>')Creating a dynamic URL with a key and corresponding value passed:
url_for('<Function name>',<key> = <value>)Redirect to a URL using Flask (assuming we are passing key and value pair):
redirect(url_for('<Function name>',<key> = <value>))How does url_for work in Flask?
In this section let us go through the working of url_for in Flask, but before that, it is very much required to know about the need for building URLs using the reversing function url_for( ). The concept of reversing function is to use meaningful URLs to help users. If the web application is able to create a meaningful URL that consists of inputs from users, users may remember the inputs used and will enhance the return to the same page again. Not only this there are other pointers that we will discuss below which signifies the importance of using a dynamic URL, keeping in mind the inputs of the user, instead of hard coding the URL.
- Developers can change the content of the URL in one shot, and there is no dependency on remembering locations to manually change the hard-coded URLs.
- The process of reversing is more descriptive than hard coding.
- The special characters and Unicode data are efficiently handled in case of using dynamic URLs.
- This is the easy way to avoid unexpected behavior of relative paths in browsers by allocating absolute paths to the generated URLs.
- In the case of an application placed outside URL root, the url_for( ) function is capable of handling such scenarios.
Now that we have an understanding of why url_for( ) is so widely appreciated, we would need to understand the types of View responses, as one of these responses relates to the work of url_for( ). The big 3 ways of route logic, an act of mapping the URLs to their specific actions, are namely generating a page template, providing a response, and redirecting the user to a specified location. The working of url_for( ) falls under the category of redirecting.
The method of redirecting accepts a string and this string is nothing but the path that the user is directed to. For the same, the routes are referred to by their names and not by their URL patterns. In the process of creating this input for the redirect function, we use url_for( ). The function url_for( ) takes the name of the view function as an input and creates an output of the provided view. With the change of route URLs, there will be no broken links between pages. Now, when a view is registered with the @app.route decorator, the endpoint name is determined and is ready to be stored with the route registration. This stored route registration is then used to find all routes which link to the registration with the name along with the parameters passed and then execute them to reveal the output.
One important thing to be kept in mind is that, in case we have registered 2 different functions under the same name, we are bound to get an AssertionError and for the same, we can take the help of the endpoint variable and specify the needful. With this, we complete the working of the url_for( ) function in terms of URL routing.
It’s now time for us to look at the implementation of url_for in a Flask application!
Examples
Now that we have complete knowledge about the implementation of url_for and the working methodology along with a complete view on syntax, in this section, we will try using them in practice so that it is easier to learn them by knowing what the practical output will look like! In the examples, we would look at using test_request_context( ) so that we can realize it on the python shell on what URL the particular command is routed to.
Example #1
Creating dynamic URL with no key passed (Run it on console)
Syntax:
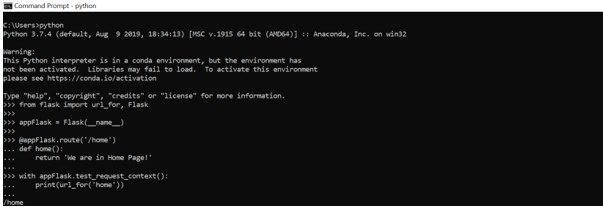
from flask import url_for, Flask
appFlask = Flask(__name__)
@appFlask.route('/home')
def home():
   return 'We are in Home Page!'
with appFlask.test_request_context():
    print(url_for('login'))
Output:
Example #2
Creating a dynamic URL with a key and corresponding value passed
Syntax:
from flask import url_for, Flask
appFlask = Flask(__name__)
@appFlask.route('/profileName/<authorname>')
def profile(authorname):
   return f'{authorname}\'s profile'
with appFlask.test_request_context():
  print(url_for('profile', authorname='EduCBA'))
  print(url_for('profile', authorname='EduCBAPremium'))
Output:
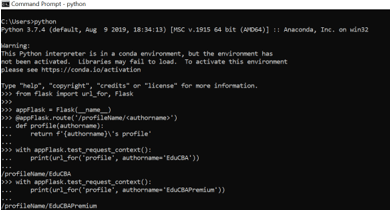
Here, we can easily see the distinction when 2 different values are passed using parameters
Example #3
Redirect to a URL using Flask (assuming we are passing key and value pair)
Syntax:
from flask import Flask, redirect, url_for
appFlask = Flask(__name__)
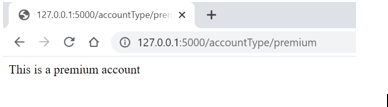
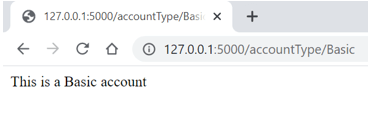
@appFlask.route('/accountType/<Type>')
def accountType(Type):
return 'This is a %s account' % Type
@appFlask.route('/user/<name>')
def userType(name):
if name =='premium':
return redirect(url_for('accountType',Type = name))
else:
return redirect(url_for('accountType',Type = name))
if __name__ == '__main__':
appFlask.run(debug = True)Output:
When the type is Premium account type:
When the type is basic account type:
Conclusion
Herewith in this article, we have got an essence of how URL routing happens and what dynamic URL can bring to the table. With this, we encourage our readers to experiment with notes in the article and build an exciting Flask application!
Recommended Articles
This is a guide to Flask url_for. Here we discuss the definition, How does url_for work in Flask? and examples with code implementation. You may also have a look at the following articles to learn more –
