Updated June 12, 2023
Introduction to CSS Image Opacity
The CSS Image Opacity property controls the transparency of an image. It achieves a desired level of transparency by applying regular opacity to pseudo-elements, which match the exact sizes of the elements positioned behind the screen. Meanwhile, the opacity level will vary from the positioning of the image on the web page screen. Whatever we have assigned the values in the opacity property in CSS, that range will be the prescription of the application. Among these attributes, the opacity level of the image remains unchanged, ranging from 0.0 to 1.0.
Syntax
We write CSS codes within the HTML page using a style tag. By following specific rules and syntax, we can create customized web pages that are visually appealing. Additionally, image format data types are commonly utilized in most web applications. The image format has an attribute called opacity with user-specified values.
<html>
<head>
<style>
.first
{
opacity:values; // value ranges from 0.0 to 1.0
}
--some css style codes with user specification values---
</style>
<body>
<img src=" " alt=" " width="" height="">
---some html codes-----
</body>
</html>
We have written the above code with the basic syntax for using the image with opacity transparency on web pages. The opacity value here is the parameter for the css style attributes.
How does Image Opacity work in CSS?
In the CSS style codes, we used a lot of attributes and properties with default values. It will be both texts, numbers, special characters, etc. Using these types of values; we can enable the particular property of their css attributes to make the presentation more attractive. We can use the image element attributes in the html codes; it’s one of the default html tags, ID, or Some built-in classes. When we use css opacity in html image, tag-based elements <img src> is one of the default and most widely used in the html codes for inserting the image has more opacity with different ranges, and the presentation of the css styles also helps the elements in the CSS Style codes. The <img> is mainly used in the <body> tag of the html because <style> also declares and initializes the opacity attribute values most probably used in the <head> web pages.
We use opacity to describe the transparency level of objects; that is, whatever things, images, videos, animations, etc., should be fully visible on the web screen without latency or transparency. On the single web page, the opaque(opacity) element has optimized the values of 1, and other full transparent elements have an opacity that controls the values. Setting the value to 0 opacity makes the image, video animation, and any other object completely invisible on the web page screens. However, the element still occupies physical space on the web page. If the invisible element states in the screen, we can use the opacity and visible properties enabled in CSS. We know that the opacity property assigns the values in two different ways; the first way, as we already mentioned earlier, the opacity property attribute element had initialized the value with ranges.
But in a second way, we can also specify the alpha channel values with RGBA format(Red, Green, Blue, Alpha) declaration of the background colors. We also change the R, G, and B values with our customized format that specifies any color’s transparent background. It also determines how we can perform the non-transparent child elements inside the transparent element; By default, the opacity values of the parent element are inherited by its child elements. However, in this case, we are using a transparent background for the child elements, allowing them to appear opaque while preserving the transparency of their containers.
Examples of CSS Image Opacity
Below are the examples of CSS Image Opacity:
Example #1
Code:
<!DOCTYPE html>
<html>
<head>
<title>Welcome To My Domain</title>
<style>
.first > div {
display: inline-block;
height: 70px;
width: 70px;
background: green;
}
div.second {
opacity: 0;
}
div.third {
opacity: 0.1;
}
div.four {
opacity: 0.2;
}
div.five {
opacity: 0.3;
}
div.six {
opacity: 0.4;
}
div.seven {
opacity: 0.5;
}
div.eight {
opacity: 0.6;
}
div.nine {
opacity: 0.7;
}
div.ten {
opacity: 0.8;
}
div.eleven {
opacity: 0.9;
}
div.twelve {
opacity: 1;
}
</style>
</head>
<body>
<div class="first">
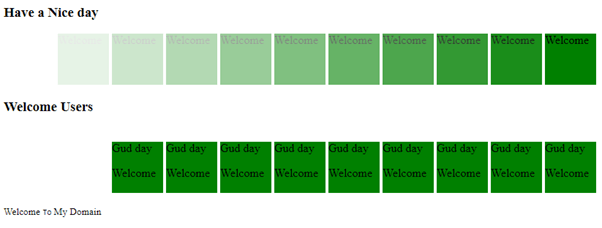
<h3>Have a Nice day</h3>
<div class="second">Welcome</div>
<div class="third">Welcome</div>
<div class="four">Welcome</div>
<div class="five">Welcome</div>
<div class="six">Welcome</div>
<div class="seven">Welcome</div>
<div class="eight">Welcome</div>
<div class="nine">Welcome</div>
<div class="ten">Welcome</div>
<div class="eleven">Welcome</div>
<div class="twelve">Welcome</div>
</div>
<div class="first">
<h3>Welcome Users</h3>
<div class="second">
Have a nice Day
<p>Gud day</p>
</div>
<div class="second">
Welcome
<p>Welcome</p>
</div>
<div class="opacity80">
Gud day
<p>Welcome</p>
</div>
<div class="opacity70">
Gud day
<p>Welcome</p>
</div>
<div class="opacity60">
Gud day
<p>Welcome</p>
</div>
<div class="opacity50">
Gud day
<p>Welcome</p>
</div>
<div class="opacity40">
Gud day
<p>Welcome</p>
</div>
<div class="opacity30">
Gud day
<p>Welcome</p>
</div>
<div class="opacity20">
Gud day
<p>Welcome</p>
</div>
<div class="opacity10">
Gud day
<p>Welcome</p>
</div>
<div class="opacity0">
Gud day
<p>Welcome</p>
</div>
<p><small>Welcome <code>To</code> My Domain</small></p>
</div>
</body>
</html>Output:
Example #2
Code:
<html>
<head>
<style>
.img
{
opacity:0.8;
filter: alpha(opacity=1);
background-color: red;
padding: 11px;
}
</style>
<body>
<img src="first.jpg" alt="transparent images " width="180" height="179">
</body>
</html>
Output:

Example #3
Code:
<!DOCTYPE html>
<html>
<head>
<style>
#first {
background-color: pink;
}
</style>
</head>
<body>
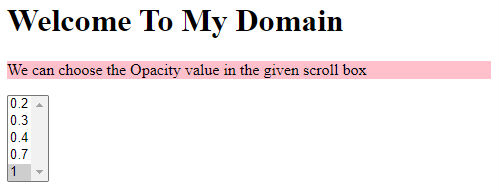
<h1>Welcome To My Domain</h1>
<p id="first">We can choose the Opacity value in the given scroll box</p>
<select onchange="demo(this);" size="5">
<option>0.2
<option>0.3
<option>0.4
<option>0.7
<option selected="selected">1
</select>
<script>
function demo(i) {
var a = i.options[i.selectedIndex].text;
var b = document.getElementById("first");
if (b.style.a !== undefined) {
b.style.a = a;
} else {
alert("Browser is not compatable!");
}
}
</script>
</body>
</html>Output:
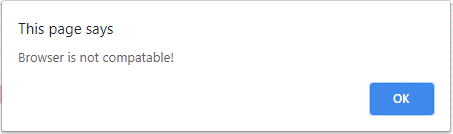
In the above three examples, we have used opacity values in three different scenarios and the final examples. If the user supports the browser from the mentioned opacity values based on the requirements, it may vary in web applications.
Conclusion
The image opacity property is used to criticize the image attributes in both html and CSS using opacity property with number and alpha-based characters. We place it on the web pages in the correct positions by checking and ensuring that it does not affect other content, such as images and animations.
Recommended Articles
We hope that this EDUCBA information on “CSS Image Opacity” was beneficial to you. You can view EDUCBA’s recommended articles for more information.

