EDUCBA

EDUCBA

MENUMENU
  • Free Tutorials
  • Free Courses
  • Certification Courses
  • 280+ Courses All in One Bundle
  • Login
Home Design Design Tutorials Illustrator Tutorial Blending Modes in Illustrator
Secondary Sidebar
Illustrator Tutorial
  • Effects
    • Effects in Illustrator
    • Insert Image in Illustrator
    • Crop in Illustrator
    • Remove Background In Illustrator
    • Remove White Background in Illustrator
    • Shapes in Illustrator
    • Text Effects In Illustrator
    • Watercolor Brushes Illustrator
    • Blending Modes in Illustrator
    • Blur in Illustrator
    • Brushes in Illustrator
    • Change Background Color in Illustrator
    • Graphic Styles in Illustrator
    • Change Artboard Size in Illustrator
    • Logo Design in Illustrator
    • Rasterize in Illustrator
    • Resize Image in Adobe Illustrator
    • 3D Effects in Illustrator
    • 3D Text in Illustrator
    • Filters in Illustrator
    • Reflection in Illustrator
    • How to Make Logo in Illustrator?
    • Transparent in Illustrator
    • How to Add Texture in Illustrator?
    • Neon Effect in Illustrator
    • Create Table in Illustrator
    • Paper Texture in Illustrator
    • Stamp Effect in Illustrator
    • Sun in Illustrator
    • How to Warp Text in Illustrator?
    • Metal Effect in Illustrator
    • Action in Illustrator
    • Illustrator Gold Gradient
  • Basic
    • What is Adobe Illustrator
    • Install Adobe Illustrator
    • Adobe Illustrator For Windows
    • Adobe Illustrator for Windows 8
    • How to Use Adobe Illustrator
    • Adobe Illustrator for beginners
    • Adobe Illustrator for Students
    • Illustrator Shortcut Keys
    • Illustrator Plugins
    • Illustrator Repeat Action
    • Illustrator auto trace
    • Layers in Illustrator
    • Moon in Illustrator
  • Tools
    • Adobe Illustrator Tools
    • Selection Tool in Illustrator
    • Width Tool in Illustrator
    • Illustrator Grid Tool
    • Pathfinder Tool in Illustrator
    • Pen Tool In Illustrator
    • Measure Tool in Illustrator
    • Mesh Tool In Illustrator
    • Blend Tool in Illustrator
    • Direct Selection Tool Illustrator
    • Illustrator Free Transform Tool
    • Shape Builder Tool in Illustrator
    • Slice Tool in Illustrator
    • Smooth Tool in Illustrator
    • Eyedropper Tool in Illustrator

Related Courses

Illustrator Training Course

Adobe Flash Training Course

3Ds Max Modeling Training Course

Blending Modes in Illustrator

Blending Modes in Illustrator

Introduction on Blending Modes in Illustrator

Blending modes are useful for changing the objects’ colour by adding blending effects and colors to the chosen objects. Blending modes works depending on the position of the object on the layer or group. We will discuss in detail all the available blending modes in Adobe Illustrator. Before that, it would be easy to remember a few terminologies while trying to understand the various blending modes:

  1. The original color of the selected object of all the group is known as the Blend Color.
  2. The Base Color refers to the colors lying underneath the artwork book.
  3. The color resulted after applying the blend is known as the Resulting Color.

Applying Blending Modes in Illustrator

To apply Blending Modes is not difficult; let’s understand this by following the below steps.

Start Your Free Design Course

3D animation, modelling, simulation, game development & others

All in One Design Bundle(280+ Courses, 100+ projects)
AutoCADHoudiniAdobe Premiere ProPhotoshop
SolidworksVFX Visual EffectsCorelDrawUnreal Engine
Price
View Courses
280+ Online Courses | 100+ projects | 2000+ Hours | Verifiable Certificates | Lifetime Access
4.6 (64,570 ratings)

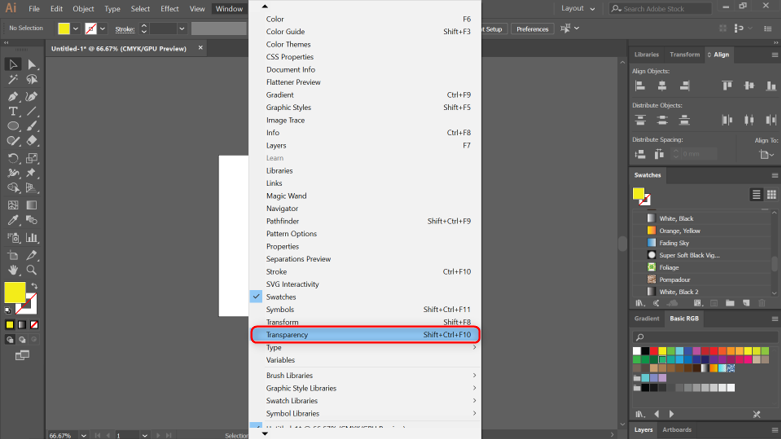
Step 1: The first thing to do is to go to the Windows menu and select transparency.

Blending Modes in Illustrator - Select Transparency

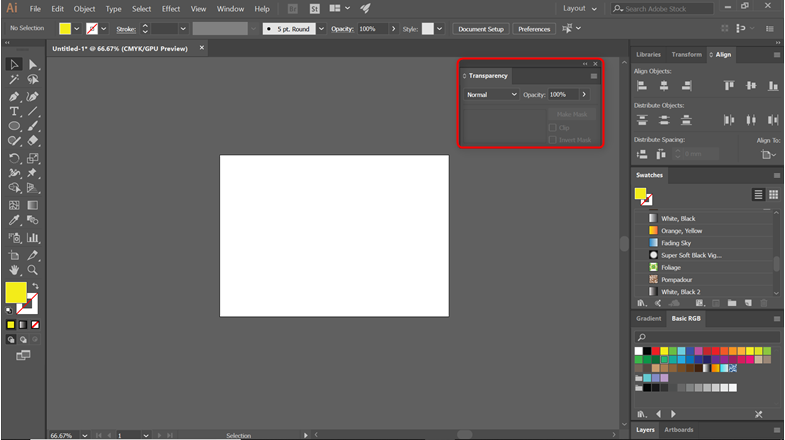
Step 2: Here, you have noticed a small window popped out, as shown below. This is where you will apply most of your blend modes.

Blending Modes in Illustrator - Blend Modes

Step 3: Using the shape tool, create two circles and place them as shown in the below image.

Blending Modes in Illustrator - Two circles

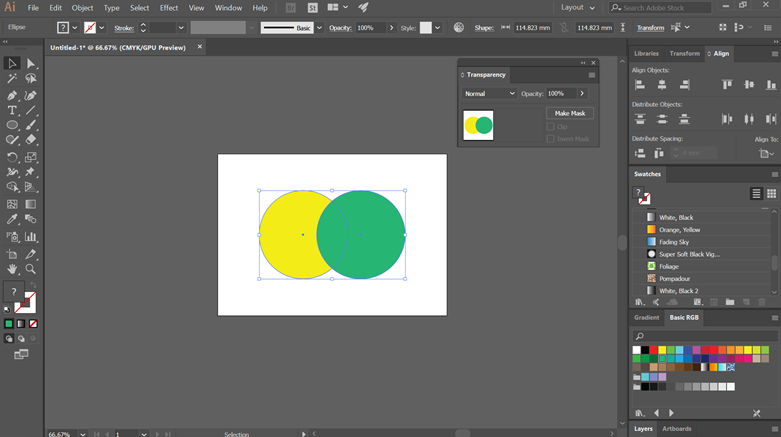
Step 4: Now, we will apply all the blend modes offered in the transparency mode on the created circle shapes and see the results.

Step 5: The default mode is normal. It does not do anything and just keeps the base color the same as you picked it.

Blending Modes in Illustrator -Base color

Step 6: When applying to darken, you will notice the overlapping part of the shapes become darker. It chooses the base or the blend color based on the levels of darkness. The lighter parts than the blend color are changed, and the areas that are darker remain the same.

darken part of the area

Step 7: It multiplies the blend color with the base color, forming a darker resulting color. If you multiply a color with black, it creates black and multiplying with white leaves; the color remains the same.

multiplying a color

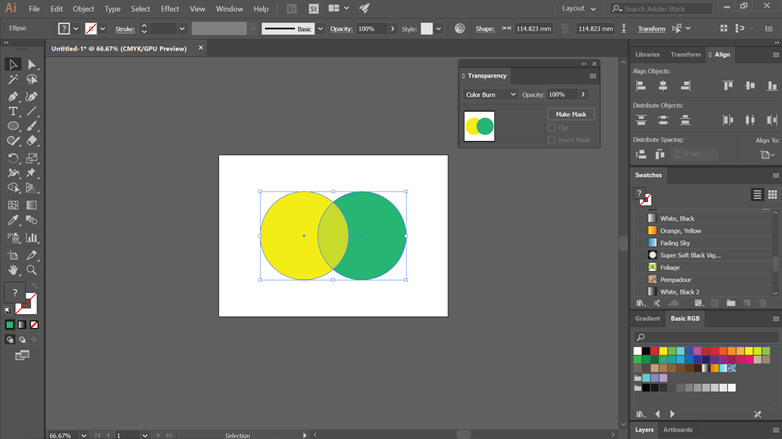
Step 8: Colour burn darkens the overlapping areas to reflect the color of the blend. Also, if you blend using the color white, it will make no changes.

overlapping areas to reflect the colour

Step 9: Lighten selects the lighter color either from the base or the blend color. If an area is darker than the blend color, it will get replaced, and the areas that are lighter than the blend color will remain the same.

Replacing Blend Color

Step 10: Screen increases the inverse of the blend and base colors. This produces a lighter color on the overlapping areas. If your screen is the black color, you will find no changes, while screening with white will create white color.

Screen increases the inverse

Step 11: Colour dodge increases the brightness of the base color based on the blend color. This again has no effect when you blend with black.

Color dodge

Step 12: Depending on the color of the base, it multiplies or screens the colors. The current artwork is overlaid by colors or patterns while retaining the highlights and shadows of the base. It mixes the blend color to reflect the lightness or darkness of the source color.

 overlaid by colors

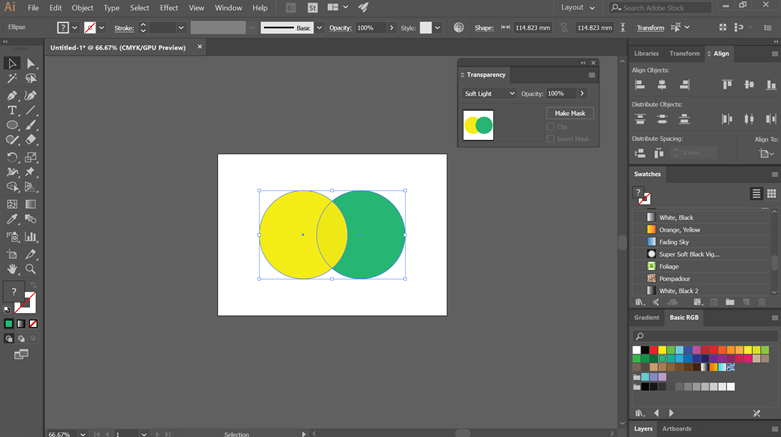
Step 13: Darkens or lightens the colors, depending on the blend color. It creates an effect similar to the diffuse spotlight for your artwork. It can darken or lighten the colors based on the blend color. If the blend color is lighter, then the artwork gets bright, and if it’s darker, the artwork becomes dark.

Darkens or lightens the colors

Step 14: Hard light creates a harsh spotlight effect on your work, as seen in the below image. Depending on the color of the blend, it amplifies or screens the colors. If the blend color is light, the screen color will look bright, and if it’s dark, then the artwork will become dark. This technique is effective for adding highlights or shadows to your artwork.

Harshspotlight

Step 15: Either the blend color or the base color gets subtracted from each other, relying upon which has a higher brightness level. However, while blending with white, it reverses the base color and blending with black has no change.

blending with white

Step 16: Exclusion generates an effect identical to the difference mode; however, the effect has low contrast. While blending the color white, the base color gets reversed. And while blending black, you will observe no changes at all.

Exclusion

Step 17: Luminance and saturation of the base color are taken into account while creating a resulting color. Also, the blend color, it takes the hue value as well.

Luminance and saturation

Step 18: Considers the luminance and hue of the base color for making the resulting color. It also takes the saturation of the blend color for it.

saturation (Blending Modes in Illustrator)

Step 19: In this mode, the resulting color is formed from the hue and saturation of the blend color along with the luminance of the base color. This mode can be useful while working on monochrome artworks, requiring the grey levels to remain intact and for tinting works.

luminance of the base color

Step 20: Creates a resulting color with the hue and saturation of the base color and the luminance of the blend color. This mode creates an inverse effect from that of the color mode. Using the luminosity mode, the Hue and saturation of the base color and luminance of the blend color combine to create the resulting color. It creates an opposite effect from the one obtained by the color mode. Refer to the image below.

opposite effect

Conclusion

Adobe Illustrator is one of the most efficient and popular vector graphics editor software used by millions of professionals. It is used by people that include designers, media personals, artists, etc. It has a lot of tools and effects for creating amazing effects to your artwork. In the above article, we have discussed the various blending modes available in Illustrator, enhancing your creations. Practice them on a basic level and slowly understand the advantages and benefits of the effects that can have on your work. Hoping you all will grow and improve your learning skills after mastering these techniques. All the best!

Recommended Articles

This is a guide to Blending Modes in Illustrator. Here we discuss an overview of blending modes and Steps to apply Blending modes in illustrator. You can also go through our other suggested articles to learn more –

  1. Effects in Illustrator
  2. Shapes in Illustrator?
  3. Smooth Tool in Illustrator
  4. How to Make Logo in Illustrator?
Popular Course in this category
Illustrator Courses (1 Courses, 2+ Projects)
  1 Online Courses |  2 Hands-on Projects |  12+ Hours |  Verifiable Certificate of Completion
4.5
Price

View Course

Related Courses

Adobe Flash Training (2 Courses, 1+ Projects)4.9
3Ds Max Modeling Training (5 Courses)4.8
0 Shares
Share
Tweet
Share
Primary Sidebar
Footer
About Us
  • Blog
  • Who is EDUCBA?
  • Sign Up
  • Live Classes
  • Corporate Training
  • Certificate from Top Institutions
  • Contact Us
  • Verifiable Certificate
  • Reviews
  • Terms and Conditions
  • Privacy Policy
  •  
Apps
  • iPhone & iPad
  • Android
Resources
  • Free Courses
  • Photoshop Tutorial
  • 3ds Max Tutorial
  • All Tutorials
Certification Courses
  • All Courses
  • Design Course - All in One Bundle
  • Photoshop Course
  • Maya Course
  • Unreal Engine Course
  • Unity Course
  • DaVinci Resolve Course
  • Pro Tools Course

ISO 10004:2018 & ISO 9001:2015 Certified

© 2022 - EDUCBA. ALL RIGHTS RESERVED. THE CERTIFICATION NAMES ARE THE TRADEMARKS OF THEIR RESPECTIVE OWNERS.

EDUCBA
Free Design Course

Banner Creation, Object Selection, Sky Replacement, Advance Filters & others

*Please provide your correct email id. Login details for this Free course will be emailed to you

By signing up, you agree to our Terms of Use and Privacy Policy.

EDUCBA Login

Forgot Password?

By signing up, you agree to our Terms of Use and Privacy Policy.

EDUCBA
Free Design Course

3D animation, modelling, simulation, game development & others

*Please provide your correct email id. Login details for this Free course will be emailed to you

By signing up, you agree to our Terms of Use and Privacy Policy.

EDUCBA

*Please provide your correct email id. Login details for this Free course will be emailed to you

By signing up, you agree to our Terms of Use and Privacy Policy.

Let’s Get Started

By signing up, you agree to our Terms of Use and Privacy Policy.

This website or its third-party tools use cookies, which are necessary to its functioning and required to achieve the purposes illustrated in the cookie policy. By closing this banner, scrolling this page, clicking a link or continuing to browse otherwise, you agree to our Privacy Policy

Loading . . .
Quiz
Question:

Answer:

Quiz Result
Total QuestionsCorrect AnswersWrong AnswersPercentage

Explore 1000+ varieties of Mock tests View more