Updated May 18, 2023

Introduction to Angular material search bar
Angular material provides us with various modules which can be used together to build the search bar; we do not have any specific module for this in the material library because the search bar is nothing but the input file with some or more kind of styling on that to make it attractive. Autocomplete is also necessary, but it differs significantly from the search bar in that we can input anything into it and perform a search. We can use the ‘input’ tag and ‘mat-icon’ to make this more user interactive; also, it is very easy to use; if we already know about both these, mat-icon is not necessary, but this will make and add more sense to the search bar, in the coming section of the tutorial we will have detailed look at the implementation and usage of it for better understanding.
Syntax
As we know, there is no such module, but we can make use of the input and icon to implement the search bar using material default styling; let’s get started with the basic syntax see below;
<mat-form-field ">
<input type="text" matInput placeholder="Search">
</mat-form-field>
As you can see, it is easy to implement; we can add our styling and functionality to it later, but for now, it is enough to get the initial idea about the search bar using the material module in the coming part of the tutorial we will have a look at the practice example for it.
How to Create a search bar in Angular material?
As we have already known, a search bar can be used to search any string of text data within the input provided; it is mainly used to search the data from the list or heavy list containing the bulk of objects; we have seen this kind of search bar on various websites which make it easy for the user to type in few texts to search the desired result. We always have a server call associated with it, which makes the server call and get the data and make this available to search from. All this code will be required to write on the TS file, but here we will mainly focus on the HTML or the template part, let’s get started with the simple piece of code;
1) mai-icon: We can use the material icon module to make this more attractive to the user, and also it adds more clarity to the user on what we can do with it. We have to use this icon with the ‘input’ tag; also, we can apply our styling to make it more user-friendly.
e.g. :
<mat-icon >search</mat-icon>As you can see, we mainly used the ‘search’ icon to represent our search bar; it is standard and good to have. 2) input: This is the basic HTML tag we can create to take the user input on which basis they want to search; this string can pass to the component to sort the data and return the result on the screen. We can add our styling to make this more user-friendly; also, see the sample code reference how we can create this using an angular material library with default styling added to it see below, e.g. :
<mat-form-field c>
<input type="tel" matInput placeholder="Search">
</mat-form-field>
As you can see, we have used ‘mat-form-field,’ which will help us to add the default styling to the inner HTML tag that we have used inside it; here, we have used the ‘input’ tag.
Now let’s get started with the steps that need to be taken to step up our angular material project initially for beginners; see below;
1) First, install the Angular CLI, which lets us download our project’s required packages and library. You can download it by typing the below command on your command; make sure you have already installed the node see below;
e.g. :
npm install -g @angular/cli)The above command will install the CLI globally in our system; hence we can use it globally when required.
3) In this step, we will try to create the new angular project from scratch; this project will not be a material project that we have to add later by installing the material dependency inside our project. So execute the below command on your Command Prompt and press enter; see below;
e.g. :
ng new your project name
ng new my-first-projectThis command will create the project with the name my-first-project; you can create your project with any name mentioned.
4) To make sure, try one command, which is mentioned below, to install all the required libraries into our project,
e.g. :
npm install5) you can now test and run your project by typing the simple command below. This ensures that we are on the right track and that our project has been created without any errors or bugs.
e.g. :
ng serve6) Go to the browser and try to run the application with the below URL :
e.g. :
http://localhps:4200
By default, the angular project runs on port 4200; you can change it as per your need if required.
7) Now everything is set, we have our angular project now, and we will add the material library to our project just by running the below command on the command prompt;
e.g. :
ng add @angular/materialExample of Angular material search bar
Below are the example of creating a search bar in Angular material:
1) HTML code:
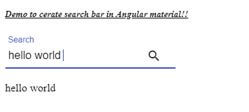
<h5><u><i>Demo to create search bar in Angular material!! </i></u></h5>
<form class="example-form">
<mat-form-field class="example-full-width">
<span matPrefix> </span>
<input type="tel" matInput placeholder="Search" name= "search" [(ngModel)]= "search">
<button matSuffix mat-button><mat-icon >search</mat-icon></button>
</mat-form-field>
<br/>
{{search}}
</form>
2) component code:
import { Component } from '@angular/core';
@Component({
selector: 'my-demo',
templateUrl: './demo.component.html',
styleUrls: [ './demo.component.css' ]
})
export class DemoSearchBar {
search : String ="";
}
Output:
Conclusion
You can make the search bar more interactive with your styling added to the CSS file; also, we can add the server call or predefining call to search from. It is easy to implement and use with very little change on the HTML file, making it maintainable if requirements come.
Recommended Articles
This is a guide to the Angular material search bar. Here we discuss the steps to create a search bar using angular material, which is very easy and readable. You may also have a look at the following articles to learn more –

