Updated April 15, 2023

Introduction to spring boot jwt
Spring boot jwt is the URL safe and compact means we can represent the claims by transferring them between two parties. The claim in spring boot jwt is encoded as the object which was used in the JWS (JSON web signature) payload or it was used in the plain text of the JWE (JSON web encryption) structure. After enabling the claim by using digitally signed or protected by integrity with MAC message authentication code and encrypted. We have used spring boot jwt in any application which contained private information, we have authenticating users without login info and cookies.
What is spring boot jwt?
- We have used spring boot jwt in the application where we require to validate the request without processing the credentials of client login for every single request.
- It is representing a set of claims of JSON object which was encoding in JWS or JWE structure.
- This JSON object is nothing but a claim set of JWT. The spring boot jwt json object consisting the zero or more pairs.
Set Up Java Spring Boot JWT
- To set up the application by using jwt we need to set up a token, this token consists of the following three-part which was separated by the dots
- Signature
- Header
- Payload
- We can say that our JWT token looks like as below.
AAAAA.BBBBB.CCCCC- The header consists of the two parts i.e. type of token and algorithm which was used in the application.
- The JWT token second part is the payload that contained the claims. The claims are nothing but the additional metadata and entity.
Using JWT with Spring Security
- As we know that JSON is less verbose as compare to XML, so after encoding JWT is smaller as compared to the token on SAML.
- Using JWT is very good to pass in environments like HTTP or HTML. It uses the private or public key pair is in form of X.509 signing certificate.
- JWT parser is more common in the language of programming because jwt is directly mapped to the objects.
- To do the document object mapping we have used jwt. It will make them easier to work with SAML and assertion in JWT. The use of JWT is easy to process on the device of the user.
- Below is the benefits of JWT are as follows.
- More compact
- More common
- More secure
- Easier process
- To use JWT with spring security we need to follow the below steps are as follows.
- First, we need to create the authorization server of OAuth2. The OAuth stack offering the possibility to set up the server of authorization in the jwt application.
- After creating the authorization server next step is to create the resource server. We have to create the resource server by creating the application.yml file.
- After creating the authorization server next step is to add the claims of custom to the access token which was returned by the server of authorization. All the claim which was sent by the framework is all good.
- After adding custom claims to the token next step is to configure the authorization server. To add the authorization server we need to create the JSON file.
- After configuring the authorization server next step is to access the token by using the angular application of the client.
- After accessing the token from the client of the angular application next step is to access the claim from the resource server.
- After accessing the claim from the resource server next step is to load the key from a key store in java.
- After doing all the steps lastly, we have to do the maven configuration of the JWT application.
Examples
Below example shows to set up a jwt application are as follows.
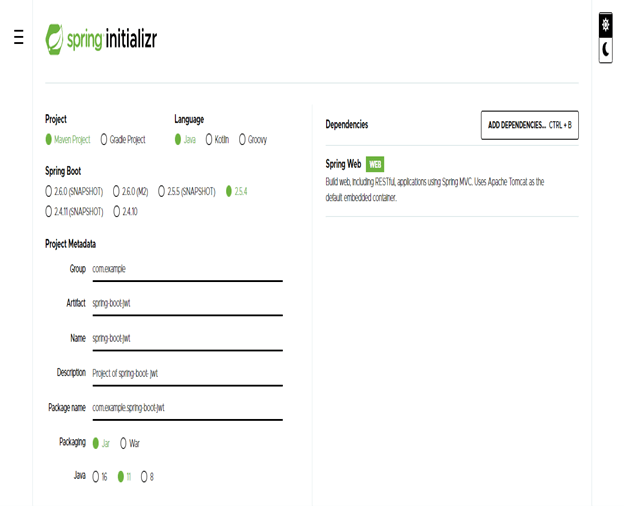
- Create a project template using a spring initializer and give the following name to the project metadata.
Group – com.example
Artifact name – spring-boot-jwt
Name – spring-boot- jwt
Description – Project of spring-boot- jwt
Package name – com.example.spring-boot- jwt
Packaging – Jar
Java – 11
Dependencies – spring web.
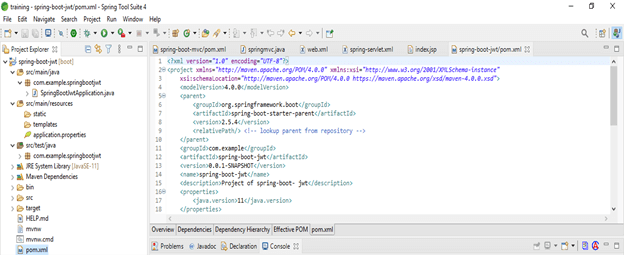
- After generating project extract files and open this project by using spring tool suite –

- After opening the project using the spring tool suite check the project and its files –
- Add the dependency
Code –
<dependency>   -- Start of dependency tag.
<groupId>org.springframework.boot</groupId>   -- Start and end of groupId tag.
<artifactId>spring-boot-starter-security</artifactId>  -- Start and end of artifactId tag.
</dependency>    -- End of dependency tag.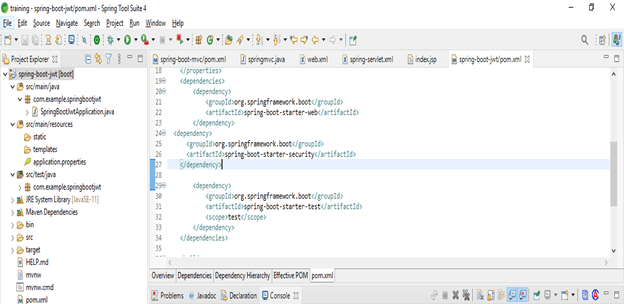
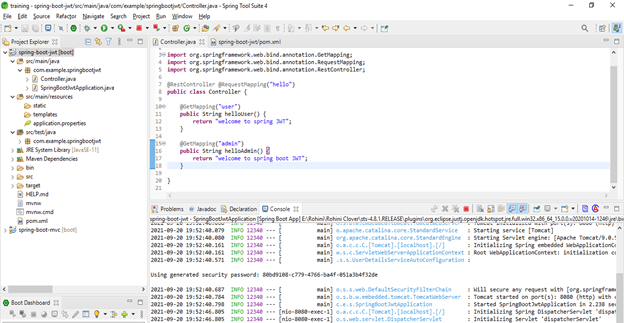
- Add simple controller
Code –
@RestController @RequestMapping ("hello")
public class Controller {
@GetMapping ("user")
public String helloUser() {
return "welcome to spring JWT";
}
@GetMapping ("admin")
public String helloAdmin() {
return "welcome to spring boot JWT";
} }
- Run application
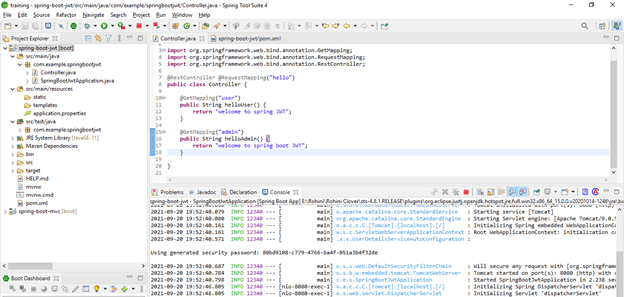
- Check the application URL
http://localhost:8080/hello/user
http://localhost:8080/hello/admin


Spring Security and JWT for performing
The below example shows spring security and jwt for performing are as follows.
- Add password to the user
Code –
spring.security.user.password = User@123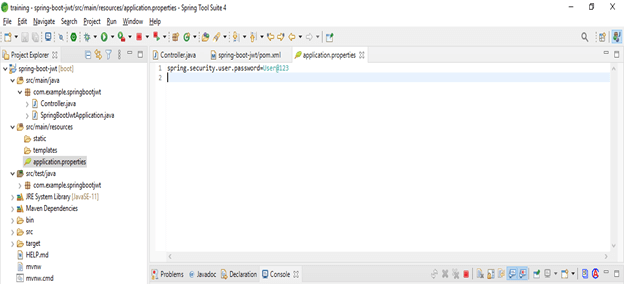
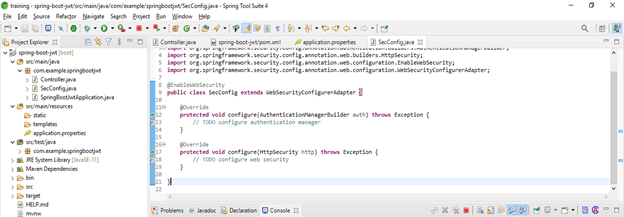
- Configure authentication manager and web security –
Code –
public class secConfig extends WebSecurityConfigurerAdapter {
@Override
protected void configure /* configure web manager */  (AuthenticationManagerBuilder auth) throws Exception {
}
@Override
protected void configure /*configure web security */ (HttpSecurity http) throws Exception {
}
}
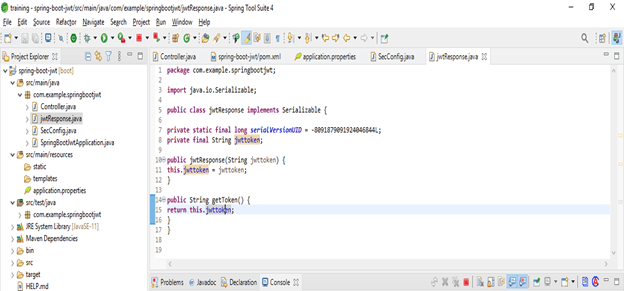
- Add JWT response
Code –
public class jwtResponse implements Serializable {
private static final long serialVersionUID = -8091879091924046844L;
private final String jwttoken;
public jwtResponse(String jwttoken) {
this.jwttoken = jwttoken;
}
public String getToken() {
return this.jwttoken;
} }
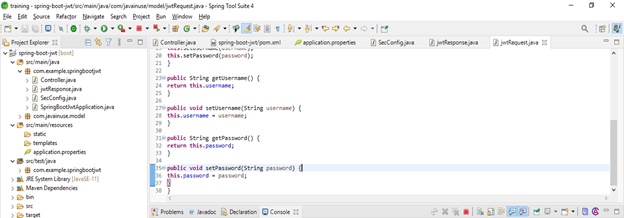
- Add JWT request
Code
public class jwtRequest implements Serializable {
private static final long serialVersionUID = 5926468583005150707L;
private String username;
private String password;
public jwtRequest()
{
}
public jwtRequest(String username, String password) {
this.setUsername (username);
this.setPassword (password);
}
public String getUsername() {
return this.username;
}
public void setUsername(String username) {
this.username = username;
}
public String getPassword() {
return this.password;
}
public void setPassword(String password) {
this.password = password;
}
}
- Run application –
Conclusion
Spring boot jwt is symmetrically signed by using the algorithm of HMAC. The SAML token is using the private or public key pair of JWT, XML signing, and digital signature of XML without introducing any security of obscure. We have used JWT in the scale of the internet.
Recommended Articles
This is a guide to spring boot jwt. Here we discuss What is spring boot jwt along with the example which shows to set up a jwt application. You may also have a look at the following articles to learn more –
