Updated March 8, 2023

Introduction to PowerShell GUI
Though PowerShell is one of the powerful scripting languages out there, it is still not possible among developers/users because its gui is not interactive. In other words, it lacks the perfect UI that is offered by other languages to interact with the users. Only people who are familiar with the PowerShell environment will be able to interact, and a common man cannot. This is the primary reason why PowerShell is used for performing behind the screen operations. Here we will see how user interactive application can be built in PowerShell like others.
Steps Involved in Building a GUI
Given below are the following steps involved in building an interactive PowerShell application:
- Writing the function that will be performed by the script.
- Building the form.
- Integrating script and form.
1. Writing the function that will be performed by the script
The first and foremost thing is to write the function or set of functions that are needed to achieve the functionality. The functionality can be anything. The script will handle all those cmdlets, functions call or api calls. This is still the heart of the application. All the business logic, validation and decision making are done in this step. The script is tested end to end, and it is made sure that the functional part is working.
2. Building the form
This part is the phase where the form is built. The form usually contains text boxes, buttons, labels, dropdowns, checkboxes etc. The form is built in such a way that it is interactive, and necessary user inputs are captured in the form. The form acts like any other form and acts as an interface between the user and the script.
3. Integrating the script and form
This is the part where the form and the functions are integrated; generally, the functions are called on button click. Each button on the form is associated with the respective function, which will perform some business logic. This is crucial, and if the integration is not properly, then the desired outcome will not be achieved.
Examples of PowerShell GUI
Given below are the examples of PowerShell GUI:
Example #1
Code:
Write-Host "Demo of dispalying out grid in a GUI with search" -ForegroundColor Green

$pro_arry = @()

$processes = Get-Process | Select Name, Id, CPU, SI

Foreach ($process in $processes){

$pro_arry += New-Object PSObject -Property @{

Process_Name = $process.Name

Process_CPU = $process.CPU

Process_Id = $process.Id

Process_SI = $process.SI

}

}

$op = $pro_arry | Out-GridView -Title "Custome grid with Filters" -OutputMode Multiple
Output:
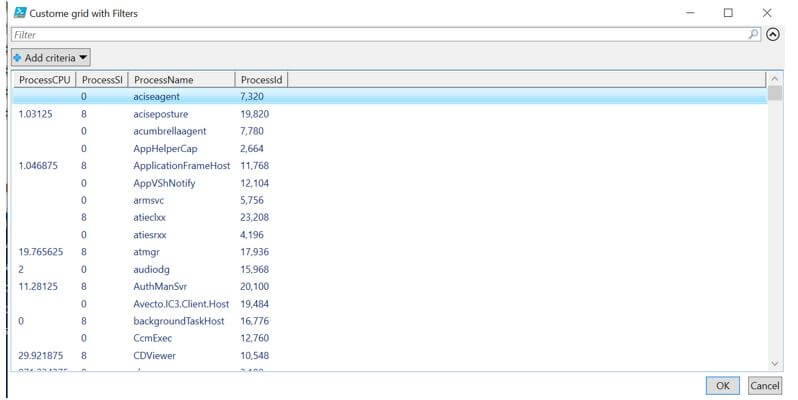
In the above example, a GUI is built to export the currently running process to a form with filters using the Out-Gridview cmdlet. As it can be seen, the results can be sorted based on process CPU, process SI, process name or process Id. There is also a filter for adding filter criteria. There is also a search box for searching the output. This provides a better GUI to the user, and the user can filter or do whatever he wants to do directly on the screen instead of sending the output to a file and then manually searching or filtering. There is only a single cmdlet in this, and hence no functions were created. A simple array is created for four columns, and their corresponding values are assigned.
Example #2
Code:
[void] [System.Reflection.Assembly]::LoadWithPartialName("System.Drawing")

[void] [System.Reflection.Assembly]::LoadWithPartialName("System.Windows.Forms")

$inputform = New-Object System.Windows.Forms.Form

$inputform.Text = "Demo of text box input"

$inputform.Size = New-Object System.Drawing.Size(300,300)

$inputform.StartPosition = "CenterScreen"

$OKB = New-Object System.Windows.Forms.Button

$OKB.Location = New-Object System.Drawing.Size(65,120)

$OKB.Size = New-Object System.Drawing.Size(65,23)

$OKB.Text = "Submit"

$OKB.Add_Click({Write-Host "Entered value is"$OTB.Text -ForegroundColor Green;$inputform.Close()})

$inputform.Controls.Add($OKB)

$CAB = New-Object System.Windows.Forms.Button

$CAB.Location = New-Object System.Drawing.Size(140,120)

$CAB.Size = New-Object System.Drawing.Size(65,23)

$CAB.Text = "Clear"

$CAB.Add_Click({Write-Host "No input from user" -ForegroundColor Red;$inputform.Close()})

$inputform.Controls.Add($CAB)

$Lbl = New-Object System.Windows.Forms.Label

$Lbl.Location = New-Object System.Drawing.Size(10,20)

$Lbl.Size = New-Object System.Drawing.Size(260,20)

$Lbl.Text = "Please provide a value

$inputform.Controls.Add($Lbl)

$OTB = New-Object System. .Forms.TextBox

$OTB.Location = New-Object System.Drawing.Size(10,50)

$OTB.Size = New-Object System.Drawing.Size(240,20)

$inputform.Controls.Add($OTB)

$inputform.Topmost = $True

$inputform.Add_Shown({$inputform.Activate()})

[void] $inputform.ShowDialog()
Output:
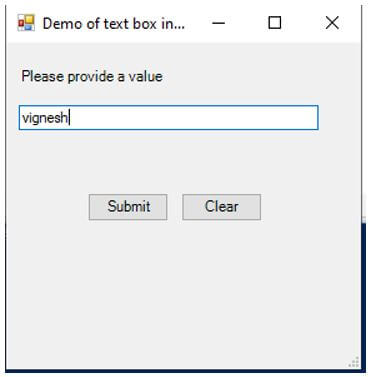
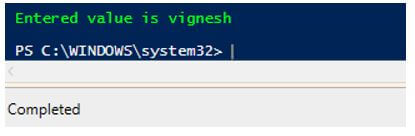
In the above example, a simple text box is created and provided to the user. The text that is entered in the text box by the user is captured and then printed in the output console. If a clear button is selected, then in the console, “No input from the user will be displayed”. First, a form is initiated using the form object. Then the form’s attribute, such as the size of the form, the heading of the form and its dimensions, is set, and it is added to the form. Then the submit and clear buttons are created, and their properties such as display position, the button size, the text to be displayed on the button and the action that needs to be performed on the click of the button are specified, and it is added to the form.
The value entered in the text box will be displayed on the console for submit button click, and the form will be closed. A message will be displayed on the console for a clear button click, and the form will be closed. Then a label is initiated, and its properties such as text, position and size are defined, and it is added to the form. Finally, a textbox is defined along with its properties such as text, size and position and it is also added to the form. It is very important to note that the form is the parent object, and it holds all the other controls such as labels, text boxes and buttons.
Conclusion
Thus, the article covered in detail about creating a graphical user interface in PowerShell. It explained with an example on creating a form with labels, text boxes and buttons. It also showed an example of how to create a custom filter window for searching and sorting purpose. Similarly, complex forms can be designed with other available items such as radio button, checkboxes, list box, multiselect list box and date picker. It is advisable to explore and create forms with each of the available items to see more in detail.
Recommended Articles
This is a guide to PowerShell GUI. Here we discuss the introduction, steps involved in building a GUI and examples, respectively. You may also have a look at the following articles to learn more –
