Updated March 4, 2023

Introduction to PowerShell change directory
PowerShell change directory is a terminology to navigate the file system through the cmdlets and they are very helpful in the script to work with the current files and folders or the relative path of the files and folders. Various cmdlets are useful for working with current locations, setting up the desired location, keeping the track of the previous location, and storing the locations in the stack and even location can be set for PSDrives like certificates, registry, etc.
Syntax
Below are the cmdlets used for the syntax to change the directory.
- Cd command to change the path.
cd -Path DirectoryPath -PassThru
- Set-Location command
Set-Location -Path DirectoryPath -PassThru
- Push-Location Command to push path into Stack.
Push-Location -Path DirectoryPath -PassThru
- Pop-Location command to pop the location from the stack.
Pop-Location -PassThru
Or to retrieve it from the particular stack,
Pop-Location -StackName stack1 -PassThru
How to change the directory in PowerShell?
To change the directory in a PowerShell, we use the various cmdlets. There are the absolute path and relative path in operating systems. Absolute path means the full path of the particular directory, file, or application. For example, C:\Windows\notepad.exe and the relative path means the direct path like Notepad.exe.
An absolute path can be accessed from any directory while the relative path can only accessible from the present directory unless any shortcut is created by the windows OS.
Set-Location command has aliases like (cd, sl, chdir) and we can use this command to change the location to the mentioned directory by using the absolute path or the relative path.
There is another way to change the location using the Push-Location command. When we specify the Push-Location command, PowerShell pushes the current location into the stack and then changes the location to the location specified by the path. Using the Pop-Location command uses the last location from the stack to change location.
By default, Push-Location uses the default stack to push locations but we can create a new stack and add new locations there.
Examples
Here are the following examples mention below
Example #1
Use the “cd” command to change location.
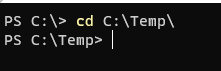
cd C:\Temp\
The above command will change the location to the C:\temp.
By default, the path parameter is included when you don’t specify anything. The above command is similar to,
cd -Path C:\Temp\ -PassThru
You can also use chdir or sl alias to set the above path for example.
chdir -Path C:\Temp\ -PassThru
or
sl -Path C:\Temp\ -PassThru
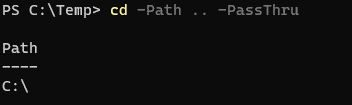
To change the directory to the previous location, you need to use “..” (double dot) syntax.
cd..
or
cd -Path .. -Passthru
Output:
Example #2
Using Set-Location command.
Although the above-mentioned examples are aliases of the Set-Location command, many scripts generally use the Set-Location command. We have already discussed the set path in the above example. In this example, we will discuss setting up the different PS locations like certificates, registry, etc, and using the stack to change the directory.
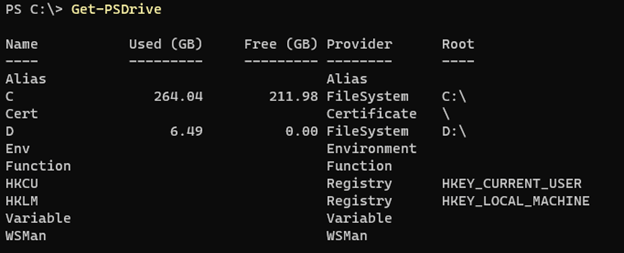
You can change the locations to the all below drives.
Get-PSDrive
Output:
To set up the location for the certificate, use the below command.
PS C:\> Set-Location -Path Cert:\
Output:

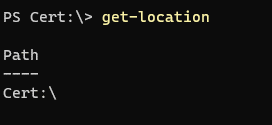
You can check the current location using the Get-Location command.
You can return to the windows directory by changing the directory using any of the above commands.
cd c:
Output:

Once you set the location to the certificate, you can browse the certificate paths and auto-completion also works with the TAB button. For example,
cd .\\LocalMachine\AuthRoot\
and to browse the content of the directory you can use the dir or Get-ChildItem command.
Similarly, to set the registry path for the Local Machine, we can use the below command.
Set-Location -Path HKLM:\SOFTWARE\
Example #3
Navigate location history through ‘+’ or ‘-‘.
PS C:\> Set-Location -Path HKLM:\HARDWARE\

PS HKLM:\HARDWARE\> Set-Location -Path $env:SystemRoot

PS C:\Windows> Set-Location -Path C:\
We have already set the locations as shown above. To navigate back through the history use the ‘-‘ (minus) sign using the Set-Location command.
PS C:\> Set-Location -Path -

PS C:\Windows> Set-Location -Path -

PS HKLM:\HARDWARE\>
To again move into the reverse direction, use the + (plus) syntax.
PS HKLM:\HARDWARE\> Set-Location -Path +

PS C:\Windows> Set-Location -Path +

PS C:\>
Example #4
Change directory using Push-Location command.
You can also change the directory using the Push-Location command. This command first pushes the current location into the stack and then navigates through the provided location. In PowerShell, you can consider the stack means Queue which works in LIFO order (Last In First Out). An example is shown below.
PS C:\> Push-Location C:\Temp\

PS C:\Temp>
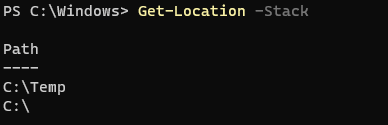
In the above example, the Current location is C: and Push-Location saves that location to the default stack (as we haven’t provided stack name) and navigates to the C:\temp location. You can check the location stored in the stack using the below command.
Get-Location -Stack
Output:

When you navigate to another location using the Push-Location command,
Push-Location $env:SystemRoot
Check the stack locations again,
Get-Location -Stack
Output:
When we use the Pop-Location command the locations will be retrieved in sequential order (LIFO).
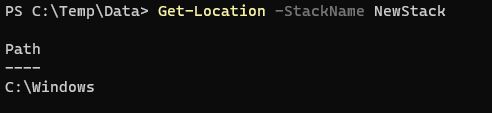
To navigate the location using the Push Command with new stack name,
Push-Location C:\Temp\Data\ -StackName Newstack

Check location new stack.

Get-Location -StackName NewStack
Output:
Example #5
Pop-Location command to change directory.
Pop-Location retrieves the last inserted location from the stack. When the stack name is not provided, the default stack is used.
For example,
PS C:\Temp\Data> Get-Location -Stack
Output:
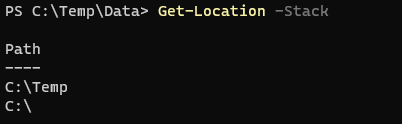
When we use the Pop-Location command, C:\temp will be retrieved first and then C:\ in the LIFO order.
PS C:\Temp\Data> Pop-Location

PS C:\Temp> Pop-Location

PS C:\>
To use the Pop-Location command for the different stack,
Pop-Location -StackName Newstack
Conclusion
There are various commands to navigate through the directory and we can directly use them in a console or we can use them in the script as well. They are useful in the script to navigate the path when the script executes.
Recommended Articles
This is a guide to the PowerShell change directory. Here we discuss How to change the directory in PowerShell along with the examples and outputs. You may also have a look at the following articles to learn more –
