
Introduction to Warp Text in Illustrator
Adobe offers one of the most popular software among graphics professionals for vector graphics that is Illustrator. This software is full of many exciting features that help us in designing graphics. In this software, you can wrap text in any particular paragraph. Warping Text means adjusting any vector image or raster image or any text itself in a particular area of the paragraph of any article for making it capable of conveying the purpose of that article clearly. Here in this article, we will learn ‘How we can warp a text in illustrator?’ and also understand some important parameters of warping text features.
How to Warp Text in Illustrator?
So let us start our learning about Warp text and understand it by some examples.
Step 1: The first thing you have to do is take a ‘New Document’ from the file menu of the Menu bar of this software. When you click on the ‘New’ option of the drop-down list of file menu, a dialog box will be open. Set the ‘New Document’ parameters according to your requirement and click on the Create button of this box to apply the settings.

Step 2: Now, take the type tool from the tool panel of this software.

Step 3: And then drag the text cursor for making a paragraph for our learning. You can take your own typed paragraph for this work.

Step 4: A new version of adobe illustrator will show you a dummy text format of the paragraph. Type your own text here in this paragraph.

Step 5: You can use vector image, raster image or any text itself for warping them in a text format. We will see all three one by one. Let us first discuss the vector image. For this, take a star tool from the tool panel of the illustrator and draw a star of your desired color and size.

Step 6: Now, place it above the typed paragraph by moving it with the help of the selection tool.

Step 7: Now select this shape and go to the ‘Object’ menu of the Menu bar of this software. A drop-down list will be open. Go to the Text Warp option in this list and click on the ‘Make’ option of a new drop-down list.

Step 8: The text of the paragraphs will be wrapped around a vector shape like this.

Step 9: You can place the wrap shape anywhere in the paragraph any time after applying the wrap text option.

Step 10: You can increase or decrease the scale of the shape at any time.

Step 11: You can release the shape from the wrap text. For releasing the shape, go to Object Menu of Menu bar and go to Text Wrap option, then click on the ‘Release’ option of a new drop-down list.
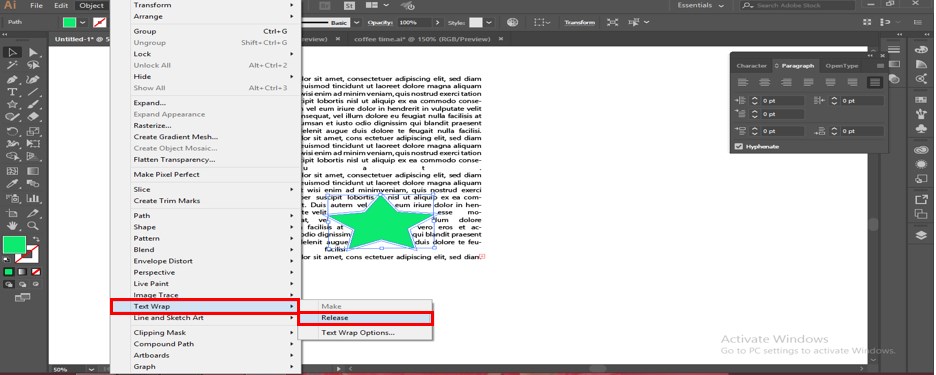
Step 12: The shape will become unwrapped like this.

Step 13: Now, let us take a look at the wrapping of text in a paragraph. Take the Type Tool from the tool panel, type your desired text, and adjust its size and color accordingly.

Step 14: Now, place this text above the paragraph and go to the Object menu, go to the Text Wrap option of the drop-down list of Object menu, then click on the ‘Make’ option.

Step 15: Now illustrator will show this message for warping this text. Press the Ok button of this dialog box to make the Text Wrap.

Step 16: Your text will look like this.

Step 17: You can change the color of this text by the foreground color box of a color panel of this text. Choose your desired color from the Color Picker box.

Step 18: You can place it anywhere in the paragraph at any time.

Step 19: You can increase or decrease the scale of this typed text at any time.

Step 20: You can also make multiple ‘Text Warp’ in one paragraph.

Step 21: Now, let us move to the next object that is wrapping text of the raster image. For this, place a raster image from the folder of your personal computer where you have saved it.

Step 22: Place this image above the paragraph. Then go to the Object menu and go to the Text Warp option of the drop-down list, then click on the ‘Make’ option of the new drop-down list.

Step 23: The text will be wrap with a raster image like this.

Step 24: You can remove the background of any raster image; for removing the background, Release this image from the Text warp option.

Step 25: Then take an ellipse tool from the tool panel of this software and make a circle by holding the shift button of the keyboard in this way so that it can fully cover the circular portion of this raster image.

Step 26: Now select both the image and circle shape. Make right-click; a drop-down list will be open. Click on the ‘Make Clipping Mask’ option of this list.

Step 27: The background of the image will be removed. Now place this image on paragraph and go to Object menu, go to Text Wrap option of the drop-down list and click on the ‘Make’ option.

Step 28: The image will warp like this.

Step 29: You can adjust the distance between the image and text which are wrapped around the image. For this, go to the Object menu again and go to the Text Wrap option, then click on ‘Text Warp Options’.

Step 30: A dialog box of ‘Text Wrap Options’ will be open when you click on this option. Increase or decrease the value of the Offset option of this box. When you increase the value of Offset, the distance between text and image will be increased, but when you decrease the value of Offset, the distance between text and image will be decreased.

Step 31: Here is the Invert Wrap option in this box. When you make checkmark ‘On’ in this option, the text of the paragraph will only warp up and down the position of the image, and the left-right position will be vacant.

In this way, you can warp the text in illustrator and enjoy this in your project work for making it more relevant to graphics work.
Conclusion
After going through this article now, you can easily understand ‘What is Wrap Text’ and ‘How you can Wrap a text in illustrator?’ by using some simple techniques and tools of this software. Wrapping text is a very helpful feature of this software when you work with the typography technique of graphics designing.
Recommended Articles
This is a guide to How to Warp Text in Illustrator?. Here we discuss the steps to create Warp Text in Illustrator with a few illustrations. You can also go through our other related articles to learn more –
